Courses - Admin Guide
SECTION 1: COURSES – FEATURE OVERVIEW
Who Should Use This Guide
The purpose of this manual is to guide administrator(s) on how to effectively create different types of courses and manage course instances within the LMS.
Courses - Overview
Courses are the basic learning object of the LMS system. There are four types of courses supported within the system; instructor led classes (classroom as well as virtual), web based courses (online), manual entries and historical.
Classroom/Instructor Led
Classroom courses require that course shells be created and in addition instances of the course (class dates) be set up as well. Without dates being assigned to classroom course(s) they are not accessible by users of the system. Instances allow for flexibility by setting parameters that can be associated with one instructor-led class. For example, a “Leadership management” class on the 15th of September may have a limit of 12 students, but the same course that is being held on the 30th may have a limit of 20 students – and may be held in a different location.
Virtual classes are those set up utilizing web conference options such as WebEx and GoTo Meeting. They are scheduled in the same way as live classroom classes – but are initiated via a web conference.
Online/Web based
Online courses are one or more web pages that can be SCORM or AICC compliant and/or digital documents that provide a self-paced learning experience to the learner. The learner can begin the course at any time, stop it and resume it at a later time. The learner decides how quickly he or she will move through the course material. The LMS supports a feature whereby a learner can come back and review the course after it has been completed, by launching it from their Transcript.
Manual Entries
Manual Entries are utilized to ‘post’ a completed course (or other) entry to a user’s transcript without the user having to follow the normal procedure of enrolling, attending and completing the course within the system.
Manual entry courses can be created on the fly and students associated with this entry will their transcripts updated. An example could be students that have taken a course outside the organization, but need the credit. It is recommended that only administrators, managers and supervisors have the policy to manage manual entries.
Manual Entries can also be used to create a cross reference table where for example a user has taken a course at another (previous) location/health system but under a different name than that which is listed in the current LMS. By updating the cross reference table, the Assignment Scheduler will recognize the ‘foreign course name’ and not re- assign the course to this user, even though the transcript listing for this course, for a user may be different from the course name in the LMS – where they are in fact the same courses – just listed under different names.
Historical
Historical courses are added when an organization converts from another system to the MeduRx system, and user or employee profiles contain references to these courses that may not appear in the MeduRx list of courses. This is usually done only once – when setting up the MeduRx system for the first time.
Objectives
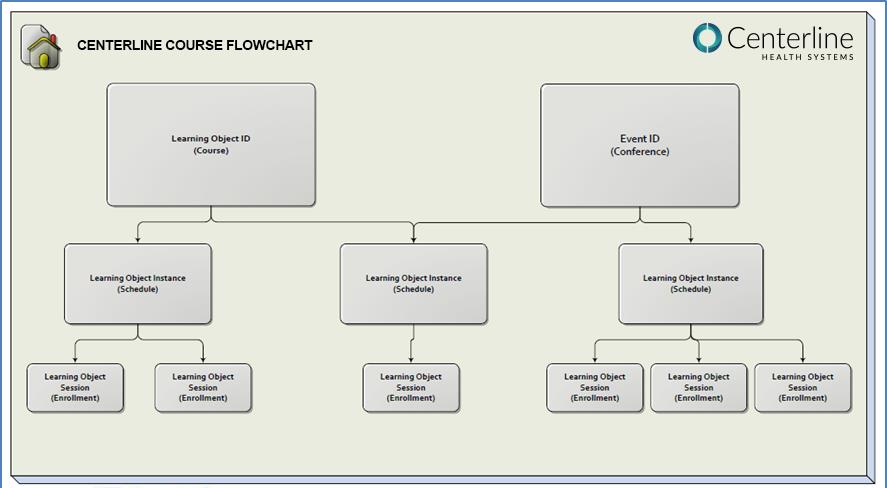
- Create Instructor Led/Classroom, Online Web Based and Manual Entry Course Listings
- Associate an Assessment(s) to Course(s)
- Associate an Evaluation(s) to Course(s)
- Create course Instance(s) – i.e. Date, Time, Location, # of Students allotted, Instructor(s), etc.
- Add additional Course Instance(s) – In depth overview provided in “Multiple Date & Time Setup One Course Instance Manual”.
- Upload SCORM or AICC Course(s)
- Clone Course(s)
- Search for Course(s)
- Update Classroom Roster(s)
SECTION 2: HOW TO ADD COURSE LISTINGS
How to Create a Course

- Click on the Learning Objects Menu
- Click on the Courses option
- Click New Learning Object
Below is the screen with the fields in the Course record. The steps will vary based on your organizational needs. (See Explanation of fields on the next page for next steps.)
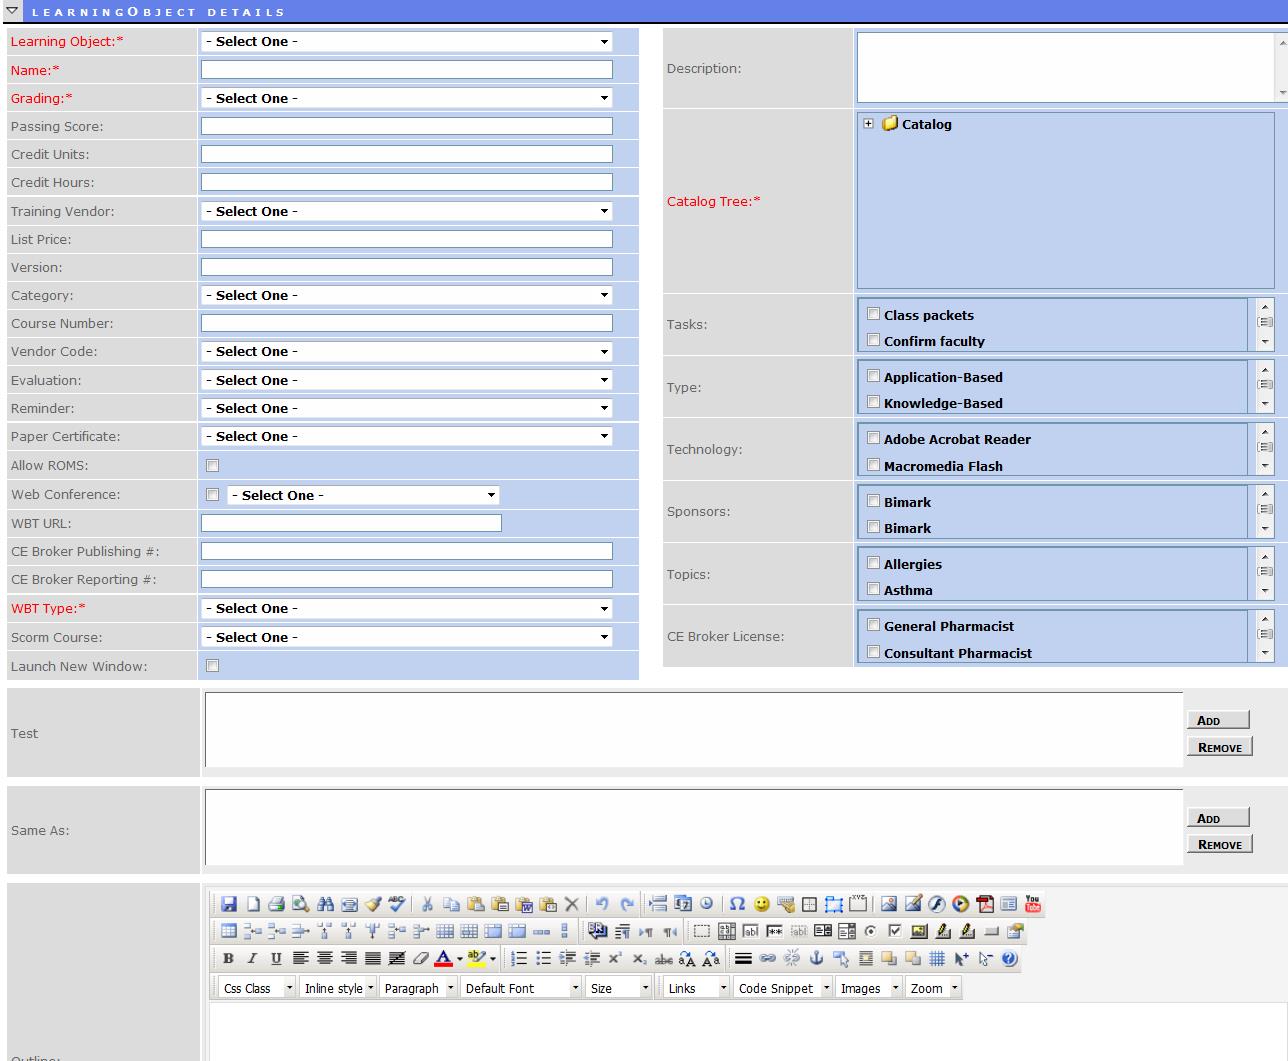
1.2 Explanation of Fields:
- Name - This is the name that will be displayed in the course list.
- Description - This is the name that will be displayed in the course list
- Grading – Dropdown offering 3 options: Not a graded course, Pass / Fail only, Student must receive a passing score

- Passing Score - If the Passing Score option was selected above, enter the score here
- Credit Units - This is how many credit units are assigned to the course. Visible within the user transcript upon completion and the course roster.
- Credit Hours - This is how many hours of credit the user will get by completing this course. Visible within the user transcript upon completion and the course roster.
- Training Vendor - Whether this course is provided by Training Vendors or Training Facilities
- List Price - Enter a price ($ value) for this course
- Version - Version Number
- Category - Select from the drop down list. This can be used from within the search filter by end user in simple view

- Course Number - This can be any internal/external course number
- Vendor Code - The system displays a list of all the current Vendors. Select one from this list
- NEXT 3 FIELDS - These are all ‘plug ‘n play’ fields – selecting objects from a ‘pool’ of previously created objects within the Learning Object Menu.
- Evaluation - This class may have an associated evaluation that is required for people who take this class. Select from the drop down list. Leave blank is there is no evaluation will be associated with this course
- Reminder- Select from the drop down menu of previously created Reminders. Leave blank is there is no reminder that will be associated with this course
- Paper Certificate - Select from the drop down menu of previously created Paper Certificates. Leave blank is there is no paper certificate that will be associated with this course
- Allow ROMS - This box should be checked it there is a requirement for ‘management by objectives’ to be assigned to the course
- ''''Web Conference - Check this box, if this is a Web Conference or Virtual class. Select the web conference provider from the drop down list

- WBT URL - If this course is a link to an external course, enter the URL link to the course. This is typically a non-track-able course event

- CE Broker Publishing # - If the course requires that the completion information be sent back to the CE Broker, this is the Publishing number that is required
- CE Broker Reporting # - If the course requires that the completion information be sent back to the CE Broker, this is the Reporting number that is required
- WBT type – Select from a dropdown of web based training compliances. Choices include: AICC, NoTrackingURLOnly, TestOnly, SingleSCORM, MultiSCORM, Pyxis. Certain vendors use different types. Confirm with the vendor of this particular WBT (web based training) as to which standard has been used for the course. If the learning object is WBT and of SCORM type – then assign the uploaded SCORM course.
- SCORM course - Select from the drop down menu – of courses previously uploaded. See manual, SCORM uploader.

- Launch in a New Window - Check this box, if this required or desired. This is a mandatory field for SCORM and AICC courses
- Catalog Tree - This feature allows the course to be placed within a catalog node. If required, one (the same) course can be listed in multiple nodes of the catalog tree .
- Click on the + sign in the catalog tree, to display further branches of the tree
- Keep on descending through the tree until you reach the CATALOG into which node you want to add the course that you are about to create
- Check the empty box on the left side of the associated catalog entry to which this course will be added
- Tasks - These are tasks assigned at the GLOBAL level for this course. Check the applicable boxes
- Type - Courses can be categorized into types – check the applicable boxes
- Technology - Courses can be categorized into technology types – check the applicable boxes
- Sponsors - A sponsor is someone that is sponsoring the course. Check the applicable box
- Topics - Courses can be categorized by topics – and used for reporting and searching purposes
- CE Broker License - If the course requires that the completion information be sent back to the CE Broker, this is the License number that is required
- Test - A course can be linked to an assessment. Some courses have built in assessments within the course packages (SCORM), but for those that do not; this is where one is able to attach one or more tests that need to be taken to get credit for the course. Click the Add Button to add an assessment. To remove a test, click the Remove button
- Same As (selector) - Your LMS has a feature to create a cross reference table of courses that have the same content, but have different names.
- For example, a newly hired nurse may have taken a CPR course (under a different name from what our organization has it listed as) from her previous place of work. When the ASSIGNMENT SCHEDULER recognizes that this nurse is required to take our CPR course and that it is not listed in the nurses enrollments, the system will check the cross table to check whether the nurse may have taken (and received credit for) this course under a different name. If the system finds the ‘same as’ course in the table, it will not assign the course (again) to the nurse. Click the Add button and search for the course to add a course. Highlight and click the Remove button to remove.
- Outline - HTML Course outlines can be created using the built in WYSIWYG editor. The editor works very similarly to Microsoft Word and PowerPoint
UPDATE 6/13/19 **Reset SCORM Calls / Store Completed SCORM Calls** not shown above

- After all entries have been made, Click Save
How to create a Course Instance
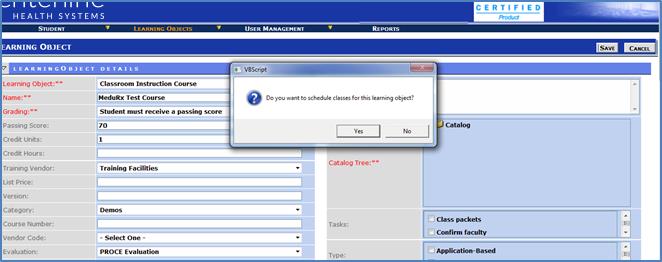
- After saving a course successfully a Pop up window will appear prompting for a course instance, click Yes
The course instance allows administrators and instructors to create multiple sessions (Dates and Times ) for one course. In addition to multiple sessions, instances allow the requirements of a given course or its session. The steps will vary based on your organizational needs. (See Explanation of fields on the next page for next steps.)
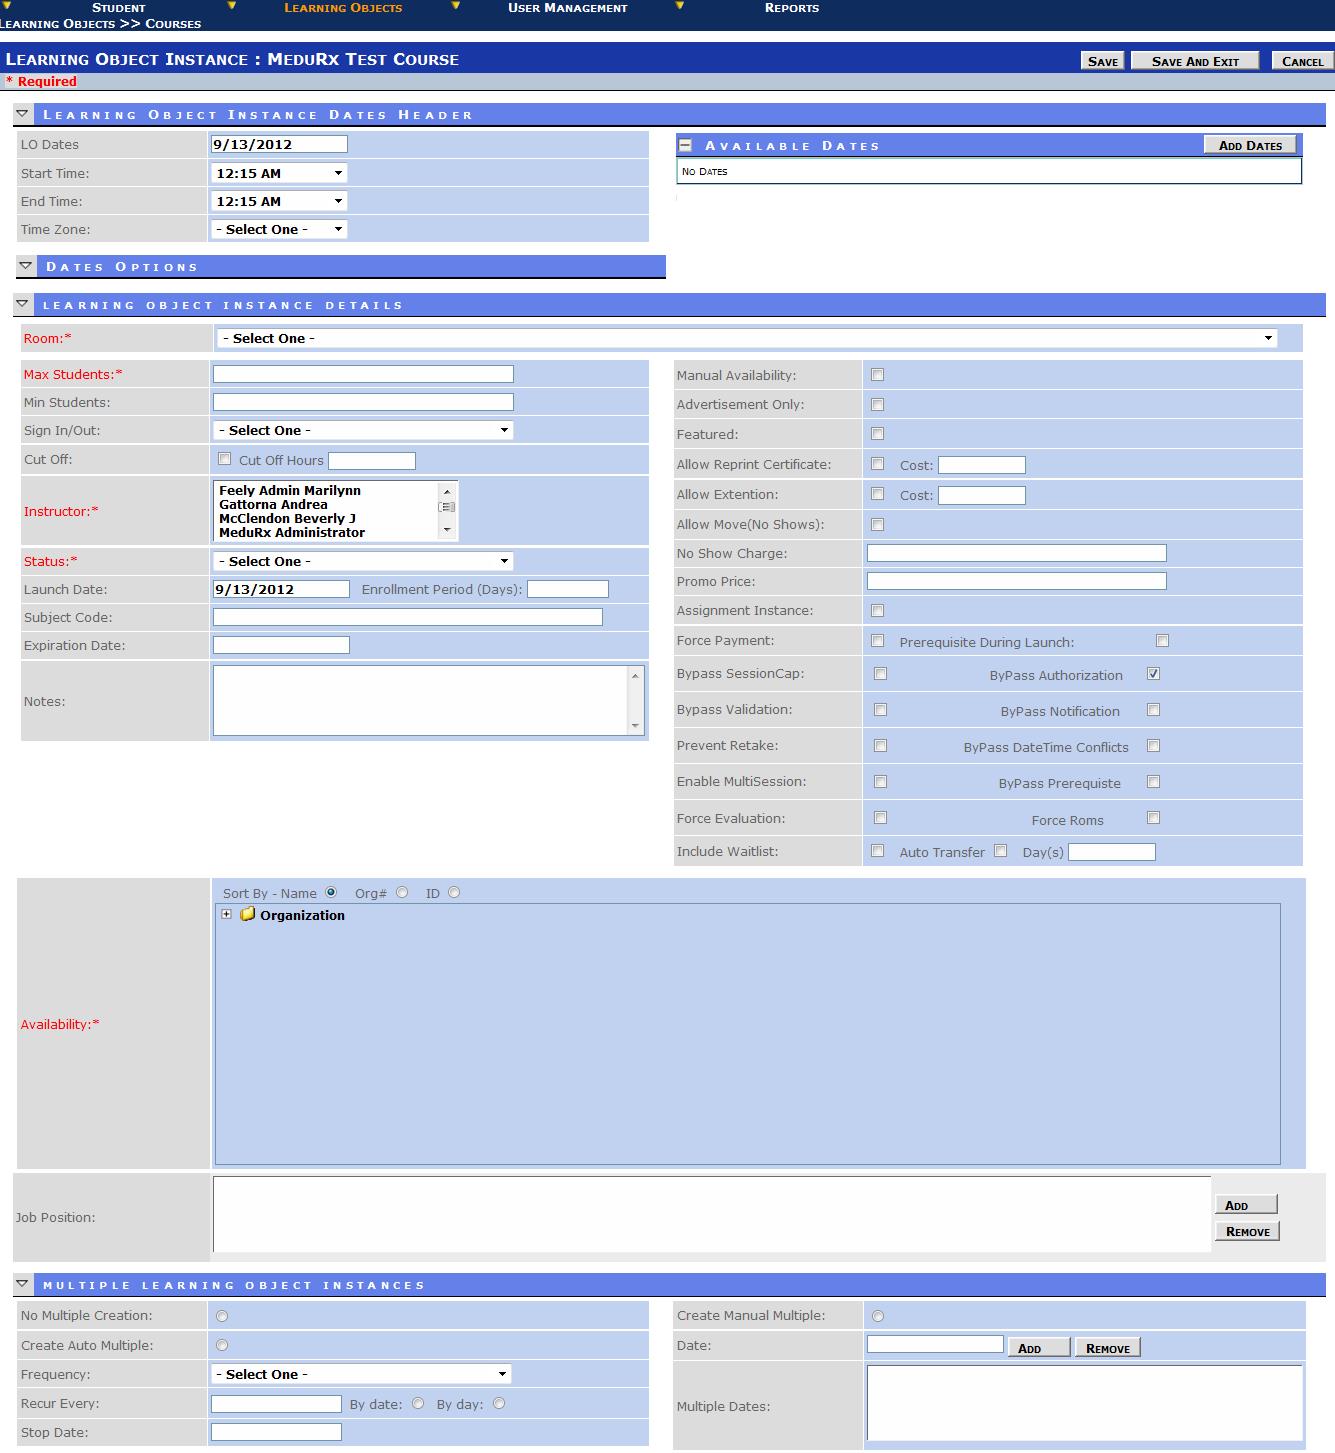
1.4 Explanation of Fields:
- Date and Time - Add the Date(s) and Time(s) for your classroom session. *Note: There are three ways to create multiple instances for a course. For in-depth overview please reference Multiple Date Header & Time Setup One Course Instance Manual”.
- Date Options- Additional method of adding Dates(s) and Time(s), Military time, Classes that start one day and end the next (night shifts), etc
- Room - Select a desired room or location from the drop down list
- Max Students - A maximum number of students can be specified for this instance of this class. Students enrolling after the maximum has been reached will be placed on a waitlist if that option has been selected below. If waitlists are not included, the class will be shown as FULL
- Min Students - The minimum students required for this class to run. Reports can be generated for all classes with below minimum students, so that they do not have to be cancelled at the last minute
- Sign In/Out – The LMS supports badge readers – and the options can be selected from the drop down list

- Test Take Type - Available only for Classroom Led courses. Flexibility to determine when the test associated to the course will be available for students to complete. Three options: Start Time, End Time and Anytime
- Instructor - Select from the drop list which is populated with all users belonging to the group “Instructors”. To select more than one instructor, hold down the CTRL key and click on another instructor name.
- Status – Select from the dropdown list. Choices are Pending, Scheduled, Completed, Cancelled by User.

- ''''Launch Date - Allows a course to be created, but only available for enrollment at a future date –If no launch date is specified, the available date is the date the course is created. Taking the course from a pending status to scheduled status
- Enrollment Period (days) - A course can be available for enrollment only for a specified period from the date that it ready for enrollment/created. For example, 30 days would indicate that this course will only appear on the schedule for 30 days – thereafter it will no longer be available for enrollment. It will not be shown in search after this 30 day period has expired
- Subject Code- For certain webinars and instructor-led courses, instructors may give out a ‘code’ which will allow users/students to access the evaluation and/or assessment after they have completed the course
- Expiration Date - The launch of the content, assessment and/or evaluation is prevented after this date
- Notes - This is area, where the class instance creator can add notes that will be emailed to all enrolled students and instructors associated to this class. *Note: Each time this field is updated after creation, students and instructors will receive email updates
- Manual Availability - If selected, although the course is scheduled, it is not available for enrollment via catalog, calendar or search. Users that want to enroll will have to contact the administrator. The Admin will MANUALLY enroll them
- Advertisement - This course will be shown in the catalog, calendar and search – and will allow the user to enroll. However, the course requires the administrator to activate the course for it to run. This feature is typically used where the administrator is not certain that there will be sufficient enrollment for this Only course, and only once there is, the administrator can activate the course and users will become actively enrolled at that time. Effectively if this flag is set, the course is for advertisement only pending sufficient enrollment
- Featured - If this flag is turned on, it permits two options – 1) An on-line course can be previewed from the catalog and search; 2) If the WEB SERVICES API module is being utilized, the course can appear as a ‘featured course’ on the organization’s home (or other) page.
- Prevent Transcript Launch - If this box is checked, each user that completes this course will not be able to launch this course again to review from the user “My Transcript” page. This will be very helpful if total number of licenses for online learning courses becomes a factor
- Allow Reprint of Certificate, - If the e-COMMERCE module is implemented, and the administrator wishes to control the reprinting of certificates, these two fields need to be completed. 1) Check to allow the reprint; 2) Enter the cost that will be billed to the user’s credit card to reprint the certificate
- Allow extension, and associated cost, if any - If the course has past the enrollment period, the course can still be enrolled in if this box is checked. An associated cost to permit this extension is available.
- Allow Move (no shows) - If this box is checked, a user that has ‘no-showed’ for a class can move themselves to another class instance within the “My Courses” tab
- No Show Charge - Enter a charge that will be levied to the user for such a ‘no-show move’
- Promo Price - If the EVENT module is implemented, a promotion price can be entered that will override the LIST PRICE of the course
- Assignment Instance - If there are limitations on the number enrollees for a particular course, a certain number can be made available through the assignment scheduler (typically as mandatory), and the balance will remain for self/manager enrollment (as electives). This field will contain the maximum number of students that can be enrolled via the ASSIGNMENT SCHEDULER
- Force Payment - If this box is checked, and the e-Commerce is installed, payment for this class must be made by credit card before enrollment will be confirmed
- Prerequisite during Launch - If this flag is set, the validation of prerequisites will be done during LAUNCH of the course, and NOT during enrollment
- ''''Bypass Session Cap - If this box is checked, the system will not limit the number of students that can enroll for this class
- Bypass Authorization - If this box is checked, the system will not check for an authorizer to have signed off on this enrollment. If left unchecked, authorization will need to be given to enrollees before completion is permitted for the course, i.e. proctored courses.
- Bypass Validation - If this box is checked, the system will not perform any validation during the enrollment process
- Bypass Notification - If this box is checked, the system will not send an e-mail to the student to remind them of the class
- Prevent Retake - If this box is checked, the system will not allow a user to re-enroll in this class
- Bypass Date/Time Conflicts - If this box is checked, the system will not check to see if the student is enrolled in another class (or the same class) at the same time
- Enable Multisession - If this box is checked, the system will allow enrollment in this class multiple times
- Bypass Prerequisite - If this box is checked, the system will not check that all prerequisites have been met before enrolling this student in the class
- Force Evaluation - If this box is checked, the system will not show the class as having been completed by the student, unless the student has completed an evaluation for the class
- Force ROMS - If this box is checked, the system will not show the class as having been completed by the student, unless the student has completed their Related Object Management System (Objectives) for the class
- Include Waitlist - If this box is checked, the system will add enrollees past the maximum allowed for this session, to a waitlist. Moving students from the waitlist to the class, if spaces become available, is by default a manual process
- Auto Transfer/Days - If this box is checked, the next in line wait-listed person will automatically be transferred into the class if a space becomes available. Days fields provide numbers of days before the first user on the waitlist will be transferred into the course
- Availability - Select a node(s) in the organization structure to make this course available ONLY to those users at the selected location(s).
- Email To - If an option is selected these identified audiences will receive enrollment emails in addition to the enrollee, i.e. Managers, Users and Managers and Others. If other is selected, place the appropriate email(s) in the field separated by a comma if more than one
- Job Position - Ability to allow identified Job position(s) to view the course is they fall out of scope to view via Catalog, Calendar and Search.
- Delegates - Ability to allow identified custom group(s) Delegate list to view the course
6. Click Save and Exit
How to add additional Course Instances
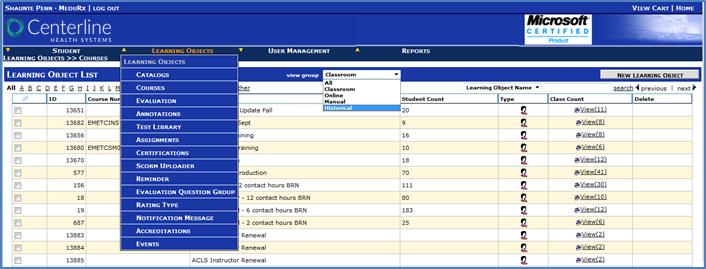
- Click on the Learning Objects Menu
- Click on the courses option
- View Group Drop Menu: Classroom
- Find Course Title
- Click View under the Class Count column
- Click New Learning Object Instance
- Repeat steps from sub section 1.4

How to Clone Courses
- Locate the course you would like to Clone (Classroom and/or Online)
- Click on the course title
- Click Edit button
- Click Clone button
- Message will appear “Clone Successful. You can view the newly cloned course from the course
list”
- Click Save
- Click yes to setup a new instance if desired. Refer to Section 1.3 for more details
How to search for courses
There are several ways to search for a course(s) within the LMS. The search functionality is a drill down method, clicking on an item moves you to a level of greater detail. From within the view group drop menu there are several filter options:
Note: All new course default to an active status within the LMS.
- All – This will list all course types and course statuses
- All Active - This will list all course types that are marked as active
- All Inactive – This will list all courses types that are marked as inactive
- Classroom Active – This will list all classroom based courses that are marked as active
- Classroom Inactive - This will list all classroom based courses that are marked as inactive
- Online Active - This will list all online based courses that are marked as active
- Online Inactive - This will list all online based courses that are marked as inactive
- Manual – This will list all manual course entries. For Manual Entry definition please refer to the beginning of this manual
- Historical – This will list all historical data that was migrated into the LMS
- Click on the Learning Objects Menu
- Click on the courses option
- Select the appropriate View Group Type to search through; All Active, All Inactive, Classroom Active, Classroom Inactive, Online Active, Online inactive.
- Course Sorting Options:
- View Group drop menu, Select course type to search by All Active, All Inactive, Classroom Active, Classroom Inactive, Online Active, and Online inactive.
- Search by alphabet
- Search by name or course number, click search
- Moving page by page through course listings
- The above grid can be sorted by any column header by click on the column name
i. If an error/typo is made or a new search is needed, click the clear button and begin a new search
How to add Users to an Instance
- Click on add link within the Students column.
- Search by last name, first name, employee ID, etc. and click go
- Select users to enroll in the class session and click the Add Attendee button
How to add update classroom Rosters
- Click on the Learning Objects Menu
- Click on the courses option
- Select Classroom Active from the View Group Drop Menu
- Click on the View Link under row titled “Class Count” for the appropriate Classroom title
- Click on the View Link for the appropriate Classroom Instance.
- User(s) classroom session can be updated several ways:
- :# User can be marked as “No Show” status for this session. If the “Allow No Show’ feature was marked at the instance level for this session, the student will be able to move into another date for this classroom course
- :# Mark user(s) record as complete for this classroom course
- :# Skipped, this will not update the roster for the user. Allowing the instructor to come back at a later time and update the record
- :# Canceled out of this classroom course
- :# If this was marked as a graded course within the Learning Object level – A grade can be manual entered in for each user. If this was marked as not a graded course within the Learning Object Level – Not Graded will appear
::# Mass Roster Email to Students:
vi. Select the user(s) as referenced by column f in above example. Click the email button, select email audience group. *Note email addresses are pulled from the users profiles. If other is selected, place email address(s) in the free form field and comma delaminate.
g. Updating multiple records at once:
:::# Select the users and the Status Type (no show, cancel, complete) from the drop menu and click update rosters or cancel enrollments.
explanation of Fields for Course Roster
- ID - Session ID that correlates the student to the Instance
- Actions - Available Options to Complete, Cancel, Suspend, etc. for the user enrolled in the given roster.
- Name - Enrollee Full Name
- Employee ID - Employee ID for the enrolled students.
- Active - True if the student has an active status and False is the student is inactive in the LMS.
- Course - Title of the Course
- Department - Department the students are affiliated with
- Type - Type of Course, Online or Classroom Led
- Start Date - Start Date of the Course if applicable
- End Date - End Date of the Course if applicable
- Facility - Facility the students are affiliated with
- Enroll Date - Date and time the students were enrolled in the course
Note added 8/14/2017 - Re: Updating Paper Certificates attached to a learning object If you simply update the design of an existing certificate, keeping the same name / path, the transcript will use the latest design version
If you change the learning object to a different certificate, it will use the latest design version of the initial certificate for users that completed before the changeover and it will use the latest same / name path of the new certificate for users completing after the change
So, Scenario #1
Learning Object – Certificate = Certficate1 with the Approver = John UserZ takes course and goes to transcript to print certificate it will Approver = John You change the design of Certificate1 to Approver = Sally UserZ goes to transcript to print certificate it will show Approver = Sally
Scenario #2 Learning Object – Certificate = Certficate1 with the Approver = John UserZ takes course and goes to transcript to print certificate it will Approver = John You edit Learning Object and select Certificate = Certificate2 Approver = Sally UserZ goes to transcript to print certificate it will show Approver = John (It points to the Certificat1 with latest info) UserX completes after change it will show approver=Sally (It points to Certificate2 with latest info)
If this certificate design is simply updated (but NO change to certificate attached to Learning Object) it displays the updated info because it uses the same path / certificate. If the certificate is changed within the learning object, then all completions prior to the change use the old path, all after use the new path.