Scorm Uploader - Admin Guide
SCORM UPLOADER – HOW TO GUIDE (Step-by-Step)
Section 1 - SCORM Uploader - Overview
The SCORM Uploader Feature allows the user to import a SCORM package as a learning object for use in the Learnsoft LMS.
SCORM stands for “Sharable Content Object Reference Model” and it is a set of technical standards developed for eLearning software products. In its essence, SCORM enables interoperability between eLearning software products. Specifically, the model determines how online learning content and Learning Management Systems (LMS) communicate with each other.
The SCORM Uploader Feature provides an easy and convenient way to add SCORM material to the LMS and enabling both instant course creation and saving the SCORM package to the SCORM list for easy drop-down selection for future courses.
There are two methodologies for SCORM upload:
- SCORM packages that are under 25 MB in size can be uploaded directly through the SCORM Uploader (see section 2.2).
- SCORM packages that are over 25 MB in size can be uploaded to the client’s private FTP directory tree and then can be added to their LMS system through use of the SCORM Uploader (See section 2.3).
2020 update: The size for Scorm Uploads using the following browsers is like following:
- EDGE Browser - upto 25 MB
- Chrome Browser upto 25 MB
- Firefox Browser upto 25 MB
- Internet Explorer - Upto 25 MB
Section 2 - SCORM Uploader – How to Guide
Section 2.1 – How to Access the SCORM Uploader Feature
- 1 - The SCORM Uploader Feature can be accessed in the Advanced View by hovering over the Learning Object dropdown menu and selecting SCORM Uploader.

- 2 - This will bring up the SCORM List which will provide a listing of all SCORM files imported into the LMS System.

Explanation of Columns: SCORM List
- - Column of checkboxes allows selection of single or multiple facilities.

- ID – LMS System generated ID based on order of creation in the system.
- Name –Name of the Scorm package.
- Folder – Location name of the SCORM package.
- Company Name – Name of the company who developed the SCORM content.
- Usage – The number of times the SCORM has been used.
- Delete – Red (X) icon. If available and if clicked, it will ask for confirmation to delete a specific SCORM package .
- 3 - To Add a new SCORM package to the LMS system, click on the New SCORM Button.

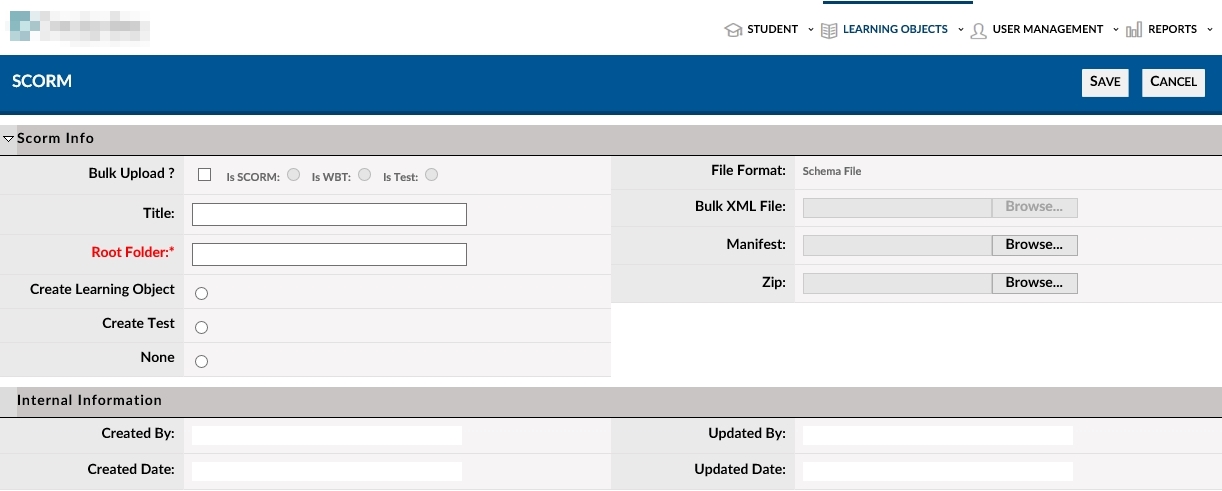
- 4 - This will bring up the SCORM Uploader details page.
- If adding a SCORM package smaller than25 MB, see section 2.2 for specific directions.
- If adding a SCORM package greater than 25 MB, see section 2.3 for specific directions
2020 update: The size for Scorm Uploads using the following browsers is like following:
- EDGE Browser - upto 25 MB
- Chrome Browser upto 25 MB
- Firefox Browser upto 25 MB
- Internet Explorer - Upto 25 MB
Section 2.2 - SCORM Uploader – Direct upload (SCORM packages under 25 MB)
Create a file on your C: drive named ‘SCORM’ move/save zip files here. If they are smaller than 25MB, you can directly upload them into the LMS. If larger, they must be FTP’d to the LMS (see section 2.3).- 1 - As noted in the previous section, from the LMS Advanced view > Learning Objects >SCORM Uploader dropdown menu, click the New SCORM Button.
- 2 - Fill in the SCORM Info area fields (Title, Root and Zip).
- A - Copy/Paste Add the title from the client or from the imsmanifest.xml file (In most cases this will be the correct title, but you can provide any title as long as correctly setting up path - make sure not to duplicate other course titles unless on purpose.
- Right click the imsmanifest file
- Select open with Notepad
- You will want to copy the text that is within the HTML title tags. (For example <title> Swimming Lessons</title> tags). (if avail, but you can provide any title as long as correctly setting up path - make sure not to duplicate other course titles unless on purpose)..
- Paste the text into the title field.
- B - “Root folder” this field should contain the same name as the manifest file (for example Swank-course44314) (this is the folder where if unzipped, the immanifest file resides. if a multitenant system, you may also need to preface with your ftp path (e.g. RegionA/rootfoldername)
- C - ''''If desiring to create a course and course instance when using the SCORM uploader:
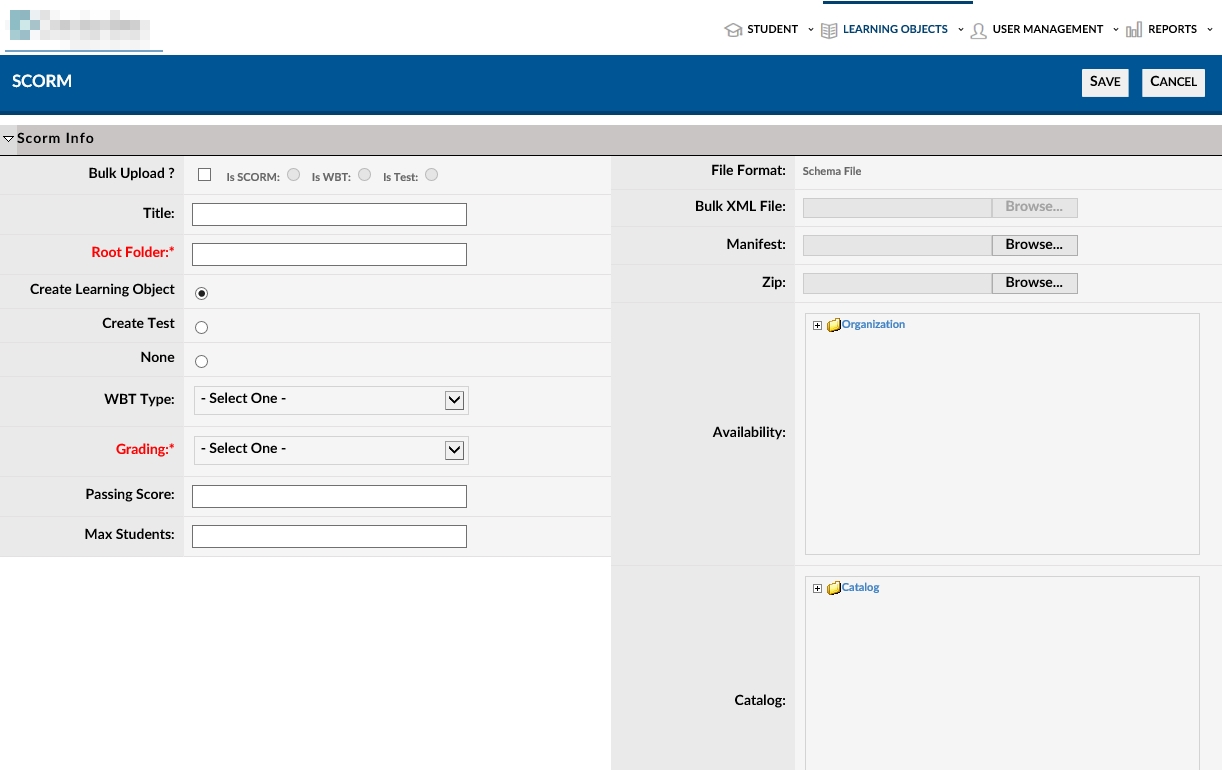
- Select Create a Learning Object checkbox- will create a LO and LOI for you. It will also provide additional selection options (see screenshot).
- WBT Type: Select Single SCORM
- Grading – should match what was created in eLearning module.
- Passing Score: – should match what was created in eLearning module.
- Max Students: max number of students allowed to enroll in the course.
- Availability: Select group who will have access to course, make this eLearning course ‘available’ to.
- Catalog – will let you place this in the catalog tree.
- 3 - Click on “Save” and Exit
- 4 - Find your course, click on it.
- This course will now appear in the SCORM Drop down List- You can use/assign it If you’ve have a WBT Instance- ready, you can use the course now. Otherwise, keep going to create one.
Adding an uploaded SCORM to a Course
If you didn’t create your course when using the SCORM Uploader, you can now create a course and add the now saved SCORM package is it now will be in the Learning Object WBT drop down SCORM list
It is assumed that Admins are already familiar with creating Learning Object / Courses and Course instances. If not, please see associated Courses – Documentation.
- 1 - To create a new Course navigate to the Advanced Menu > Learning Objects > Courses dropdown menu.
- 2 - Fill in Learning Object- On-Line Training Course
- 3 - Name the course
- 4 - Select grading method either pass/fail, OR passing score required + input #
- 5 - Select Single SCORM for the WBT type
- 6 - Select the SCORM title from the drop down list [the one we just loaded form step 3-5 above] .
- 7 - Select a spot in the catalog and click Save.
- 8 - A confirmation box will popup indicating that the course has been saved and asking if you wish to create an Learning Object instance. Click Yes.
- Max students- enter a number
- Status – scheduled for available instance
- Availability - check off organization or node of your choice. When in doubt pick the top folder. Availability is who can take this class.
Section 2.3 - SCORM Uploader – FTP upload (SCORM packages over 25 MB)
FTP and Local File Directions
- 1 - When using an eLearning authoring software program like Articulate, Adobe Captivate or any other program, it is important to export the eLearning module into SCORM format. When this happens, the program will most likely export to .ZIP format.
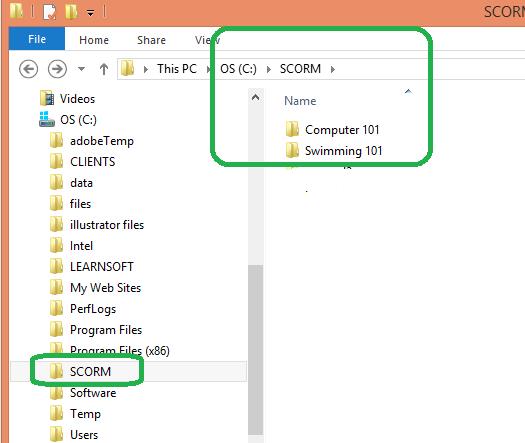
- 2 - On your C: drive create a folder called “SCORM”, inside it create a folder for each course you will upload. See folder below for Swimming 101. When you unzip your zip file, you will copy/paste the contents into its course folder.
- You will need to store both zipped/unzipped files on C:/SCORM course folder, and on Learnsoft FTP site.
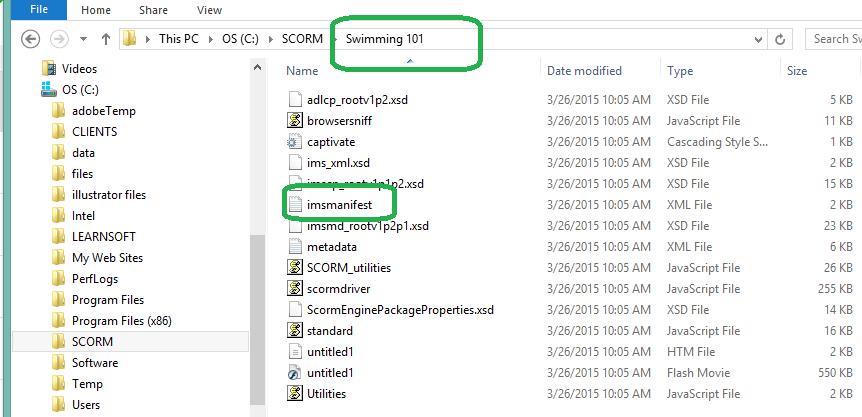
- Unzip the file, place in the C:/SCORM/Course Folder-named the exactly the SAME name as your eLearning module.
- In the Course folder, make sure is has a must be a file called: imsmanifest.xml
- 3 - FTP (copy/paste your new course folder onto your Learnsoft FTP site-Keep a copy on your PC. WAIT 15-30 minutes for the course to be available to the LMS. Then follow steps 1-6
To Create the new SCORM course in your LMS with “SCORM Uploader”
- 1 - Login to your LMS>Advanced>Learning Objects>Click on SCORM Uploader>Click on “New SCORM” button.
- 2 - Input title, should be exact same name as eLearning module, but you can provide any title as long as correctly setting up path - make sure not to duplicate other course titles unless on purpose.
- 3 - Fill in Root folder: this is the name of the course folder containing the imsmanifest.xml file (this is the folder where if unzipped, the immanifest file resides. if a multitenant system, you may also need to preface with your ftp path (e.g. RegionA/rootfoldername)
- 4 -Optional Steps to create a new Learning Object & WBT Instance to use with this SCORM course
- Select Create a Learning Object- will create a LO and LOI for you…
- WBT Type: Select Single SCORM
- ''''Grading – should match what was created in eLearning module.
- Passing Score: – should match what was created in eLearning module.
- Max Students: max number of students allowed to enroll in the course.
- Availability: Select group who will have access to course, make this eLearning course ‘available’ to.
- 5 - Manifest: click on Browse button to find the imsmanifest file. When browsing, should be C:>SCORM>Name of course folder – then select the smanifest file it will be stored on your COMPUTER – not on FTP!
- 6 - Exit>Learning Objects>Courses>Search for your course/instance and enroll yourself.>Launch the course to test your success.
If you didn’t create a new course when using the SCORM Uploader, follow steps in the prior section to add the SCORM to a Learning Object / Course and Course instance.
Section 2.4 – Notes when Creating SCORM file from scratch
- When using an eLearning authoring software program like Articulate, Adobe Captivate or any other program, it is important to export the eLearning module into SCORM format.
- When this happens, the program will most likely export to .ZIP format. You will need to store both zipped/unzipped files on your PC/mapped drive network server share.
- Unzip this file and confirm the SCORM compliance components from this .ZIP file exist
- The main folder name should be name of eLearning module. It may have many files and additional sub-folders.
- In the root folder, there needs be a file called: imsmanifest.xml