ANNOTATIONS - (ORIGINAL GUIDE)
Annotations
The Annotations feature in the LMS system allows an Administrator to customize web based learning content.
This is done by inserting custom pages, which may in the format of a file, web page or URL, into an existing web based training course.
An example may be that there is one standard SECURITY Course for an organization that has multiple facilities, each with its own unique card key entry system.
Instead of having to create a separate security course for each location, by using the Annotation feature in the LMS system, the organization can have just a single security course, but add ‘slides/pages’ specific to each location.
For example - when taking the course, each employee will see pages 1-5 of the course, but employees in location A may see slide 6A, employees in location B see slide 6B, in Location C employees will be presented with 6C and so on. And then they all continue the course viewing pages 7-30.
How to Access the Annotations Feature
1 Use the Advanced Menu and hover over the Learning Object dropdown menu and select Annotations.
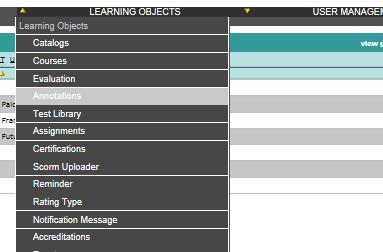
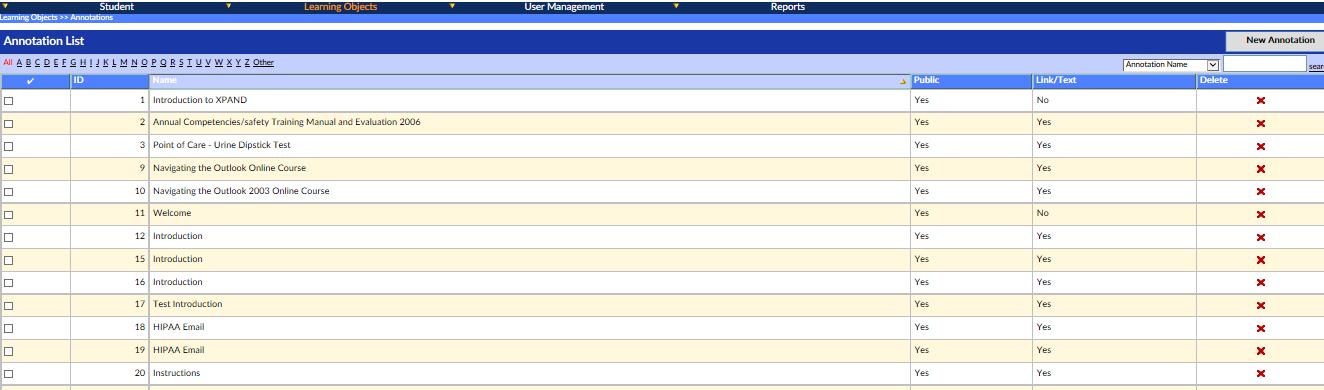
2 The system will display the Annotations List which provides a row by row listing of existing annotations.
How to Add a New Annotation
To add a new Annotation…
1 Click the New Annotation Button at the top right of the Annotation List.
2 The Annotation Details screen will be displayed
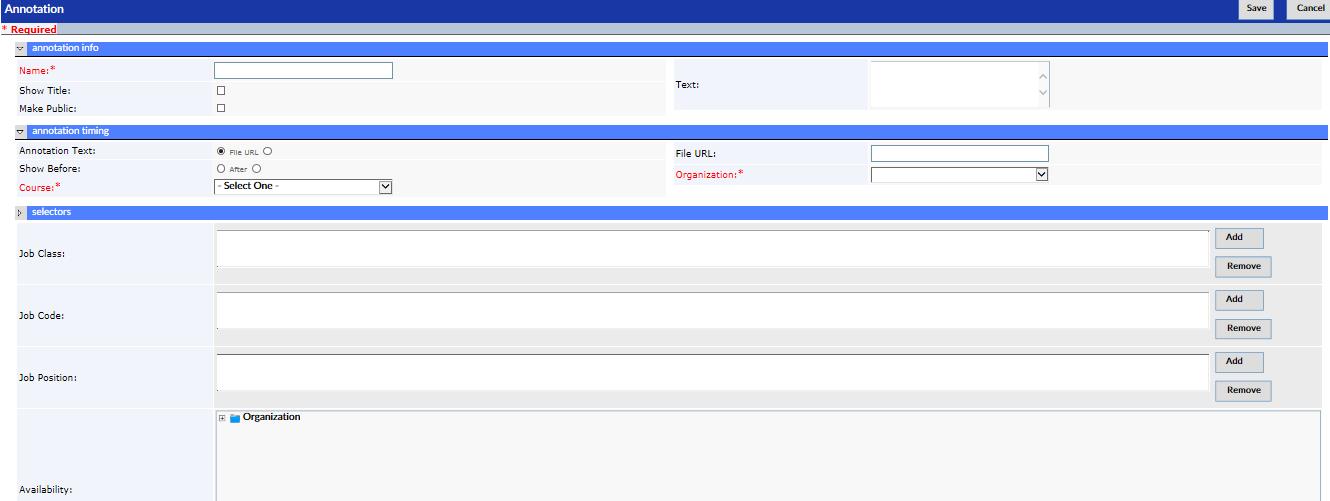
3 Enter required fields Name, Course and Organization.
4 Enter optional fields as desired.
Explanation of Fields
- Name* - The name of the Annotation to be created.
- Text - Free format description or detail of the page / slide that is to be inserted into an existing Web based course.
- Show Title - If the title is to be displayed, check this box.
- Make Public - Click to make this slide/page/annotation available to all users.
- Annotation Text - Check this box if the text entered above is the annotation.
- File URL - Check this box if the annotation is going to be a URL – if so, then the URL address must be entered in the adjacent field
- Address - Enter the URL address where the content for the annotation is to be found.
- Show before - Check this box if the annotation is to displayed BEFORE the marked existing slide/page.
- Show after - Check this box if the annotation is to displayed AFTER the marked existing slide/page.
- Course* - From the drop down list - Select the course into which the annotation is going to be inserted
- Organization* – In SCORM terminology, the ‘Organization’ refers to the list of ‘slides’ in the WBT. Now select the slide where the annotation will be inserted – either BEFORE or AFTER as selected above
Screenshot 04
(*) Required
Entering Selectors
SELECTORS allow the Annotations to be directed to specific groups within the organization.
The groups are as follows –
- Job Class
- Job Code
- Job Position
Specifying these will only permit users in the groups selected to view these annotations. The more specific you define the parameters the fewer the people able to view these annotations.
For example, an annotation could be directed only to those persons in Job Class A, and who hold the position of Y.
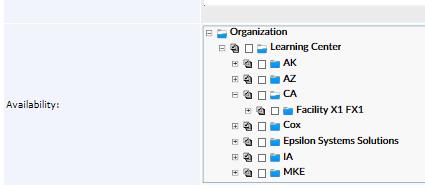
Not only can the above groups selected, but the LMS also permits a geographic location or node in the organization tree to be specified (the AVAILABILITY) – so that only those groups in a particular location/facility or node in the organization will be able to view the annotation.
4 Enter selectors to specify to which groups of users the Annotation will Apply..
a To add a JOB CLASS or JOB CODE or JOB POSITION as a selector, click on the ADD Button adjacent to the required parameter
b A Lookup pop-up window will be opened
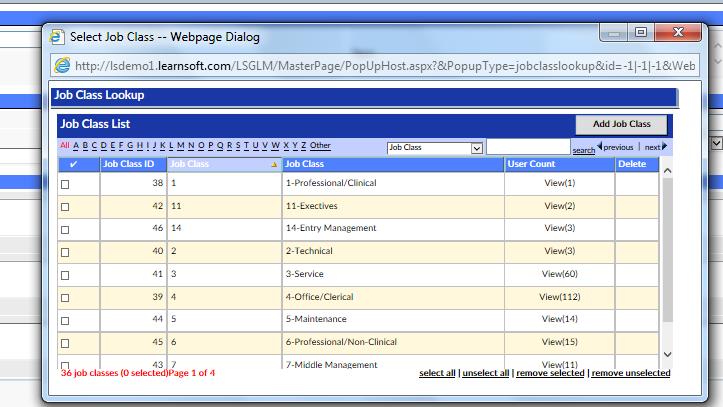
c From the list in the window, find the Job Class (Job Code or Job Position) that you need
d Mark the check box on the left side of the required entry to select it (Multiple selections can be made )
e Once all selections have been made, click on the ADD JOB xxx button
f You will notice that the Job Class (code or position) has been added to the selected selector box.
g To remove a selector, click to highlight then click on the Remove Button
h To specify the Availability, click on the + sign in the organization tree, and move down wards through the tree. Checking a box will apply not only to that node, but if there are nodes below the selected node, these too will be included in the selection.
5 To complete the process click the Save button.