My Profile - Admin Guide
My Profile Screen
The My Profile section displays personal, current and historical information about the user. it can be accessed two ways:- Simple View - Click on the My Profile Tab
- Advanced View - Hover over the Student dropdown menu and select My Profile
Explanation of Fields
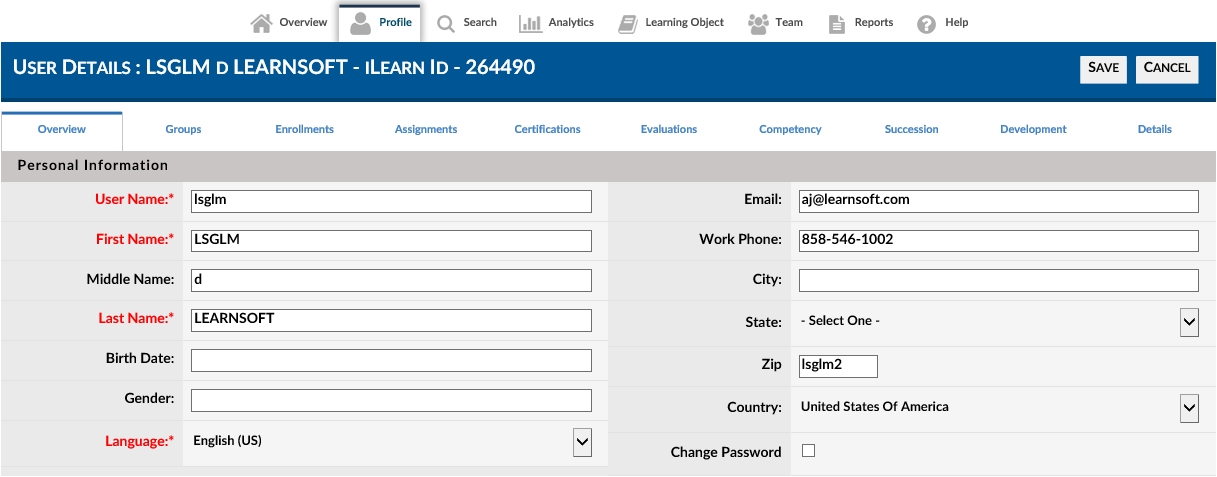
USER DETAILS
- Employment Type:* Establishes the employment classification of the selected record. This drop down list contains elements defined during the implementation of your system.
- Salutation: Salutation associated with the selected record.
- First Name:* First name associated with the selected record.
- Middle Name: Middle name associated with the selected record.
- Last Name:* Last name associated with the selected record.
- eMail:* Email address associated with the selected record. This field is used to send reminders to the user and confirm activities.
- Address: Address associated with the selected record.
- City: City associated with the selected record.
- State: State associated with the selected record.
- Country: Country associated with the selected record.
- Active: Check indicates active unchecked indicates the user is no longer active in the system.
The administrator may also choose to change the password of the account using the “Change Password” feature.
- Advance View: Specifies whether or not the user associated with the selected record will see the “Advanced View” which is more data intensive or the “Simple View” which limits the complexity of the user interface.
- Division:* Division associated with the selected record. May be modified by clicking the icon located next to the textbox. When editing this field a data tree will be displayed to assist with making the correct selection.
- Position: Position associated with the selected record. May be modified by clicking the icon located next to the textbox. When editing this field a data tree will be displayed to assist with making the correct selection.
- Home Phone: Home phone associated with the selected record.
- Work Phone: Work phone associated with the selected record.
- Hire Date:* Hire date associated with the selected record. This field is used to establish anniversary dates for certain assignments and annual mandatory learning activities.
- Termination Date: Termination associated with the selected record. Active records should not contain a termination date.
- Vendor User ID: Employee identification associated with the selected record
- Cert. Division: Division associated with certification for the selected record. May be modified by clicking the icon located next to the textbox. When editing this field a data tree will be displayed to assist with making the correct selection.
- Language:* Specifies the language that will be used to display the system for the selected user.
- User Name:* Specifies the User Name that will be used to login to the system by the user associated with the selected record.
TAB DESCRIPTIONS

- Overview Display all Profile details
- Groups Display only the groups that this User belongs to
- Enrollments Display all enrollments of this User
- Certifications Display only the certifications belonging to this User
- Assignments Display only the assignments of this user
- Evaluations Display only evaluation information
- Competency Display the competency analysis grid for this User
- Succession Display only the succession planning data for this User
- Details Display only User details
GROUPS
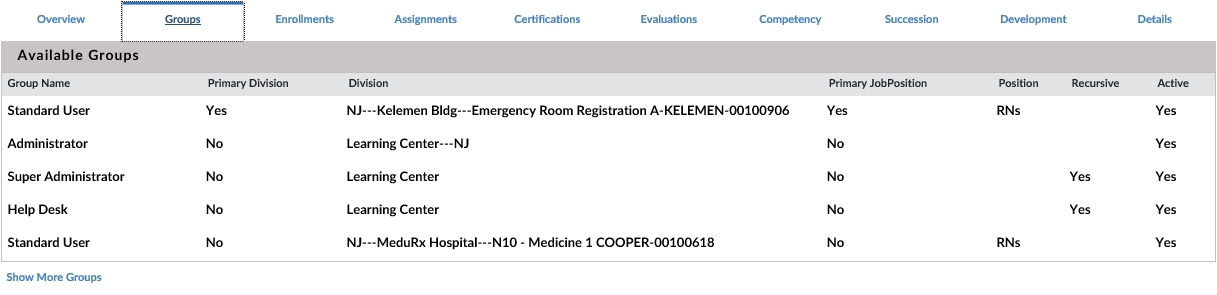
Step Action Explanation
- 1 To edit the group information, select the required record and click on the
icon A pop-up Window appears with the fields that may be edited
- 2 Click on the
button to save the changes
- 3 To delete a group that the user belongs to, click on the
icon, on the left hand side of the record The user will be deleted from this group 4 To add this user to a NEW group, click on the
- Button A new pop-up window appears
Step Action Explanation
- 1 Then click on the Group drop down menu to select a group
- 2 Next, click on the
Icon to the right of the DIVISION field to display the Organization structure
- 3 Click on the + sign and expand the nodes, moving down the tree, until you find the level that you are searching for
- 4 Check the box if this is Recursive
If the user checks this recursive box, the user will be considered to belong to the added group for all the divisions under the selected division.
- 5 Check the box is this is active
If the user checks this active box , the user will be considered an active user for this added group. Non-active users (such as terminated employees) cannot log onto the system, but their information is still kept on file for reporting purposes.
- 6 Select an action from the top right corner options
Save – save and return to the previous screen
Save and New – save and the system will prompt for the entry of another group
Cancel – return to the previous screen and discards all entries to this screen
CERTIFICATIONS
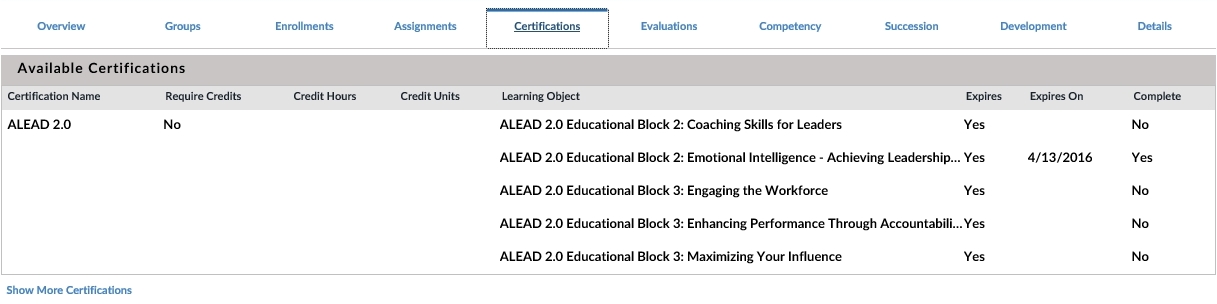
Certification details
Step Action Explanation
- 1 Certification Name Name of the Certification, which is ‘assigned’ to this user, and is made up of learning objects.
- 2 Learning Object name The Learning Object that is linked to this certificate.
- 3 Expires Whether this certificate can expire.
- 4 Expires On Date on which this certificate expires.
- 5 Complete Indicates whether this learning object is complete.
ENROLLMENTS
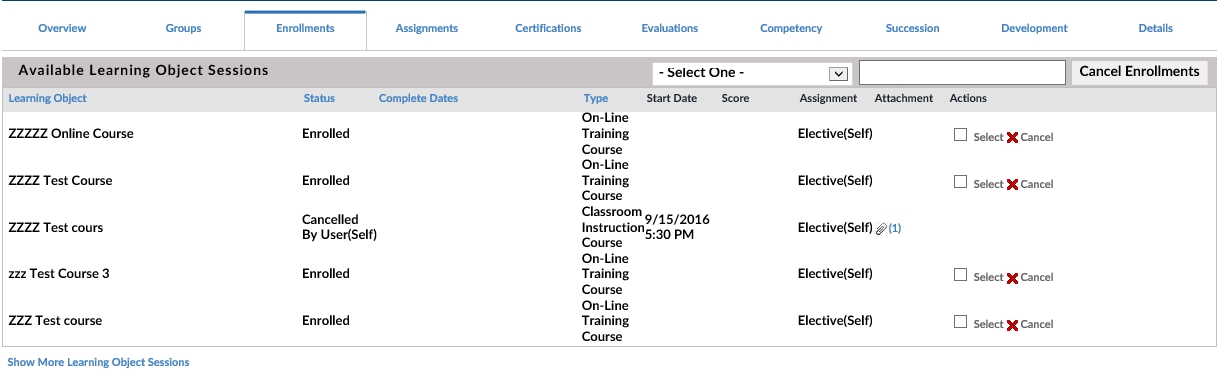
The enrollment screen only has a VIEW option.
No modifying or deleting is possible on the enrollment information through this screen.
The EDIT button at the top of the screen will take you back to EDIT just the USER profile details.
To show more sessions click on the link at the bottom of the display.
ASSIGNMENTS

Step Action Explanation
- 1 Assignment Name Name of the Assignment (for this user).
- 2 Learning Object name Learning Object assigned to this certificate.
- 3 Status Learning Object status type
- 4 Date Complete If this learning object is complete, then this field displays the date it was completed.
- 5 Due date Due date if this is an assignment
- 6 Complete Whether complete or incomplete.