My Courses - Admin Guide
My Courses
The My Courses window allows the user to view all classes they have requested or have been assigned to them in which their status is pending, enrolled or waitlist.There are two My Courses views: Simple View & Advanced View.
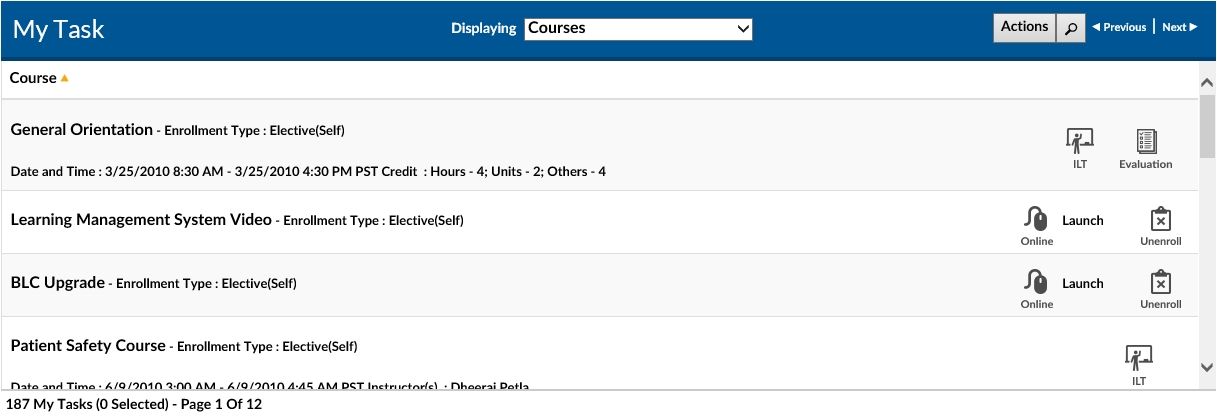
My Task - Simple View
For clients without a specialized landing page, the My Courses Tab in Simple View mode will be the first screen that is displayed. It will provide a tabular listing with graphical icons of all classes the user is enrolled in. It will also allow them to launch online course, view and download attachments, take online tests, complete online evaluation and cancel self-enrolled courses. This page is also accessible by clicking on the My Courses Tab in the Simple View.
For further details, please see the Simple View user guide.
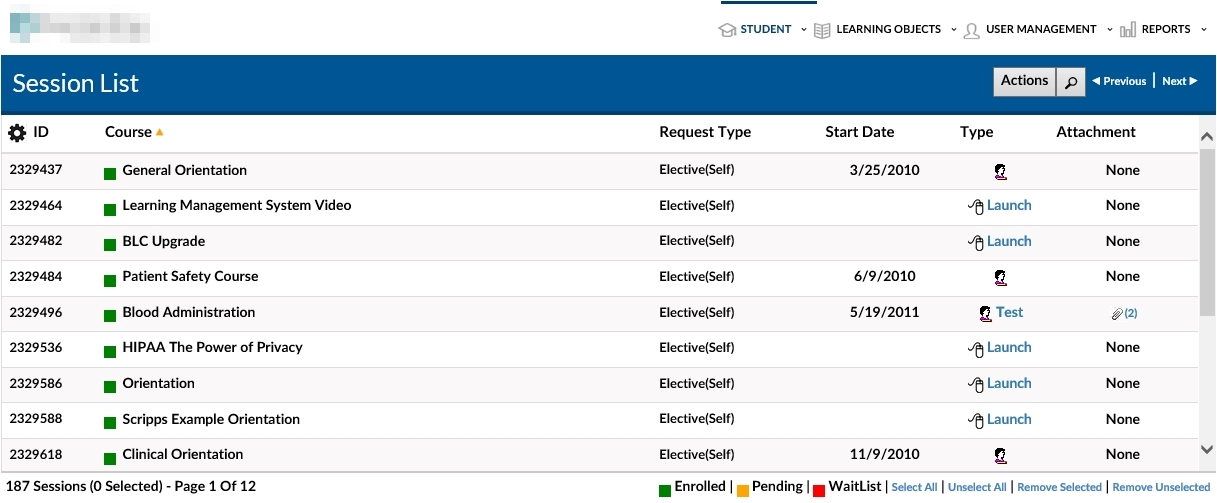
My Courses Page / Session List - Advanced View
By default, clicking on the Advanced View icon will launch the My Courses Page / Session List which will provide a non-graphical tabular view of the courses in which the user is enrolled.
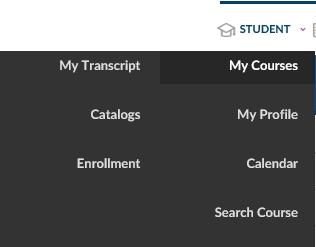
This page is also available in the Advanced View when hovering over the Student dropdown menu and selecting My Courses.
My Courses Page / Session List - Displaying
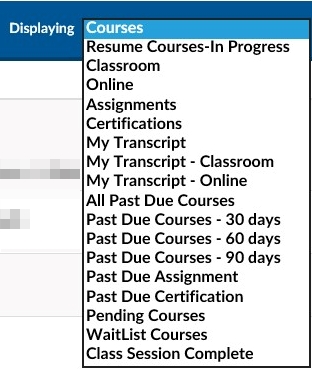
- Resume Courses-In Progress - This will display all courses that are in progress.
- Classroom - This will display all Classroom courses.
- Online - This will display all Online (WBT) courses.
- Assignments - This will display all Assignments that have been assigned to you.
- My Transcript - This will display your complete Transcript..
- My Transcript - Classrom - This will display all Classroom courses on your Transcript.
- My Transcript - Online - This will display all Online courses on your Transcript.
- All Past Due Courses - This will display all items that are Past Due.
- Past Due Courses - 30 days - This will display Past Due courses in the last 30 days.
- Past Due Courses - 60 days - This will display Past Due courses in the last 60 days.
- Past Due Courses - 90 days - This will display Past Due courses in the last 90 days.
- Past Due Assignment - This will display any Past Due Assignments.
- Past Due Certification - This will display any Past Due Certification.
- Pending Courses - This will display any courses in the Pending status awaiting approval.
- WaitList Courses - This will display any courses where you are in the WaitList.
- Class Session Complete - This will display any classroom courses that have completed the class but have not completed an evaluation associated with the course.
My Courses Page / Session List - Column Headings
By default, all classes are listed alphabetically, but can be sorted by the clicking on the column headings. One click provides an ascending ordering; a second click changes the order to descending.
Below is a listing of each column heading and the related information:
- ID This is the unique identifier for a session record in the LMS system. This number is assigned by the LMS system when a session record is created.
- Course - lists the courses by name. Each course name is a clickable link. When clicked, the Course Name link displays the Student Request Details page. This page allows the user to view information about the course or cancel the course. The colored fields to the left of the course name have the following meanings.

- Request Type This identifies whether the course was Elective or assigned. Options include: Enrolled (Self) in which the user self enrolls, Assigned (Manager) in which the user was manually assigned to the course or Assigned (with Details) in which the user was assigned automatically by the Assignment Scheduler Service.
- Start Date If a course has a starting date it will be displayed in this field. Note: Web based training is asynchronous and has no start date.
- Type Course types are specified under the Course Type column.
- Classroom based course. This means the student is scheduled to attend this course at the specified date and time.

- Web based course. By clicking on “Launch” the student is able to start the course.

- Attachment Attachments to a course are documents that provide useful information for a student. These may include pre-class reading assignments or templates that they can use once they return to their daily activities. Attachments can be accessed by clicking the underlined number in this field. If the field is blank no attachments are available for the session or course.
- Progress This field graphically displays the progress to date in a web based training course.
- Evals A small icon indicates that an evaluation is associated with this course. Completing an evaluation may be required to receive credit for the course. Click on the small icon to access the evaluation.
- ROMS - If the "Checklist" link is present than there are specific objectives associated with this course. These objectives may be required or optional and may allow for self approval or require approval by an external proctor, preceptor or validator. Click on the Checklist link to launch a popup box listing the associated objectives.
- Cancel Cancels a student’s enrollment for a particular session. This feature is only available for courses in which the student has enrolled themselves.

Individual Course / Session Details
Clicking on the row of the course in the ID, Course, Request Type or Start Date fields will launch the session details page.which provides more detailed information about the specific course.
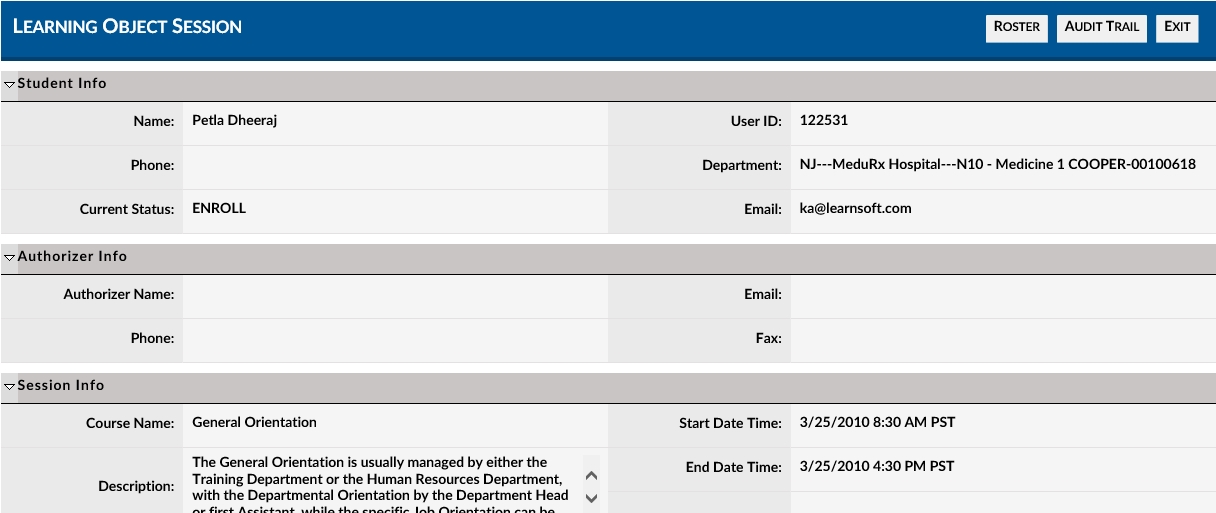
Sections Include:
- Student Info - provides information about the specific user.
- Authorizer Info - If the course requires authorization, provides information about the specific authorizer.
- Session Info - provides information about the specific course, including (if available) course name, facility address, days / times and directions to the venue. Also, if available, it will include a course outline.
- Attachment - If documents are attached to the course, allows you to view, download and print the documents by clicking on the specific document link. Also, students and instructors can upload new documents by clicking on the Add Document button. This will launch the Add Document popup box where you can select the document from your computer / network's directory system, name and describe the document and select the document type.(e.g. Course Document, User Document). You can also use the email feature to email the document to the user, manager or others.

- Available Instructor - If a classroom-based course, it will provide the name and (if available) contact information of the instructor(s).