Skills - Admin Guide
SKILLS - Admin Guide (Step-by-Step)
SECTION 1: SKILLS - FEATURE OVERVIEW
The Skills Feature allows the creation of a library of skills the LMS system. Skills are specific competencies or objectives for which students must demonstrate proficiency.
Skills are further utilized within the LMS as part of the ROMS process. ROMS stands for Relative Object Management System and it allows a series of skills (called a Checklist)to be associated to a course and demonstrated / reviewed prior to the user receiving credit for the course.
For example, after taking a CPR course, a nurse may be required to show that they can demonstrate the required steps necessary to show proficiency in CPR (E.g. 1) Check for responsiveness, 2) begin chest compressions - Push down in the center of the chest 2 inches 30 times, 3) Tilt the head back and lift the chin. Pinch nose and cover the mouth with yours and blow until you see the chest rise. Give 2 breaths). .
A manager or proctor can review to ensure the student performed each step in a satisfactory manner when measured against predetermined objectives. Once the entire Checklist of skills is completed and recorded (and, if necessary, receives approval or is considered passing) in the LMS, the student can receive credit for the course.
This Guide will focus specifically on the creation of Skills. For further information on the entire ROMS process, please see the following documentation.
- ROMS - Feature Overivew
- ROMS - How to Guide (Step-by-Step)
- ROMS - Quick Start Guide
SECTION 2: SKILLS -HOW TO...
2.1 How to add a Skill to the LMS system
To Add a Skill / competency to the LMS system, follow these steps (Note, if Skills have previously been created, this step can be skipped):
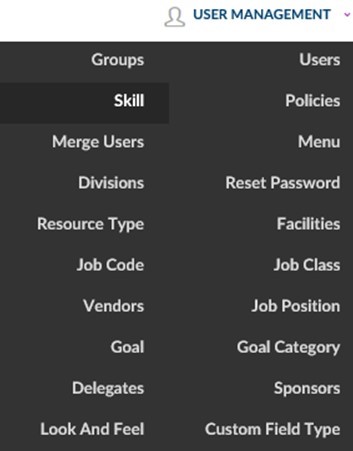
- Click on the User Management dropdown box.
- Click Skill.
This will bring up the Skill List screen which displays Skills that have previously been added to the system.

To add a New Skill
- Click on the New Skill button near the top right portion of the screen.
This will launch the New Skill Details screen. The level of detailed entry will vary based on your organizational needs. (See Explanation of fields on the next page for next steps.)
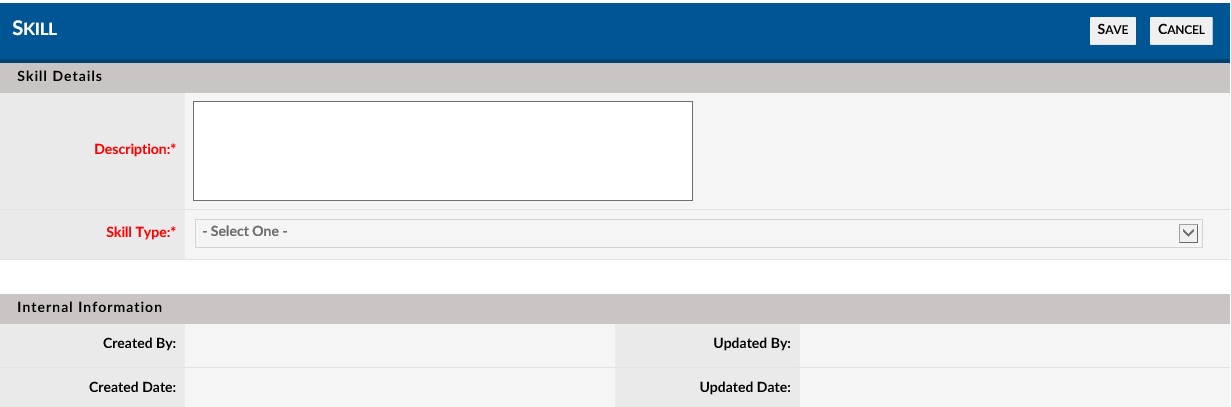
Explanation of Fields: Skill Details
Description* - Also called a competency. This is a description of the skill that will need to be demonstrated by the student
Skill Type * - NOTE: NOT CURRENTLY ENABLED
''''* Required Fields
- Enter a description of the skill in the description field (This can also be understood as the competency which will be tested).
- Click the Save button located near the top right of the screen.
The Skill has now been created and will be available in the Skill List. Repeat this step as necessary for all Skills to which ROMS will be associated.
2.2 How to Edit a Skill
- 1. Access the Skill List screen (Advanced View > User Management > Skills).
- 2. Use the navigation and search features to identify the specific skill you wish to edit.
- 3. Clock on the row of this skill (in the ID or Name column) to launch the Skill Details Screen associated with the specific skill.
- 4. Edit as desired.
- 5. Click the Save button to save edited changes.
2.3 How to Delete a Skill
- 1. Access the Skill List screen (Advanced View > User Management > Skills).
- 2. Use the navigation and search features to identify the specific skill you wish to delete.
- 3. Clock on the red (X) delete icon in the same row to the far right of this skill
- 4. A popup box will ask for confirmation to delete.
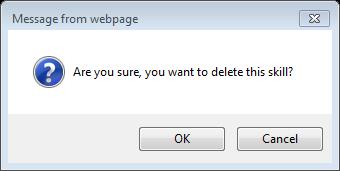
- 5. Click the OKbutton to confirm the deletion.
SECTION 3: SKILLS - ADVANCED FEATURES
For further information on the entire ROMS process including the use of SKils, please see the following documentation.
- ROMS - Feature Overivew
- ROMS - How to Guide (Step-by-Step)
- ROMS - Quick Start Guide