LMS ADVANCED CONCEPT: ASSIGNMENTS – SELECTING CLASS INSTANCES
LMS ADVANCED CONCEPT: ASSIGNMENTS – SELECTING CLASS INSTANCES
Version 4.02.20151130_1.1
Who Should Use This Guide
This guide is for - Learning Management System (LMS) Client Super administrators and Administrators to enable them to understand how the Assignments Feature schedules users in particular class instances.
Understanding the Issue
Assignments automate the process of enrolling users in courses; however, because Assignments are mandatory, they override most of the default selectors that apply to the normal human-led enrollment process (This does not apply to courses which are defined as Only for Certification at the Learning Object Details level).
For example, maximum class sizes apply to User, Manager, Instructor or Admin enrollments of students, but are ignored completely by Assignments.
Selectors ignored or bypassed by Assignments include:
- Max Students
- Include Waitlist
- Auto Transfer (from Waitlist)
- Manual Availability
- Bypass Session Cap
- Bypass Authorization
- Bypass Validation
- Bypass Notification
- Prevent Retake
- Bypass Date / Time Conflicts
- Enable Multisession
- Bypass Prerequisites (The Assigned by Course Order checkbox in the Assignments Feature provides a partial workaround to this particular selector)
Additionally, while the enroller can select the specific class instance to which they wish to add each specific enrollee (subject to the above selector limitations), an Assignment simply bulk enrolls all users into a single, available class instance.
For On-Line Training Courses, which only usually have a single instance, this is not usually an issue (though because it ignores “Max Students”, users with license restrictions need to pay special attention to the number of users in scope of an assignment).
Classroom Instruction Courses, however, may have multiple instances corresponding to the actual date / times of the classroom courses. With human-led enrollment, the enroller can select their preferred data time. If they don’t qualify for some reason (e.g. class full), they can adjust and try enrollment in a different instance.
Assignments, on the other hand don’t know the user (or manager’s or admin’s) preference. An assignment simply is set up so the required scope of users is enrolled in a specific course which the user is supposed to complete by a specific deadline.
Accordingly, the Assignment Instance concept was developed for Classroom Instruction Courses.
By creating a special course instance and checking the Assignment Instance checkbox (It is also recommended that the Available Dates section be set to a date very far in the future, for example 12/31/2050) and by selecting this Assignment Instance after adding a Learning Object (Course) to an Assignment, the Assignment Scheduler service will place all in-scope users temporarily in the Assignment Instance and provide a Register button by which the users can select to register in the instance of their own choosing.
Thus, the users are given the mandatory course and deadline, but they get to select the instance that works best for their schedule (subject to the max student /waitlist restrictions of the instance).
Below, the Assignment / Enrollment Flow Process is detailed, for both On-Line Training and Classroom Instruction Courses. For the latter, the system logic is laid out for both the best practice of including / selecting an assignment instance and for not recommended alternative instance selections (or lack of selection).
Assigning On-Line Training Courses
For On-Line Training Course, the process is simple. Since there is usually only one instance associated with an On-Line Training Course. All in-scope users are assigned / enrolled in that course instance.
For the rare occasion when there is more than one instance associated with a specific On-Line Training Course, the instance that was created most recently (the highest Instance ID #) will be the instance into which all in-scope users are assigned / enrolled
Assigning Classroom Instruction Courses
When a Classroom Instruction Course is added to an assignment, the screen refreshes and a new Learning Object Instance section is added which shows a listing of all instances of that course with both a future Available Date and a status of “Available” (sorted in descending date order).
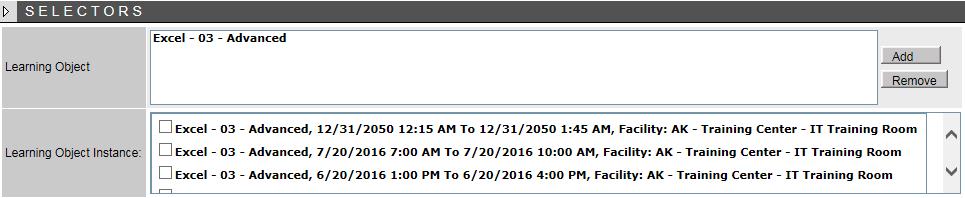
As noted previously, the Best Practice is to select the checkbox next to the Assignment Instance (Above, dated 12/31/2015).
NOTE: Only one checkbox can be selected from the Learning Object Instances shown for any particular Learning Object / Classroom Instruction Course. If two Classroom Instruction Courses are added to the Learning Objects section, for example, the (future / available) instances of each will display in the Learning Object Instance section. You may select one checkbox from the different instances listed for Classroom instruction Course #1 and one checkbox from the different instances listed for Classroom instruction Course #2. This system will allow you to change selections, but not make multiple selections within the instances of a specific Classroom instruction Course.
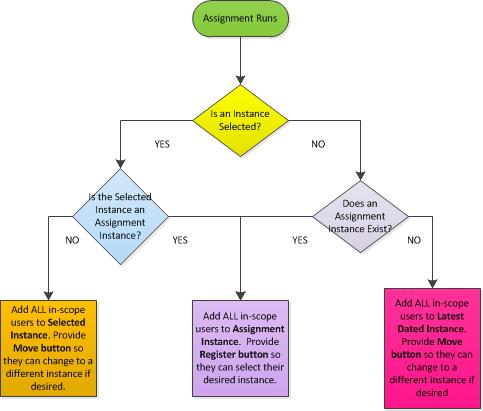
Below is a detailed breakout of the process for both the best practice and alternate, non-recommended scenarios.
Scenario #1 – Assignment Instance Selected (Best Practice)
- If an Assignment instance is selected, the Assignment Scheduler will place all in-scope users in that assignment instance as a temporary placeholder.
- It is recommended to create Assignment Instances with dates in the far, distant future (e.g. 12/31/2050)
- When Users view their My Courses tab they will see the above Date and an icon labeled Register.
- Clicking Register will bring up a listing of all scheduled instances (beyond the current date / time).
- The user can select the radio button corresponding to their desired, scheduled class instance date / time.
- The user would then click enroll.
- The system will run normal checks regarding class availability / waitlist.
- If available, the student will be enrolled(or waitlisted if available)
- If not available, then the student will receive an error message and will need to select a different instance and repeat steps 4-7.
- Once the student is enrolled in an instance, the Register button will change to a Move button.
- This will allow the student to change their instance selection only if desired and there is availability.

Notice, the “Register” link.
- Clicking on the Register link opens up a window which allows a user enroll in the instance of their choice.
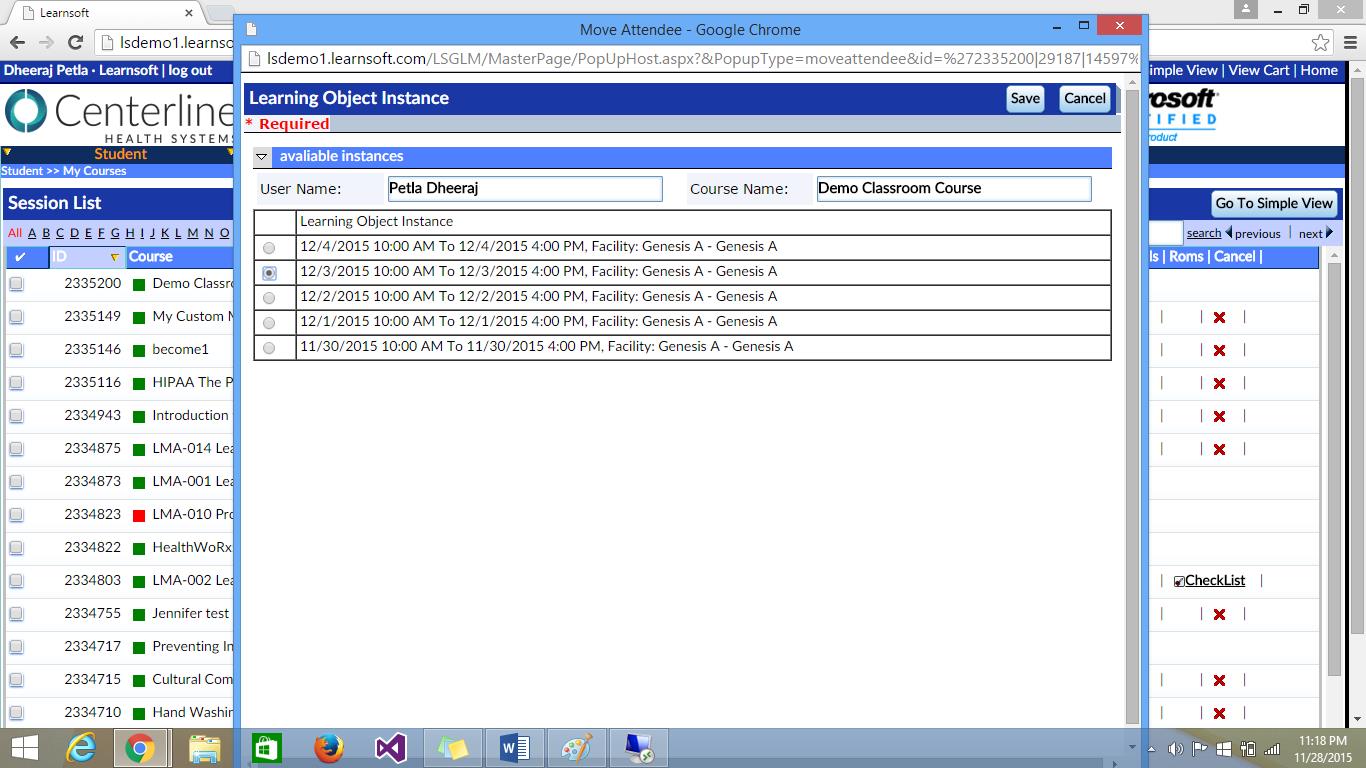
Once the user makes his/her selection…
- The user presses the “save” button
- Assuming the session has availability, the system moves the user into the desired instance.

Notice the “Register” link has been replaced with the “Move” link and the start date has the date that the user selected.
Scenario #2 – No Instance Selected AND an Assignment Instance Exists
- If NO instance has been selected and an Assignment instance exists, the Assignment Scheduler will place all in-scope users in that assignment instance as a temporary placeholder.
- If there are more than one assignment instance, it will use the one with the latest Available Date.
- When Users view their My Courses tab they will see the Assignment Instance and an icon labeled Register.
- Clicking Register will bring up a listing of all scheduled instances (beyond the current date / time).
- The user can select the radio button corresponding to their desired, scheduled class instance date / time.
- The user would then click enroll.
- The system will run normal checks regarding class availability / waitlist.
- If available, the student will be enrolled(or waitlisted if available)
- If not available, then the student will receive an error message and will need to select a different instance and repeat steps 4-7.
- Once the student is enrolled in an instance, the Register button will change to a Move button.
- This will allow the student to change their instance selection only if desired and there is availability.
Scenario #3 – No Instance Selected AND an Assignment Instance Does Not Exist
- If there is NO Assignment instance AND No Instance has been selected, the Assignment Scheduler will place all in-scope users into the Available Instance that has the latest Available date (furthest in the future).
- When Users view their My Courses tab they will see that they are enrolled in the course with the date / time of the instance with the latest Available date (furthest in the future).
- The will also have a Move button. If clicked, it will bring up a listing of all scheduled instances (beyond the current date / time).
- The user can select the radio button corresponding to their desired, scheduled class instance date / time.
- The user would then click enroll.
- The system will run normal checks regarding class availability / waitlist.
- If available, the student will be enrolled(or waitlisted if available)
- If not available, then the student will receive an error message and will need to select a different instance and repeat steps 4-7.
- Once the student is enrolled in an instance, the Move button will remain, allowing the student to change their instance selection only if desired and if there is availability.
Scenario #4 – A Single Instance (Not an Assignment Instance) Selected
- If a specific Instance, that is NOT an Assignment Instance, has been selected, the Assignment Scheduler will place all scope users into the Selected Instance.
- When Users view their My Courses tab they will see that they are enrolled in the course with the date / time of the selected instance.
- The will also have a Move button. If clicked, it will bring up a listing of all scheduled instances (beyond the current date / time).
- The user can select the radio button corresponding to their desired, scheduled class instance date / time.
- The user would then click enroll.
- The system will run normal checks regarding class availability / waitlist.
- If available, the student will be enrolled(or waitlisted if available)
- If not available, then the student will receive an error message and will need to select a different instance and repeat steps 4-7.
- Once the student is enrolled in an instance, the Move button will remain, allowing the student to change their instance selection only if desired and if there is availability.
''''Classroom Instruction Course – Assignment Flow