Delegates - Admin Guide
SECTION 1: DELEGATE - OVERVIEW
Who Should Use This Guide
This guide is for - Learning Management System (LMS) Client Super administrators and Administrators to enable them to utilize and train others in the use of the Delegates Functionality as both creators and users.
What is a Delegate?
In the Learnsoft LMS, a Delegate is similar to a distribution list in an email system. Delegates allow the creation of reusable groups of targeted users that can then be quickly added to courses, assignment and reports. As importantly, they allow for a level of filtered targeting the other sections are unable to offer.
Sample Delegate groups used by clients have included:
- All Users
- All Employees of a Particular Job Type, e.g. Managers
- All Employees in a particular Region or Division, e.g. California Team.
- Specific members of a cross functional team
- Etc.
Course Overview
The purpose of this manual is to guide administrator(s) on how to effectively create Delegates.
Upon completion, you will be able to:
- Navigate to the Delegate List
- Understand Key Elements of the Delegate List
- Add a Delegate
- Fill in the delegate info section
- Fill in the Selectors section to add and exclude users
- View Delegate Members
- Assign a Delegate to a Course Instance
- Edit delegates
- Delete delegates
SECTION 2: DELEGATES - HOW TO GUIDE:
In the Learnsoft LMS, a Delegate is similar to a distribution list in an email system. Delegates allow the creation of reusable groups of users that can then be quickly added to courses, assignment and reports.
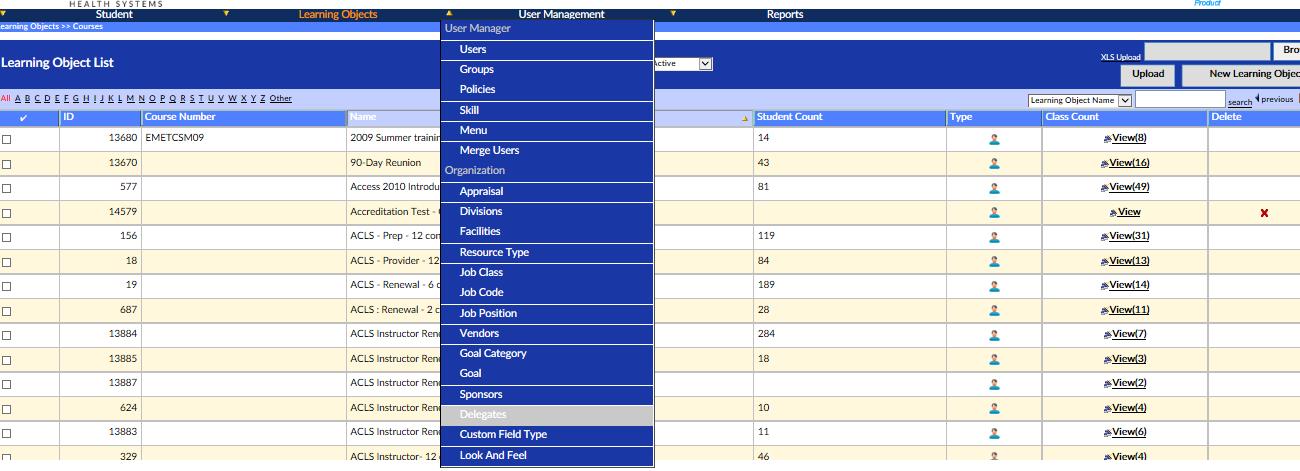
How to Access the Delegate Feature
The Delegate feature can be accessed using the Advanced View > User Management > Delegates dropdown menu.
Screenshot 1 - Advanced View > User Management > Delegates dropdown 'menu
This will bring you to the Delegate List page where you can view, edit, delete existing assignments and create (and schedule) new Delegates.
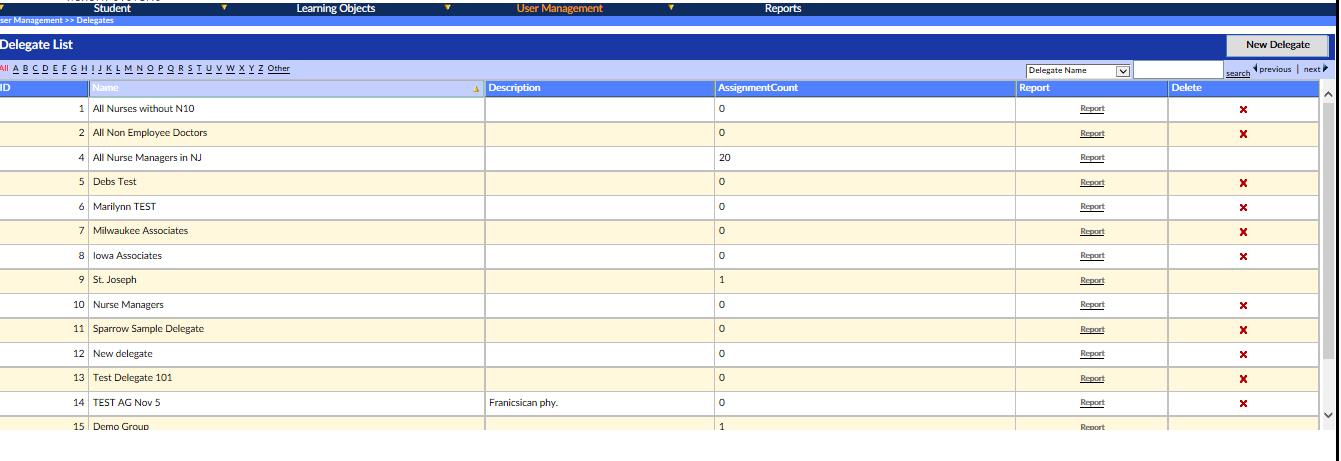
Screenshot 2 - Delegate List - New Delegate button highlighted
Delegate List - Explanation of Column Data
The Delegate List uses the standard Microsoft tabular design found in many elements of the Learnsoft LMS system. The data can be searched by specific starting letter or delegate name. It also has a header row with specific column headers, some of which are click sortable (one click for ascending; a second click for descending). Each row lists key data pertaining to each specific delegate, as well as links to accessing further details, viewing an associated report of members or deleting the delegate. Below is a brief listing of each column.
- ID - System generated number delegate ID number based on order of creation.
- The default sort order is by ID, ascending
- Name - Creator defined name for the delegate
- Description - Creator defined description of the delegate.
- Assignment Count - number of assignments
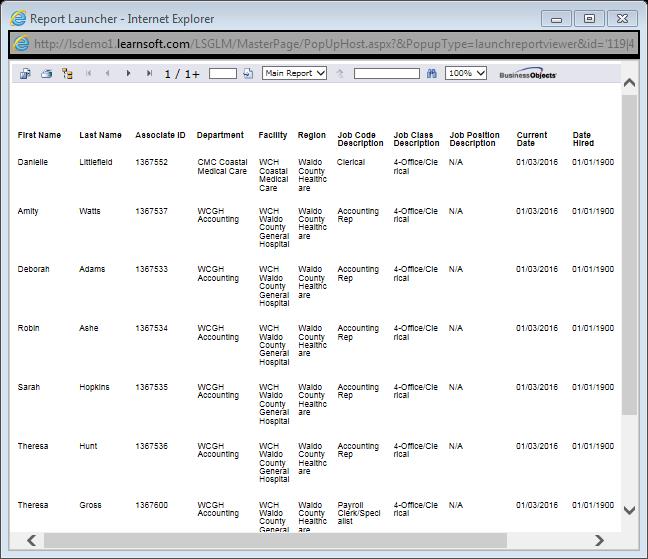
- Report - A link to a separate report which provides a listing of all the user-members of the delegate (see screenshot 3)
- Delete - A link to delete the delegate (see section How to Delete a Delegate)
Screenshot 3 - Delegate List Report
How to Add an New Delegate to the LMS System
To create a new Delegate, Access the Delegate list by navigating to the Advanced View > User Management > Delegates drop down menu as shown in the previous section.

Screenshot 3b - Delegate List - New Delegate button
- Click on the New Delegate button.
- This will launch the Delegate details page.
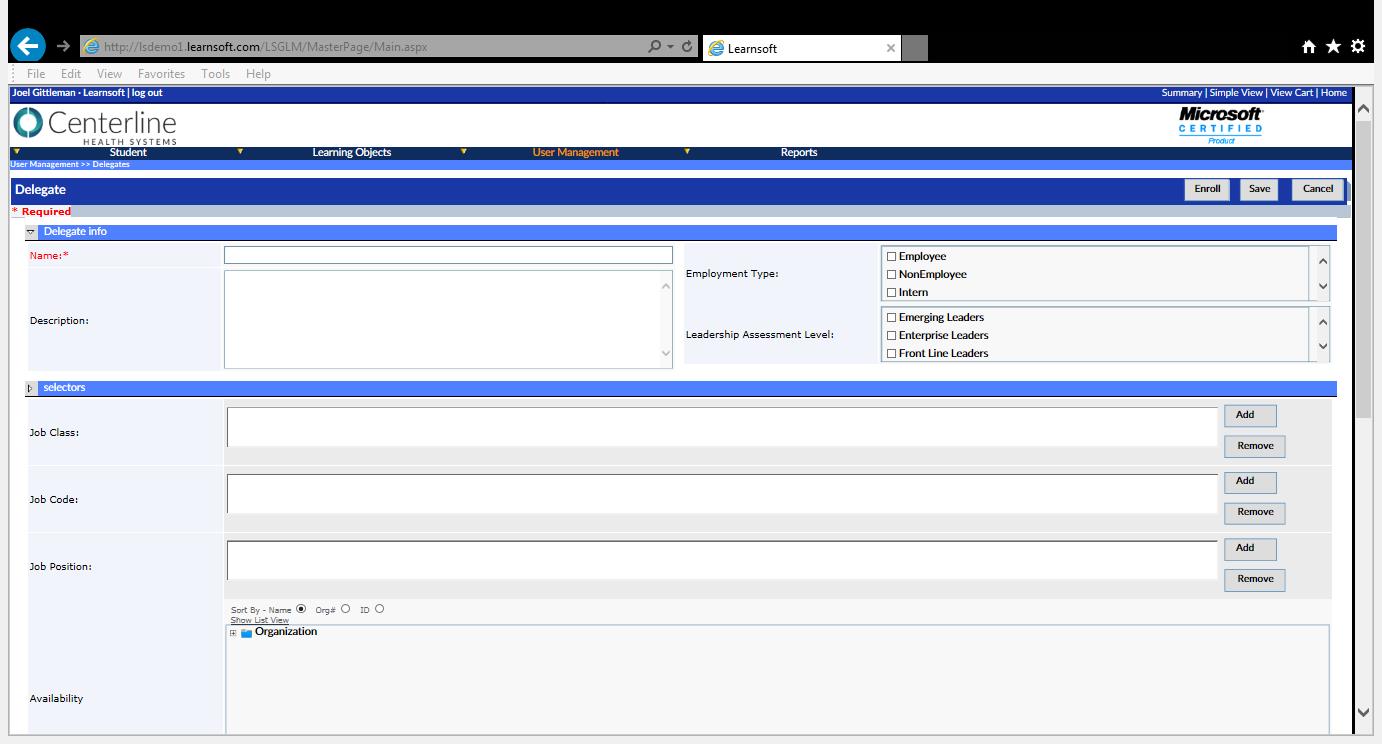
The Delegate details page has two main sections; Delegate Info and Selectors. The following subsections of this manual will provide details of each section and step-by-step instructions as to how to fill in each section when creating a new delegate.
How to Fill-in the Delegate Info Section
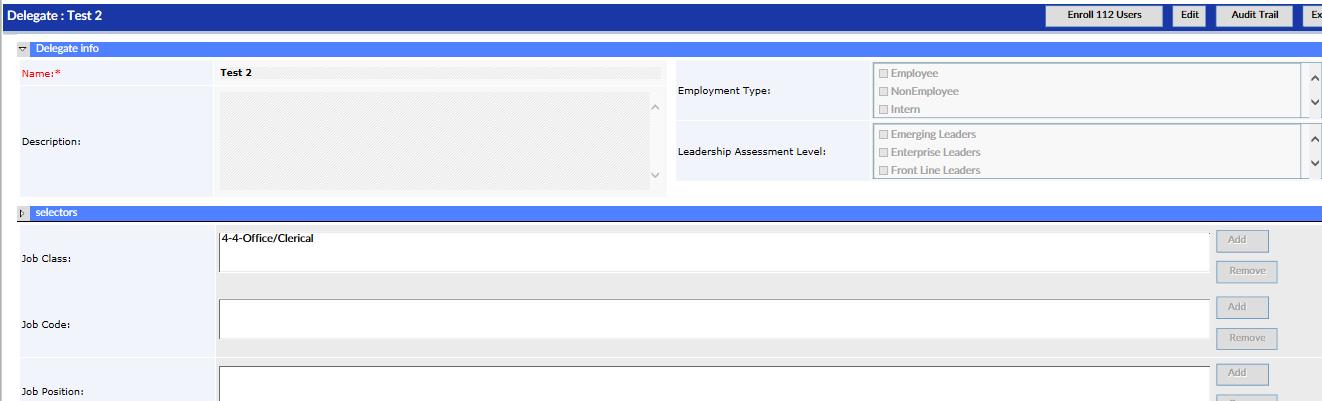
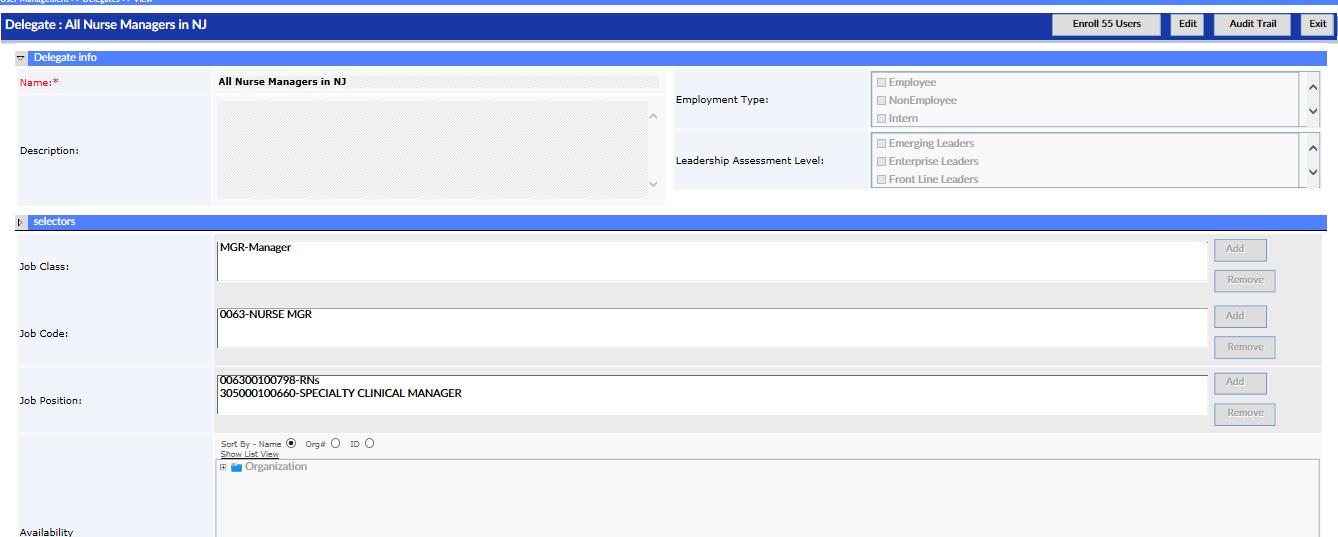
The Delegate info section of the Delegate Details page lets you name and describe the Delegate list to be created and determine if the delegate list should be associated with specific employment and leadership levels.

The only required entry in Delegate info section is a Name for the delegate list.
By default, delegates will be further detailed and refined in the Selector section of the Delegate Details page, however, two special categories of predefined groups, Employment Type and Leadership Level can be selected in this section.
Below is a listing of each of the required and optional fields (attributes) of the delegate info section along with a brief description.
Assignment Info Section - Explanation of Fields
- Name* - Creator defined name for the delegate list.
- Description - Allows for a delegate description (For Administrator Reference).
- Employment Type - Part of the Scope Process. Allows the creator to limit the delegate to users meeting a specific employment type or types from those predefined for your organization (e.g. Full Time Employees & Interns).
- If no selection is made, than any employment type is eligible to be in scope (subject to other scope restrictions made elsewhere in the assignment).
- Leadership Assessment Level - A specific Leadership type or types from those predefined for your organization (e.g. Emerging Leaders, Enterprise Leaders) If no selection is made, than this is not part of the scope process.
.
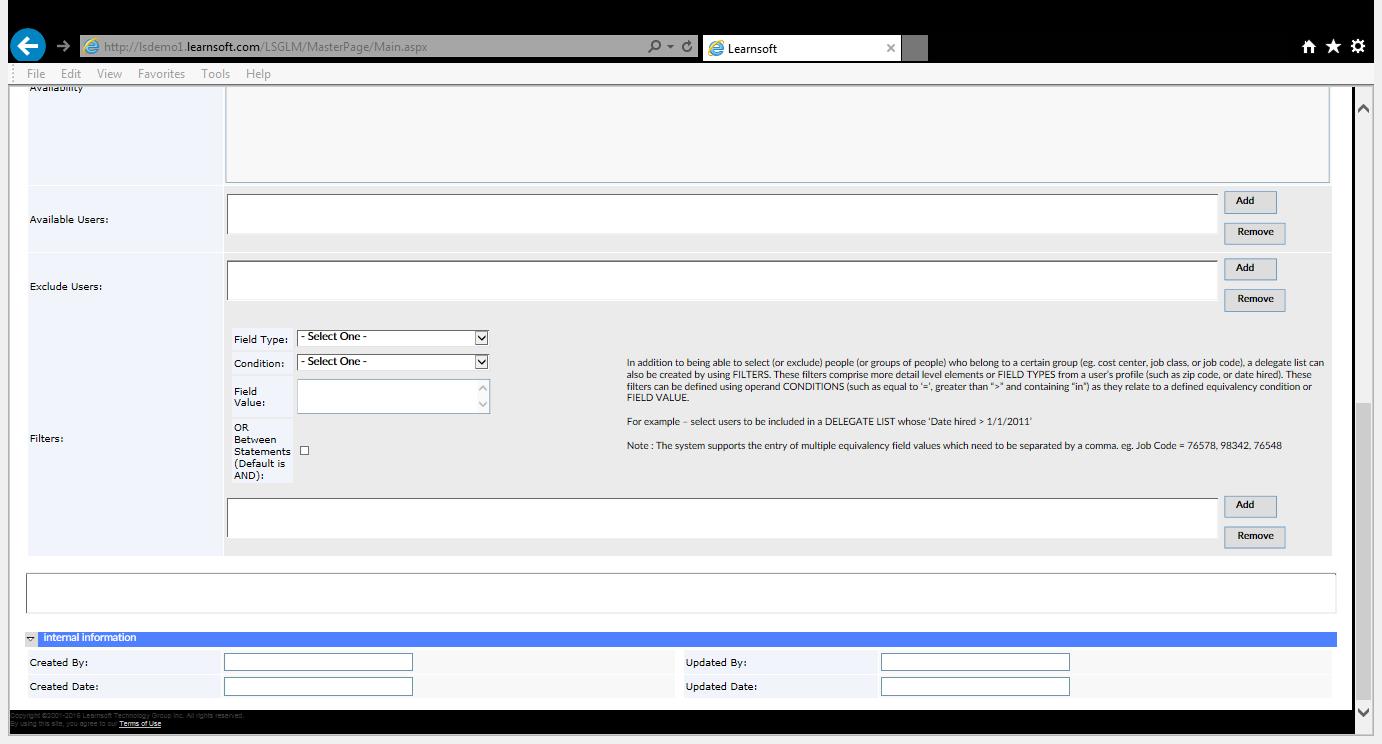
How to Fill-in the Selectors Section
In the Selectors section of the Delegate Details page, the creator is able to choose a scope by which groups of users can be added to the delegate list. Additionally, the creator can both add and exclude specific individual users.
Note: This guide assumes the CSA / Admin is familiar with using the system to select a single or multiple courses or scope selectors such as Job Position or using the tree structure of the Availability tree to select sections of an organization. If not, please see related help sections for further details as to how to utilize those specific elements presented below.
Scope of Users Selectors - Job Class, Job Code, Job Position
The Job Class, Job Code and Job Position selectors allow the creator to specify a particular job class / codes / positions or groups of job classes / job codes / job positions to include in the delegate. Job Class, Job Code and Job Position information is usually provided by the company’s HR system and associated with individual users and updated within the LMS as part of the User Import service which runs daily.
If viewable for this assignment, the Job Class. Job Code and Job Position Selectors are located at the top of the Selectors Section.

By clicking the Add button to the specific selector, the system will launch the Lookup list for the selected item in a new popup window. Here, creators will be able to search and select Job Classes, Job Codes or Job Positions in which to include as part of the scope of the assignment. Job Classes, Job Codes or Job Positions can be added one at a time or in multiple selections (by using the check box) then pressing the Add Job (Class, Code, Position) button.
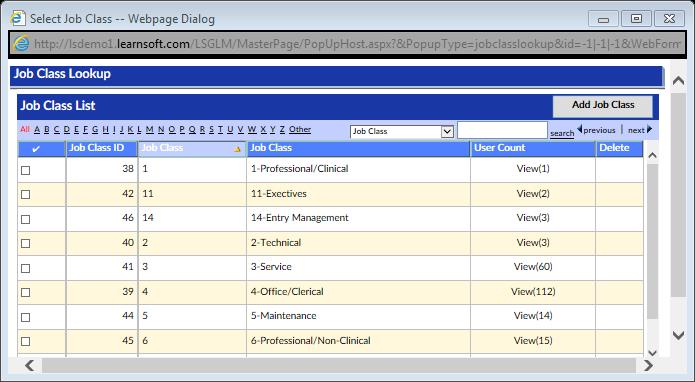
Once Job Classes, Job Codes and / or Job Positions are added they will appear in the corresponding selector textbox window.

They may be removed by first highlighting the specific Job Classes, Job Codes and / or Job Positions to remove and clicking the Remove button (While items can be added in bulk, they must be removed individually).
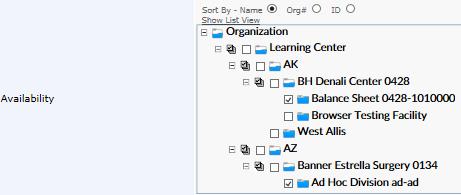
Scope of Users Selectors - Availability
The Availability selector, which uses a tree structure and usually represents some type of company organization chart, allows the creator to specify which parts of the organization to include in the Delegate list. The Availability tree is automatically built based upon data imported into the LMS as part of the User Import service which runs daily. The definitions are usually established as part of the initial LMS installation and deployment process (Please contact your project manager if changes to the Availability tree structure are required).
In the default view, the Availability selector is just below the Job Position selector.
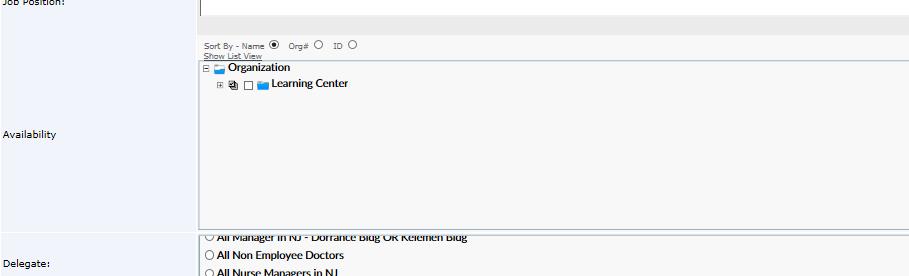
By clicking the (+) button the tree will expand to show deeper levels of the organization. (The Sort By Name, Dept, ID radio buttons allow sorting of the tree view for easier lookup for some organizations.) The creator can select which part of an organization will be eligible to be part of the Delegate list by simply clicking the checkbox next to that listing (location, division, department, etc.)
- Multiple selections can be made by selecting multiple checkboxes.
- The tree structure is recursive, that is, if a higher level of the tree is selected; all lower levels in the direct line will be included in the scope, as well.
- Items can be deselected by simply clicking again to remove the checkbox.
Scope of Users - Available Users
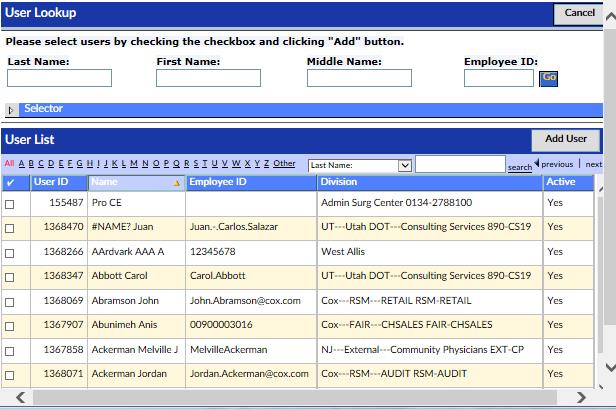
The Available Users selector allows the creator to add specific users to an assignment. The Available Users section is just below the Availability tree section

To Add a specific user or group of specific users:
- Click the Add button.
- The User Lookup / User List Screen will popup.

- Use the search screen to find the users to add.
- Check the checkbox at the left of their records.
- Click the Add User button.
- The User Lookup / User List Screen will close and the Delegate details page will be shown with the selected users added.
- If there are sufficient selected users a scroll bar will also appear.

Users may be removed by first highlighting the specific selected Available User to remove and clicking the Remove button (While items can be added in bulk, they must be removed individually).
Scope of Users - Exclude Users
The Exclude Users selector allows the creator to exclude specific users from a delegate list. This allows for more refined targeting of Delegate members.
For example, suppose the creator wants to create a delegate lists which includes all users of a specific job position (e.g. Manager), but wants to exclude 3 specific managers. They can use the selector Job position to select the Manager position and then use the Exclude users selector to select the three specific managers to remove from the delegate list.
The Exclude users section is just below the available users section in the Selectors section.
NOTE: Do not add users to Exclude list who were entered in the Available Users section. Only exclude users who would be included using the auto selectors (e.g. job code).

To Add a specific user or group of specific users to be excluded:
- Click the Add button.
- The User Lookup / User List Screen will popup.
- Use the search screen to find the users to add to the list to be excluded.
- Check the checkbox at the left of their records.
- Click the Add User button.
- The User Lookup / User List Screen will close and the Delegate details page will be shown with the selected users added to the Exclude users sections.
- If there are sufficient selected users a scroll bar will also appear.

Users may be removed by first highlighting the specific selected Exclude User to remove and clicking the Remove button (While items can be added in bulk, they must be removed individually).
Scope of Users Selectors - Filters
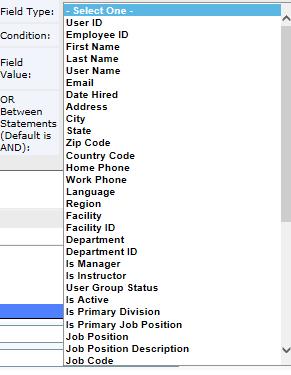
In addition to being able to select (or exclude) people (or groups of people) who belong to a certain group (e.g. cost center, job class, or job code), a delegate list can also be created by using FILTERS. These filters comprise more detail level elements or FIELD TYPES from a user's profile (such as zip code, or date hired).
Field Types represent variables that are typically found in a User’s profile and usually generated by the company’s HR system and imported into the LMS system as part of the daily User Import service. The detailed level of Field Type in the filters section is far greater than those available in the above selectors sections or in similar distribution features, such as reports or assignments, allowing for greatly detailed selection.
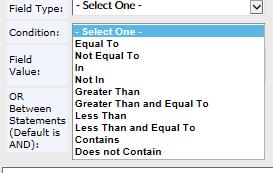
These filters can be defined using operand CONDITIONS (such as equal to "=", greater than ">"and containing) as they relate to a defined equivalency condition or FIELD VALUE.
For example - select users to be included in a DELEGATE LIST whose Date hired > 1/1/2011
Note: The system supports the entry of multiple equivalency field values which need to be separated by a comma (e.g. Job Code = 76578, 98342, 76548).
The Filters subsection can be found at the bottom of the selectors section.
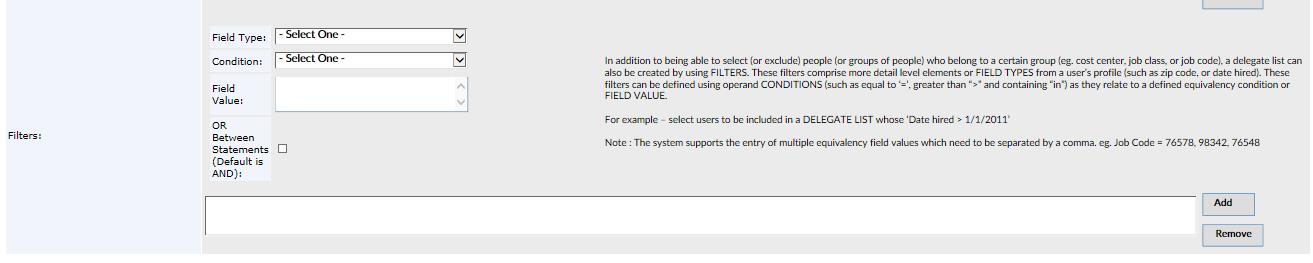
To create a filter
- Select a Field Type from the Field Type Drop Down menu.
- Select an mathematical operator from the Condition dropdown box
- Enter a value in the Field Value textbox
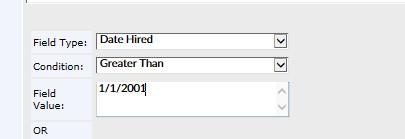
- Click the Add button to enter the formula into the filter
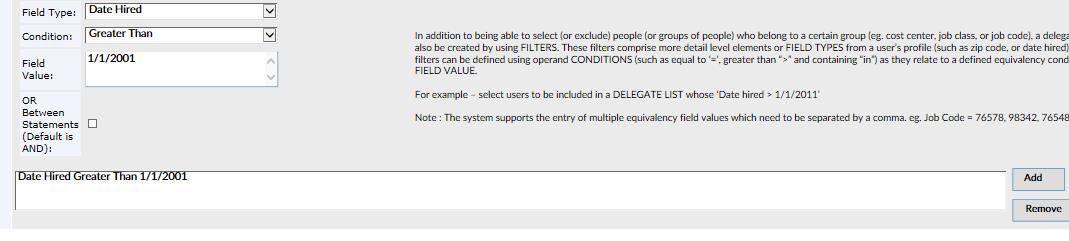
Screenshot 21 - Filter formula added
- If multiple formulas are being used for even greater refinement, repeat steps 1 - 4 above
- Creators can select (check) the Or Between Statements checkbox if desiring to use an OR rather than an AND function between multiple filter formulas
- For further information see Section 3 - Advanced Concepts and Best Practices
- To remove, simply highlight the filter formula and click the Remove button.
How to View Delegate Members
Once a delegate has been created and saved, the LMS system will associate specific users as part of the delegate. There are two methods to view members of a delegate:
- View a report of delegate members from the delegate list
- Navigate to the Delegate List using the Advanced View > User Management > Delegates dropdown Menu.
- Use the sort and search functions to find the row of the desired delegate.
- Click on the Report hyperlink found in the Report Column of the row of the delegate which you wish to review.

This will launch a report listing all users associated with this delegate. This report can be viewed, printed or exported (for example to a .pdf or excel file)

Screenshot 23 - Delegate List Report
- View a listing of the top 100 delegate members from the delegate details page
- Navigate to the Delegate List using the Advanced View > User Management > Delegates dropdown Menu.
- Use the sort and search functions to find the row of the desired delegate.
- Click on the row of the delegate to launch the delegate details page.
Screenshot 24 - Delegate Details page
- View the Enroll button to see a summary of the total number of users that are member of the selected delegate
- Navigate to the bottom of the Selectors section of the Delegate Details page just below the Filters selector.
- A textbox on the bottom will provide a listing of the total number of delegates and a scrollable list of (up to) the top 100 delegates in the list.

How to Add a Delegate to a Learning Object / Course Instance
Once a delegate has been created and saved, the LMS system will allow those with Policy access permission to Enroll Delegates into Learning Object / Course(s) instance.
To add a Delegate to a Learning Object / Course Instance from within the Delegate Feature.
- Use the Advanced View > User Management > Delegates dropdown Menu to navigate to the Delegate List.

- In the section Delegate List, click on the row of the specific Delegate you wish to edit and the associated Delegate Details page will load with option button on the top right.

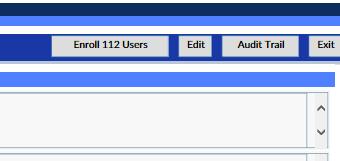
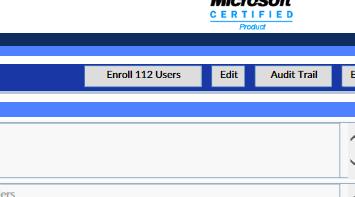
- Click Enroll xx Users to enroll the users in a Learning Object / Course.
- :# Xx is the number of users that are part of the scope of the delegate
- The Learning Object Instance List will launch in a popup window.
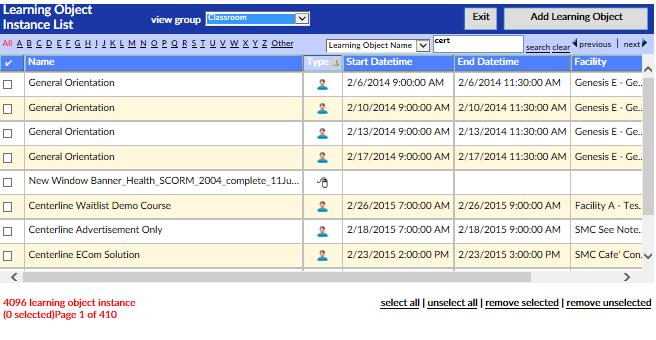
- Use the filters and lookups to find the desired Instance(s) and check on the boxes in the left most column to select those instances.
- Click on the Add Learning Object button to enroll the delegate.
- Click Exit if wishing to cancel.
- The popup window will close and the Delegate List will reopen. It will show a listing of each delegate member and provide confirmation (or a notice if unable to confirm) of their enrollment in the instance.

- Click Exit to return to the Delegate list.
How to Edit a Delegate
- To edit a delegate, use the Advanced View > User Management > Delegates dropdown Menu to navigate to the Delegate List.

- In the section Delegate List, click on the row of the specific Delegate you wish to edit and the associated Delegate Details page will load.
- Click the Edit button to enter Edit mode.
- Click Exit to cancel and return to the Delegate List
- Click Audit Trail to see the audit trail associated with changes to this Delegate
- Click Enroll xx Users to enroll the users in a Learning Object / Course or Certification (See prior section for details)
- Xx is the number of users that are part of the scope of the delegate
- Edit as desired.

- Click Save to save the edits.
- Click Cancel, to cancel any changes.
- Click Clone to create a separate delegate with the same parameters.
How to Delete a Delegate
- To delete a delegate, use the Advanced View > User Management > Delegates dropdown Menu to navigate to the Delegate List.

- Click on the delete (X) button to the right of the row of the Assignment you wish to delete.
- A pop-up box will ask you to confirm this deletion.
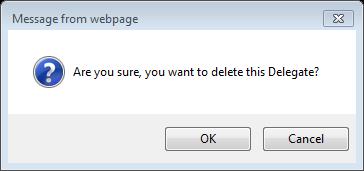
- To confirm deletion, click the OK button.
- To cancel, click Cancel.
SECTION 3 - DELEGATES - ADVANCED CONCEPTS
Advanced Concepts - Filter Formulas
- Multiple Formulas, by default, use an AND function, that is both formulas must be True for a user to be added to the delegate
- For Example if the following two filters were entered:
- Date Hired Greater than 1/1/2016
- First Name Equal to John
- Based on the above, by default only users hired after 1/1/2016 AND whose name was John would be included.
- Creators can select (check) the Or Between Statements checkbox if desiring to use an OR rather than an AND function between multiple filter formulas
- Based on the above, users hired after 1/1/2016 or users named John would be included