Users - Admin Guide
Section 1: Users - Overview
Who Should Use This Guide
This guide is for - Learning Management System (LMS) Client Super Administrators (CSAs) and Administrators to enable them to utilize and train others in the use of the Users Feature and Functionality.
Users - Overview
The Users Feature allows CSAs / Admins to add, edit and manage User Information in the LMS.
Generally, Users are created automatically as part of the daily User Import Service where the latest organizational HR / ERP data is imported into the LMS system. Administrators, however, do have the capability of adding and editing User information directly, assigning groups and enrolling users in courses.
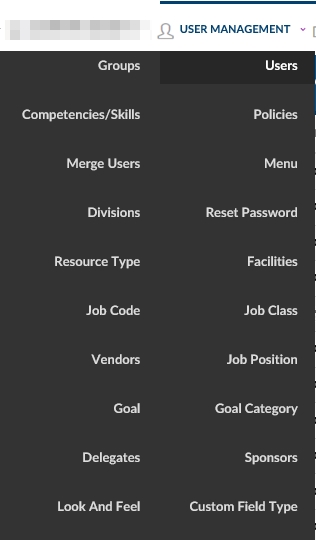
To access the Users Feature, navigate to the Advanced View, hover over the User Management dropdown menu and select Users.
Objectives
Upon completion, you will be able to:
- Access the Users Feature
- Sort, Navigate and Search for Users
- Enroll Users in Courses
- Create a New User
- Upload Multiple Users into the System
- View and Edit Individual User Profile Information
- Associate a user with a Group
- Add New Group Information To Users
Section 2: Users- How to Guide
2.1 How to Access the Users Feature
The Users Feature allows the CSA / Admin to add, edit and manage user information in the LMS.
Generally, Users are created automatically as part of the daily User Import Service where the latest organizational HR / ERP data is imported into the LMS system. Administrators, however, do have the capability of adding and editing User information directly.
To access the Users Feature:
- Navigate to the Advanced View, hover over the User Management dropdown menu and select Users.
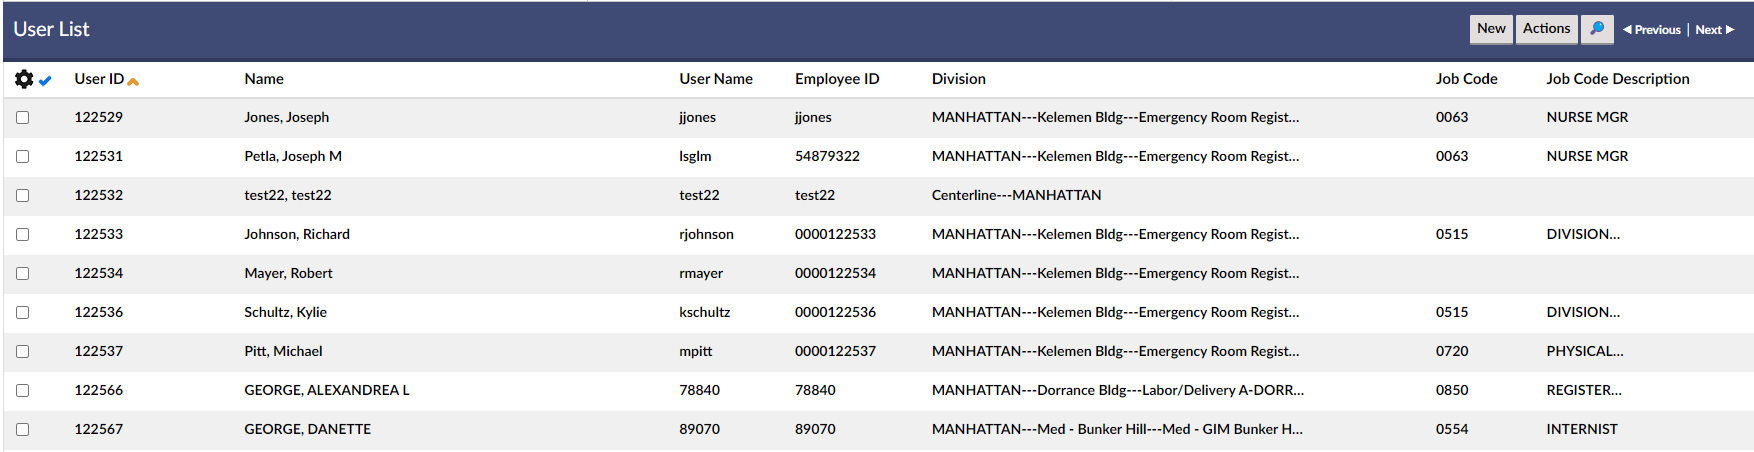
This will bring up the User List which provides a listing of all Users in the LMS system.
Screenshot 02
Explanation of Columns: User List
- - Column of checkboxes allows selection of single or multiple Job classes.
- User ID - LMS System generated ID based on order of creation.
- Name - Name of User, usually in order Last name, first Name,Middle name or initial
- Username - Unique User Name which is used throughout system for associating this user with various objects.
- Employee ID - ID of user as existing in company’s HRIS System.
- Division - Primary LMS division / department of which the user is a member.
- Active - Indicates whether the user account is active (Yes) or inactive (No)
- Last Name - Last name of User
- First Name - Last name of User
- Hire date - (Not shown in above view) User’s Hire Date.
- Job Code - User's Job Code.
- Job Class - User's Job Class.
- Job Position - User's Job Position.
- Delete - Red (X) icon. If available (usually not available) and clicked, it will ask for confirmation to delete User).
2.2 How to Sort, Search and Navigate the User List
Some of the most used and powerful capabilities of the Users Feature center around the ability to find individual or groups of users meeting specific search criteria, searching these users and sorting these users cultivated from the thousands or tens of thousands (or more) found in the original User List.
All / A- Z / Others Filters
In the top left corner, just below the title "User List" are the word "All", the individual letters A-Z and the word "others". These single click filters allow for quick filtering by the starting letter (or non-letter if "Others") of the Name field. For example, click "T" and all names beginning with the letter "T" will be selected. Click"All" to clear the individual filters and select all users.

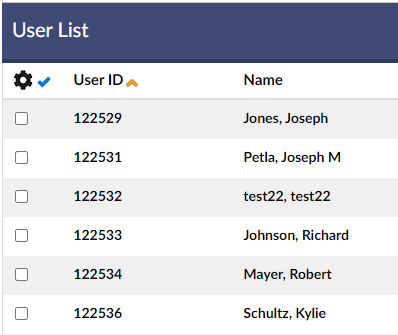
Column Headers - Sorting Function
Non-filtered or filtered search results can be sorted by alphabetically by individual column types by clicking on the associated column header (except for checkbox and delete columns). Click once for an ascending search and click a second time for a descending search.

For example, the below screenshot shows a filtered result for users whose last name begins with Z and who are sorted by hire date in descending order (newest to oldest). Notice the little yellow down arrow icon to the right of the Hire Date column header.

Field Search Dropdown / Text Search
On the right side, below the buttons, but just above the column headers is the user text search function.

This consists of the following components:
- Field Search dropdown menu- provides a listing of common user profile features from which to search.
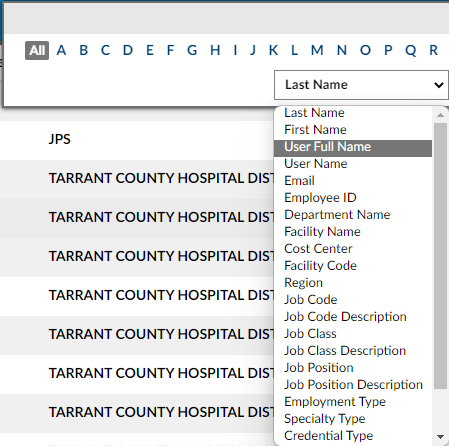
- Text Search Box - allows you to enter the term to search
- Search Link- once a field is chosen and text search has been entered, click to filter by these search parameters.
- Clear Link - only available after a search has been performed, allows you to clear search filtering and show all results from which a new search can be done. (Note: Each successive search is a sub-search using existing results only unless the clear link is selected)
To use the user search
- 1 - Use the Field Search dropdown menu and select a user profile field to search. For example, "First name".
- 2 - Enter the specific search term you wish to search by in the Text Search Box. For example "Rob"
- Note: Searches are "includes" searches, so a search for "Rob" would yield "Rob", but also "Robert", "Roberto", "Robin" etc.
- 3 - Click Search.
- 4 - A filtered result set will appear.
- 5 - To sub-search within this result set, follow steps 1 -3 with additional search info.
- 6 - To reset and enable another search from the full group, click the Clear Link.
2.3 How to Enroll Users in a Course Instance
Generally, users are added to courses using Assignments, the Add / Enroll User function of Searches or the Add Link of the Course Instance, however, once a single or group of users has been selected, they can be enrolled in a Learning Object Course through the Users Feature, as well. To do so,
- 1 - Click on the checkbox(es) to the left of the row of the particular user(s) you wish to enroll .
Screenshot 10b
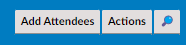
- a - You can quickly select all the users of a particular search by clicking on the Add Attendees Link at the bottom of the page.
- 3 - This will launch the Learning Object instance List in a separate popup window.
Screenshot 12a

- 4 - Use the search, sort and navigation functions to find the specific course instance or instances to which you wish to enroll the selected users in.
- 5 - Click the check box to the left of the specific instance(s)
- 6 - Click the Add Learning Object button.
- 7 - The popup window will close, the system will show a timer screen while processing and upon completion the results of the request for each individual and course will be displayed in the upper left hand between the Advanced Menu and User List.

2.4 How to Add a User - Single User Manual Entry
As noted earlier, users are created automatically as part of the daily User Import Service where the latest organizational HR / ERP data is imported into the LMS system. Administrators, however, do have the capability to add (and edit) users directly.
To manually add a User to the LMS system, follow these steps:
- 1 - Navigate to the Advanced View, hover over the User Management dropdown menu and select Users to bring up the User List.
- 2 - Click the New Users button in the upper right hand corner of the Users List.
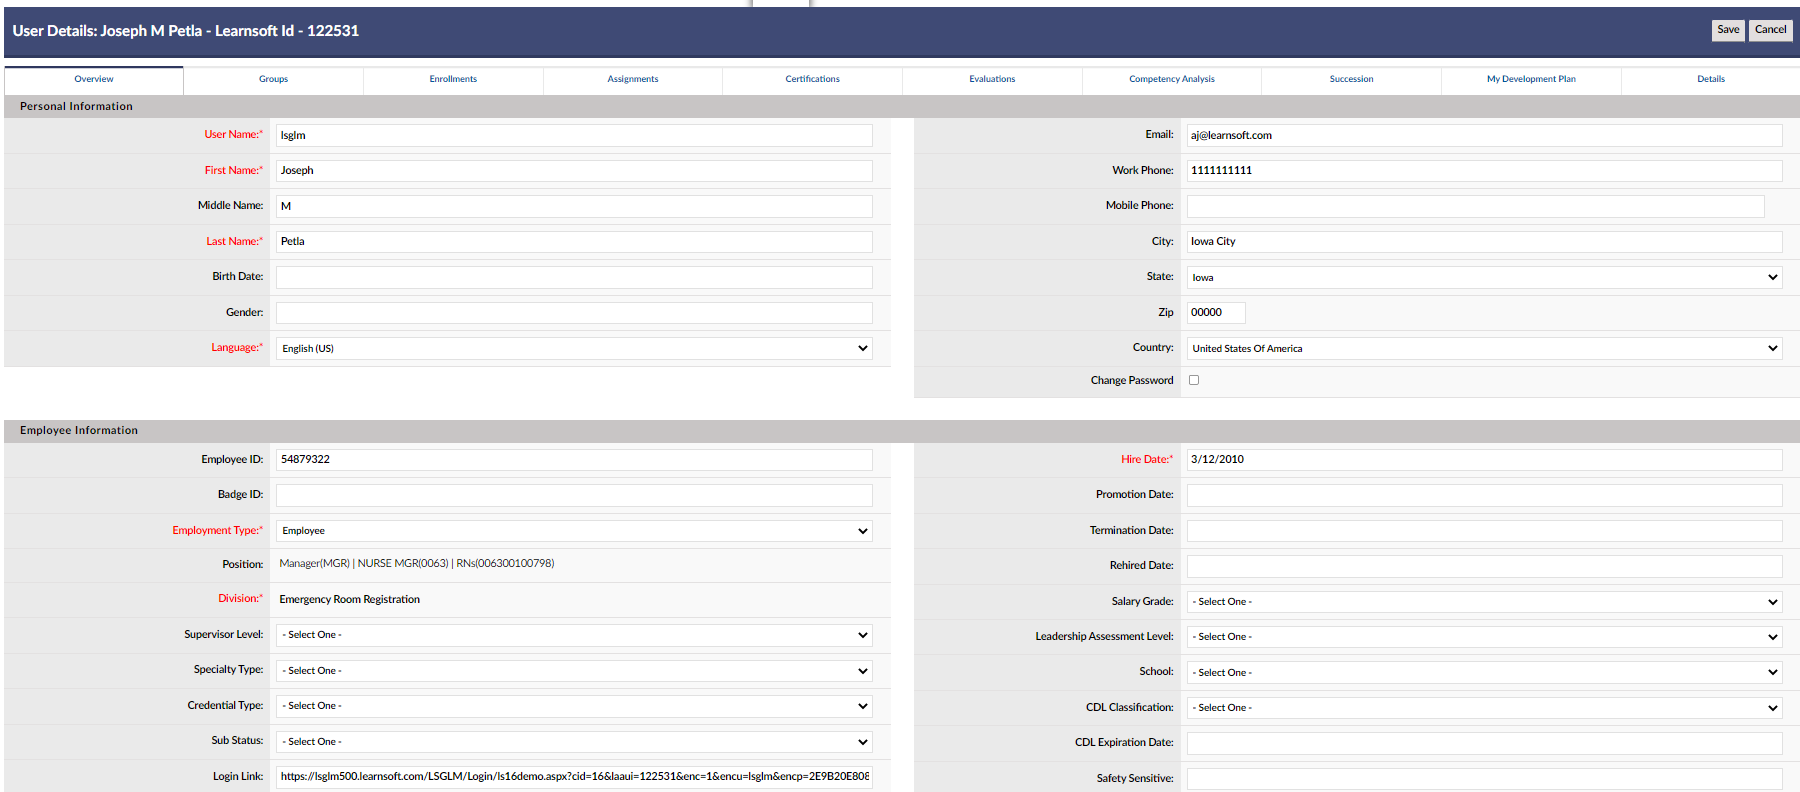
- 3 - This will bring up the New User / Users Details Screen.
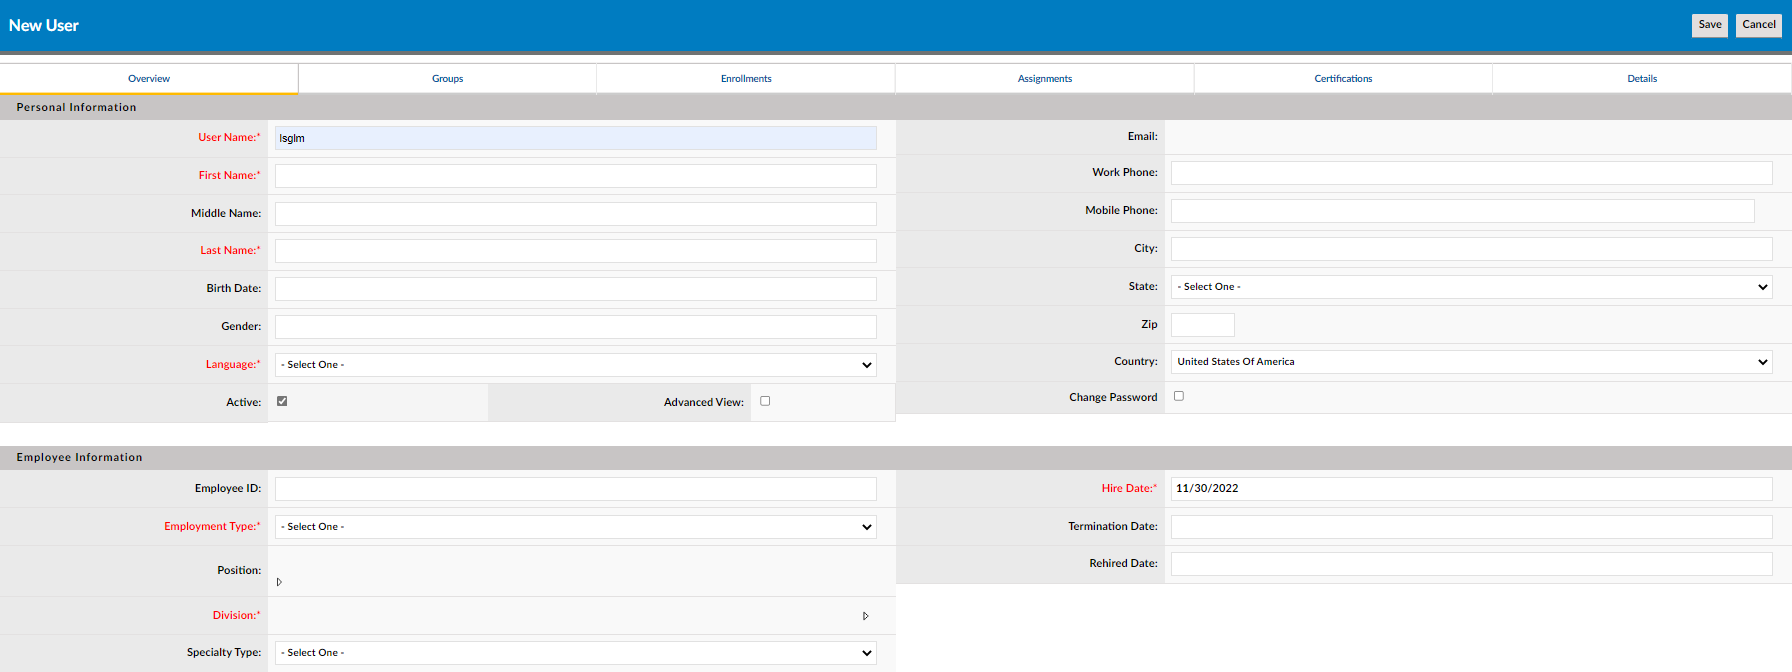
Explanation of Fields: Users Details
Required fields displayed with *:
- Employment Type*: Establishes the employment classification of the selected record. This drop down list contains elements defined during the implementation of your LMS system.
- Salutation: Salutation associated with the selected record.
- First Name*: First name associated with the selected record.
- Middle Name: Middle name associated with the selected record.
- Last Name*: Last name associated with the selected record.
- Email: (Recommended) Email address associated with the selected record. This field is used to send reminders to the user and confirm LMS activities.
- Address: Address associated with the selected record.
- City: City associated with the selected record.
- State: State associated with the selected record.
- Country: Country associated with the selected record.
- Specialty Type: Allows for selection from dropdown box (if prepopulated).
- Credential Type: Allows for selection from dropdown box (if prepopulated).
- Sub Status: Allows for selection from dropdown box (if prepopulated).
- Active: Check indicates active unchecked indicates the user is no longer active in the system.
- Change Password – Checkbox when selected allows the administrator may also choose to change the password of the account (in conjunction with New Password / Confirm Password).
- Advance View: Specifies whether or not the user associated with the selected record will have access to the Advanced View menu (must be enabled at the back end for the specific group type).
- New Password* - Starred textbox to allow entry of new password.
- ''''Confirm Password* - Starred textbox to allow re-entry confirmation of new password.
- Promotion Date - Textbox allowing for entry of date of promotion.
- Salary Grade - Allows for selection from dropdown box (if prepopulated).
- Supervisor level - Allows for selection from dropdown box (if prepopulated).
- Ethnicity - Allows for selection from dropdown box (if prepopulated).
- CDL Classification - Allows for selection from dropdown box (if prepopulated).
- Safety Sensitive - Textbox allowing for entry.
- CDL Expiration - Textbox allowing for entry of date of CDL expiration.
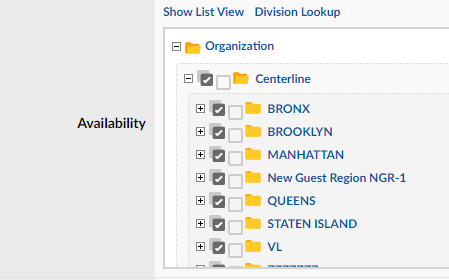
- Division*: Cost Center associated with the selected record. May be modified by clicking the icon located next to the textbox. When editing this field the Availability data tree will be displayed to assist with making the correct selection.
- NOTE: Ensure you choose Availability at the lowest, cost center / departmental level (Expand the tree fully) or it may cause problems later.
- Position: Position associated with the selected record. May be modified by clicking the icon located next to the textbox. When editing this field a data tree will be displayed to assist with making the correct selection.
- Home Phone: Home phone associated with the selected record.
- Work Phone: Work phone associated with the selected record.
- Hire Date*: Hire date associated with the selected record. This field is used to establish anniversary dates for certain assignments and annual mandatory learning activities.
- On Manual entry, will confirm to the current date.
- Termination Date: Termination associated with the selected record. Active records should not contain a termination date.
- Birth Date: Date of birth of selected user. May be utilized for assignments and license / certification renewals.
- Rehired Date: Date of rehire if user left the organization and was rehired. This field is used to establish dates for certain assignments and mandatory learning activities.
- Badge ID: Badge ID of user.
- Employee ID: (Recommended) Internal Employee ID of user.
- Cert. Division: Division associated with certification for the selected record. May be modified by clicking the icon located next to the textbox. When editing this field a data tree will be displayed to assist with making the correct selection.
- School - Allows for selection from dropdown box (if prepopulated).
- Language*: Specifies the language that will be used to display the LMS system for the selected user.
- User Name*: Specifies the User Name that will be used to login to the LMS by the user associated with the selected record.
- 4 - Enter the required fields of Employment Type*, First Name*, Last Name*, Hire Date*, New Password*, Confirm Password*, Language*, User Name* and select the associated cost center from the Availability Tree found by clicking on the Division* section icon.
- NOTE: Ensure you choose the lowest cost center / departmental level (Expand the tree fully) or it may cause problems later.
- 5 - It is recommended to enter an Email address as this field will be used for notifications of assignments, reminders, enrollments, etc.
- 6- It is recommended to add a Position as this can be useful in assigning and enrolling users in courses. To do so, click on the icon to the right of the Position textbox. This will launch the Job Position Lookup / Job List Screen in a popup window.
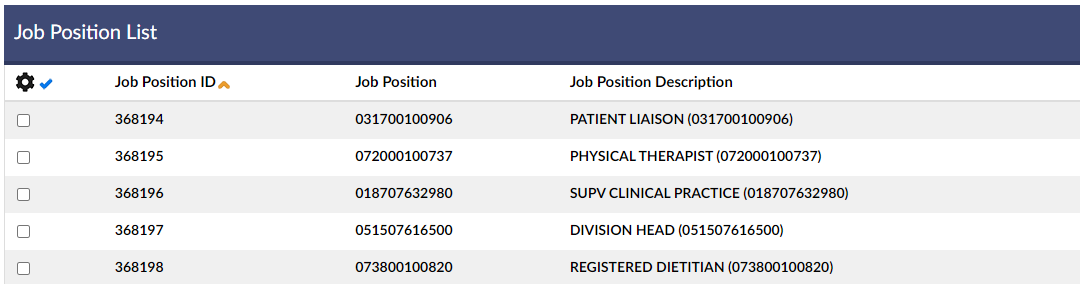
- a - Use the navigation, sort and search features to find the desired position, then click on the associated checkbox to the left, then click the Add Job Position button. The popup window will close and the Position textbox will populate with the selected position.
- 7 - Enter any additional optional field info.
Screenshot 17a - New user record with required and recommended field entries
- 8 - Once all desired information has been entered, click the Save button.
- 9 The new User will be saved and his / her Users Details Screen will reload with the updated information and additional sections, including the User's Name and system generated ID in the upper left hand corner and assignment in the Standard User Group to be found in the Available Group section.
Screenshot 18a - Saved New user record
- 10 - To return to the User List click Exit, or¦
- To make changes to the User Details, click Edit, or¦
- To enter further information to the User's profile, see the sections below.
2.5 How to Add Multiple Users Using the Excel User Uploader Feature
In areas where high volume entry may be required (Users, Courses, Rosters), the Learnsoft LMS offers the capability of adding new items en masse using a custom tailored Excel spreadsheet and an auto upload feature.
Generally, as noted earlier, Users are added to the system via integration with the organization's HRIS system and a daily User Import service. Administrators usually add or edit additional information that is not provided by this daily process (otherwise it may become overwritten by the next day's process).
For those areas where the User Import service is not being utilized or the HR system does not provide data (for example for non-employees or for employees who have not yet been entered in the HR system), the CSA / Admin has the option of adding users manually one at a time (as noted in the previous section) or in bulk using the Excel User Uploader Feature.
To do so follow these steps:
- 1 - Navigate to the Advanced View, hover over the User Management dropdown menu and select Users to bring up the User List.
- 2 - (Optional) Click on the User Upload text link in the upper right hand corner of the Users List screen.
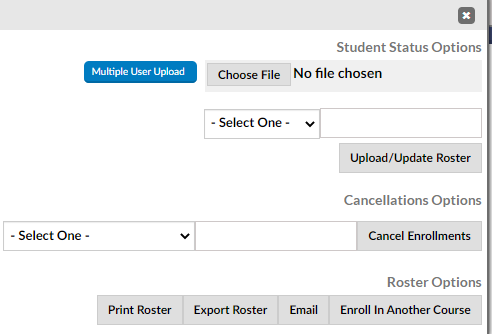
- a - This will pop up a dialog box allowing you to Open or Save an Excel File containing the template required to use the Excel user uploader.
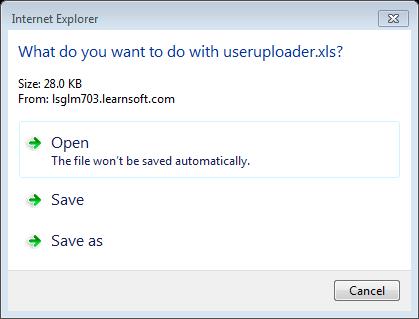
- b - Click Save (or Save as) if wishing to save for future reference and use and follow the standard Windows menu options to give permission and to select where to save the file. When ready to use open in Excel.
- c - Click Open if wishing to use the file at that time. It will launch and open in Excel (you may need to allow permission for the file to open). The Template file will contain sample data.

Explanation of Fields: Excel User Uploader Spreadsheet
(Version as of 04/28/2016)
Excel Column Field Description Format
- A LastName* User's Surname Alphanumeric
- B FirstName* User's First Name
- C MiddleInital Initials
- D Employee Id* Unique Identifier for the employee
- E SSN SSN Leave Blank
- F Region* Geographical Region where user will be located
- G Hire Date* Date user was hired / inserted into the LMS
- H JobClass* Identifier for the Job Class
- I JobClassDescription* Description for the Job Class
- J JobCode* Identifier for the Job Code
- K JobCodeDescription* Description for the Job Code
- L JobPosition* Identifier for the Job Position
- M JobPositionDescription* Identifier for the Job Position
- N Department* Department Code
- O DepartmentName* Name of the Department
- P FacilityCode* Alpha-Numeric Code for the Facility
- Q FacilityName* Name of the Facility
- R Status* A=ACTIVE or I=INACTIVE
- S Email (Recommended) User's Email
- T Username* Chosen Username
- U Password User Password
- V HomeAddress User's Home Address
- W City City
- X State State
- Y Zip User ZIP Code
- Z HomePhoneNumber User Home phone
- AA WorkPhoneNumber User Work Phone
- AB Supervisor(s) List of all the User's supervisors Employee ID (separated by pipes)
- AC EmploymentTypeName
- AD Birthdate (yyyymmdd)
- AE MergeFacilityCode (25 Characters) Does Not Apply (for acquiring new facilities)
- AF MergeDate(yyyymmdd) Does Not Apply (for acquiring new facilities)
- AG LeadershipAssessmentLevelName (500 Characters) If company tracks this
- AH DistributionCode process level if defined in HR system (e.g. Lawson)
- AI DistributionName process name if defined in HR system (e.g. Lawson)
- AJ TerminationDate (yyyymmdd)
- AK RehireDate (yyyymmdd)
- AL EmployeeBadgeNumber
- AM Hierarchy Supervisors If wanting to show in profile, employee id from bottom to top
- AN Company
- AO Specialty (250 Characters)
- AP Clinical Credentials (250 Characters)
- AQ Sub Status (250 Characters)
- AR UserLicense(s)
- AS PromotionDate(yyyymmdd)
- AT SalaryGrade
- AU SupervisorLevel
- AV SafetySensitive Yes or No Y / N
- AW LearnerGender Gender Their choice
- AX LearnerEthnicity Their choice
- AY CDLClassification
- AZ CDLExpirationDate(yyyymmdd)
- BA CustomUserFields
- BB PhotoPath (1024 Characters)
Please note that all fields with an * are MANDATORY and MUST be filled out.
- 3 - Fill in the required data and any desired optional data for each user in a separate row (without empty rows)
- Erase the Sample data row (Can be done before or after entering data for the actual new users) and make sure there is no stray data elsewhere in the spreadsheet tab.
- 4 - When finished Save the file on your local drive.
- 5 - Click the Choose File (Browse for some clients) button in the upper right hand corner to load the Windows open File dialog.
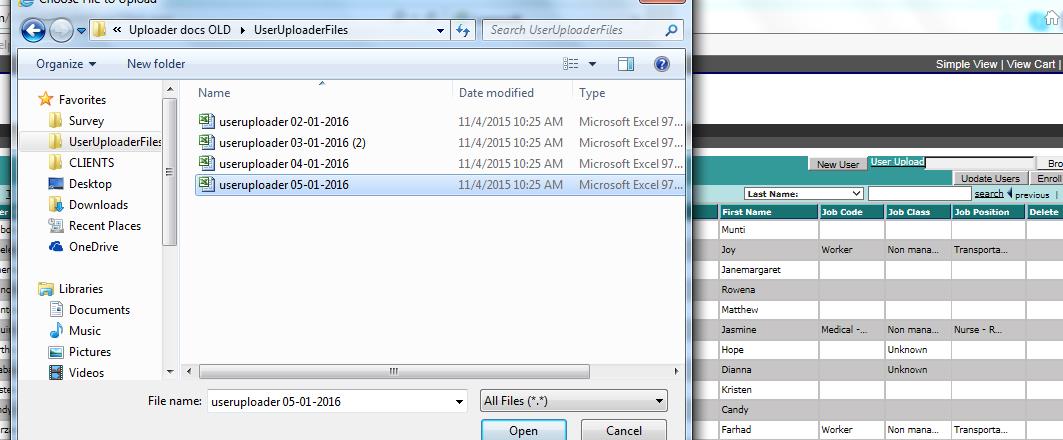
- a - Navigate to the location where the file was saved (in step 5), select and click Open.
- b - The file path should be populated in the Choose File (Browse for some clients) textbox.
- 6 - Click the Update Users button
- 7 - Wait while the system processes the users. Each record will be added and a message will display in the upper left hand corner of the user list.
- 8 - Check to ensure all users have been added. If not, or if errors, correct the sheet to ensure accurate field entry and repeat steps 4 - 10.
- 9 - Sort the list by ID in Descending Order. Your users should appear as the last items in the list.
2.6 How to Navigate the User Profile Section
When selecting a specific user within the Users Feature, the User Details page (aka User Profile) of the specific user will be accessed. At the top of the page are four buttons:
- Print Transcript - Launches a viewable report with the user's transcript information. Icons in the top left corner allow you to print or export the information.
- Edit - Puts you in "Edit Mode" so you can edit the user's profile (Click save when edits are complete).
- Audit Trail - provides a listing of recent changes made to a user's profile and by whom.
- Exit - Returns you to the User List.
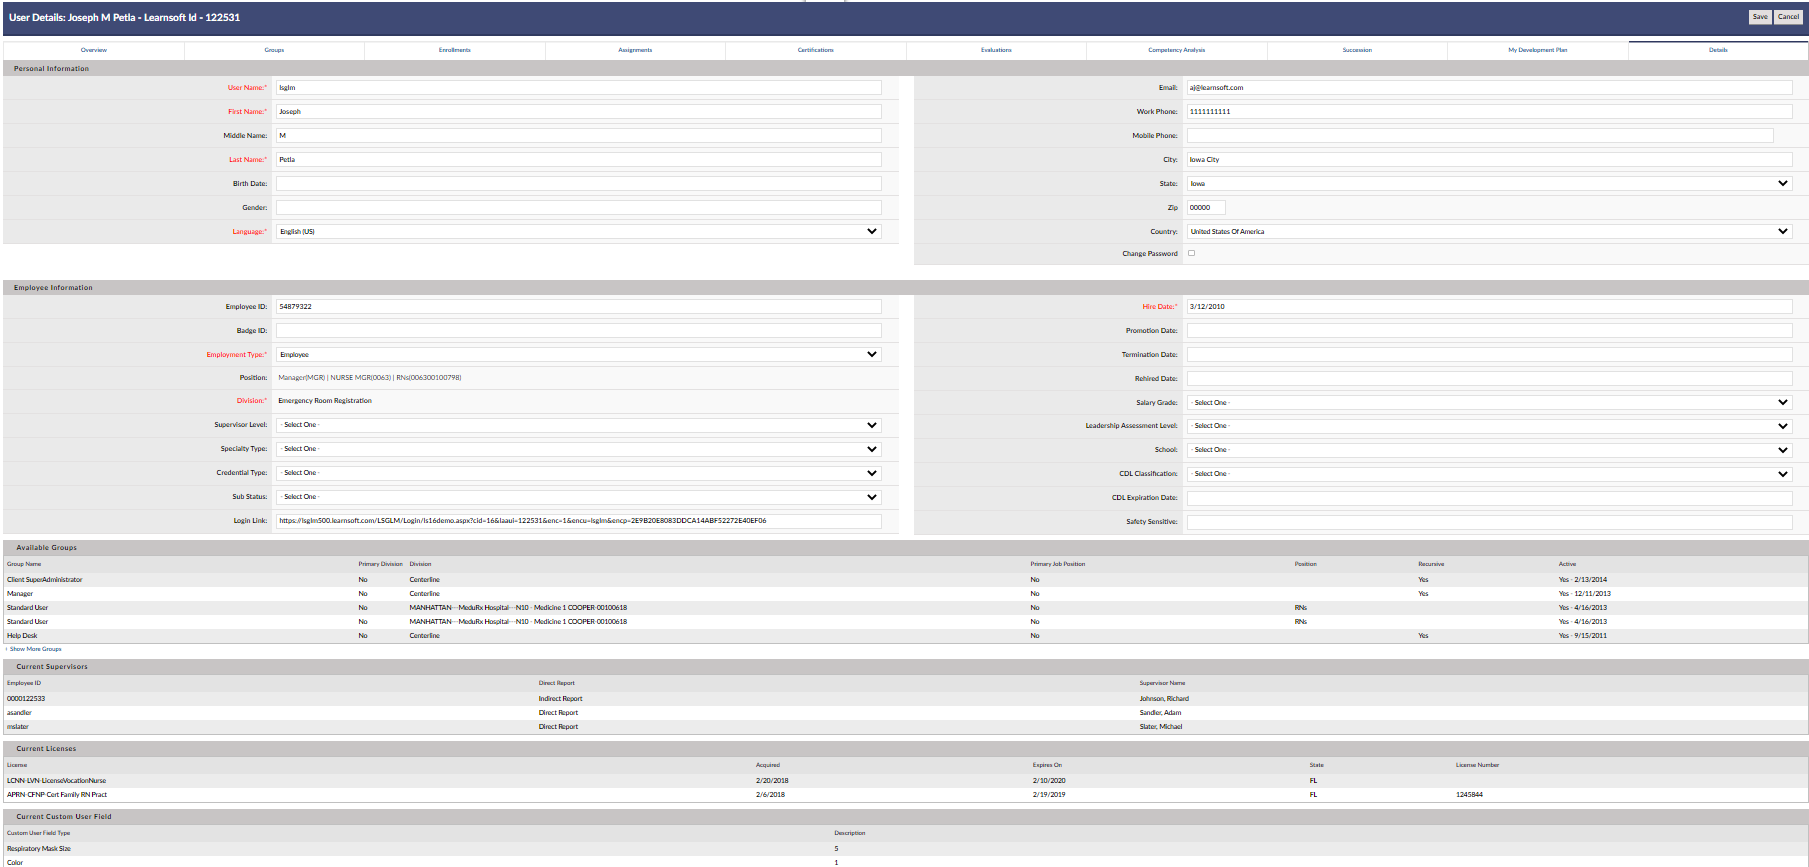
Additionally, each User Profile will consist of a series of sections, which may be accessed by either scrolling down the page or by clicking on specific Navigation Tabs which are available at the top of the profile. Note: Depending on the specific configuration, some of the tabs shown below may not be visible or accessible).
Navigation Tab Descriptions
- All - Display all profile details.
- Details - Display only the User Details sections including Details, Current Supervisors, Current Custom User Fields, Current User Preference and Attachment sections.
- Groups - Display only the Available Groups section
- Certifications - Display only the Certifications belonging to this User.
- Enrollments - Displays attachments and all the Learning Objects (Courses) and enrollment / completion status.
- Admins can Cancel enrollment in this section
- Assignments - Display all the User's Assignments.
- Skills - Display the User's Skills (Part of the ROMS Module)
- Evaluation - Displays User Evaluations (Part of the TMS system).
- Competency Analysis - Displays an analysis of the User's competency against company standards (Part of the TMS system).
- Succession - Displays information about succession planning (Part of the TMS system).
How to Add or Delete Current Supervisors
As noted earlier, Users are normally brought into the LMS as part of a daily file export process from the client HRIS system and User Import service which processes this file and adds and updates user info in the LMS. As part of this process, or when using the Excel upload process, the user's direct supervisor is also usually added to the system and available for viewing in the Details section of the User profile.
The Admin, however, has the capability to add and delete Supervisors associated to specific Users through the User profile.
To do so,
- 1 - Access the User Profile by selecting Advanced Menu, User Management, Users, finding the desired User and clicking on the row of the User's info to launch the User Details Page / Profile.
- 2 - Scroll down to the section Current Supervisors to see a listing of Supervisors associated with the User.

- 3 - To delete a currently assigned Supervisor, click on the red X in the Delete Column on the left side of the row of the specifically named supervisor.
- Confirm if asked.
- 4 - To add a new supervisor, click the New Supervisor button at the top right of the Current Supervisors section.
- 5 - This will launch the User Lookup / User List in a popup window.
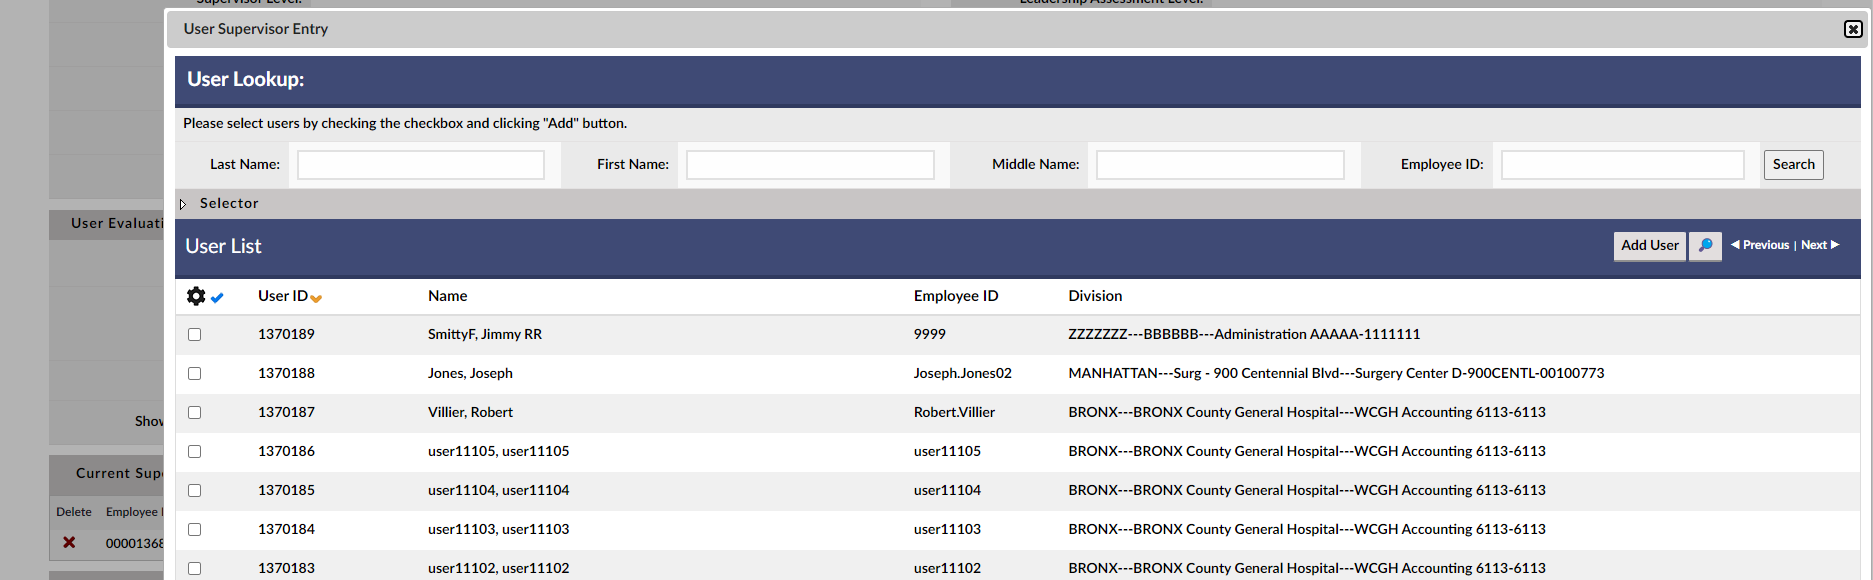
- 6 - Sort, Navigate and search as required to find the desired supervisor and click the Add User button.
- 7 -The popup will close and the selected user will be shown as a supervisor in the Current Supervisors section.
- 8 - Repeat as necessary for any additional supervisors.
How to Add, Edit or Delete Available Groups
By default, all users, when added to the system are made members of the Standard User group. Administrators can add, edit and delete additional group roles to users through the user profile as follows:
- 1 - Access the User Profile by selecting Advanced Menu, User Management, Users, finding the desired User and clicking on the row of the User's info to launch the User Details Page / Profile.
- 2 - Click on the Groups tab in the Navigation Bar or scroll down to the section Available Groups to see a listing of Groups associated with the User.

- 3 - To add a new Group, click the New Group button at the top right of the Available Groups section.
- To edit the existing info, click the pencil icon in the Edit column on the far right of the row of the group you wish to edit.
- To delete an existing group association, click on the red X in the Delete Column on the left side of the row of the specifically named group. Confirm if asked. (NOTE: It is recommended practice to edit and make a group association inactive, rather than delete).
- 4 - This will launch the Add User Group / Group Details Screen in a popup window.

- 5 - Use the Group* drop down menu to select the group to add from the prepopulated listing of all groups created for the organization.
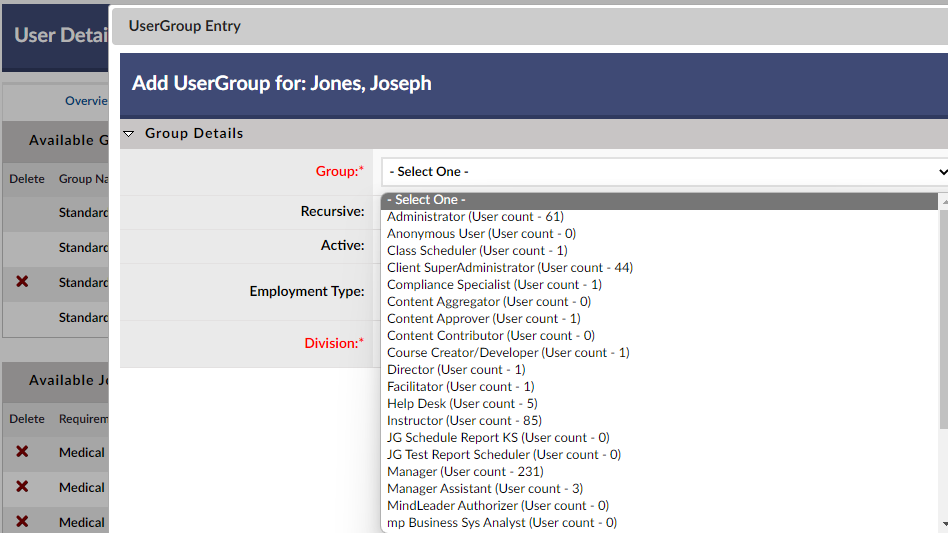
- 6 - Click the Active checkbox if wishing to make this group association active for this user.
- 7 - Click on the triangle icon to select the required Division* field from the popup availability tree.
- Use the + sign to expand the tree.
- Select the checkbox next to the appropriate division to which this group will apply.

- 8 - Enter additional optional information as desired (see below for details0.
- 9 - When all entries are complete, click Save.
- 10 - The popup will close and the new Group will appear in the Available Groups section.
Explanation of Fields: Add User Group / Group Details Screen
- Group* - drop down menu to select the group to add from the prepopulated listing of all.
- Recursive - checkbox that if selected will apply group rights to all levels of Division / Availability tree, directly below selected division.
- Active - checkbox that if selected will make this user / group association active.
- Note: When making a user inactive, ensure that all group references are also made inactive.
- Employment Type: Establishes the employment classification of the selected user for this particular group. This drop down list contains elements defined during the implementation of your LMS system.
- Position - Associates the User's job position for this particular group role.
- Clicking the yellow triangle will bring up the Job Position Lookup screen in a separate popup window. Find the desired job position, mark the checkbox to the left and click the Add Job Position button.
- Is Primary Position? - Checkbox, then when enabled indicates the position noted above is the User's primary position.
- This is both a way to change the user’s position in their profile, for example, by adding a new standard user group with the new position and making the original standard user group / position inactive and of noting which of many positions may be the user’s primary role.
- Some reports may have been customized to only provide user info for their primary role, so info is not duplicated in multiple departments.
- Is Primary Division? - Checkbox, then when enabled indicates the division selected is the User's primary division.
- Hire Date - allows for entry of hire date associated with this position.
- Division*- Primary LMS division / department of which the user is a member.
Please note that all fields with an * are MANDATORY and MUST be filled out.
How to View, Add or Delete an Attachment
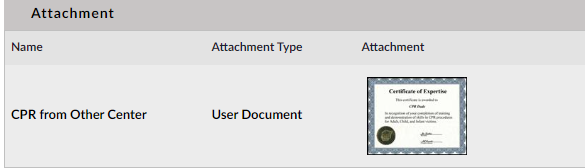
Documents can be added to the User's profile. This allows storage and association of information that may be related to learning activities, but is not part of the LMS system. Examples might include an HR Form or a scan of a certification document.
To access Attachments,
- 1 - Access the User Profile by selecting Advanced Menu, User Management, Users, finding the desired User and clicking on the row of the User's info to launch the User Details Page / Profile.
- 2 - Scroll down to the Attachment section to see a listing of Documents that have been added to the User's Profile.

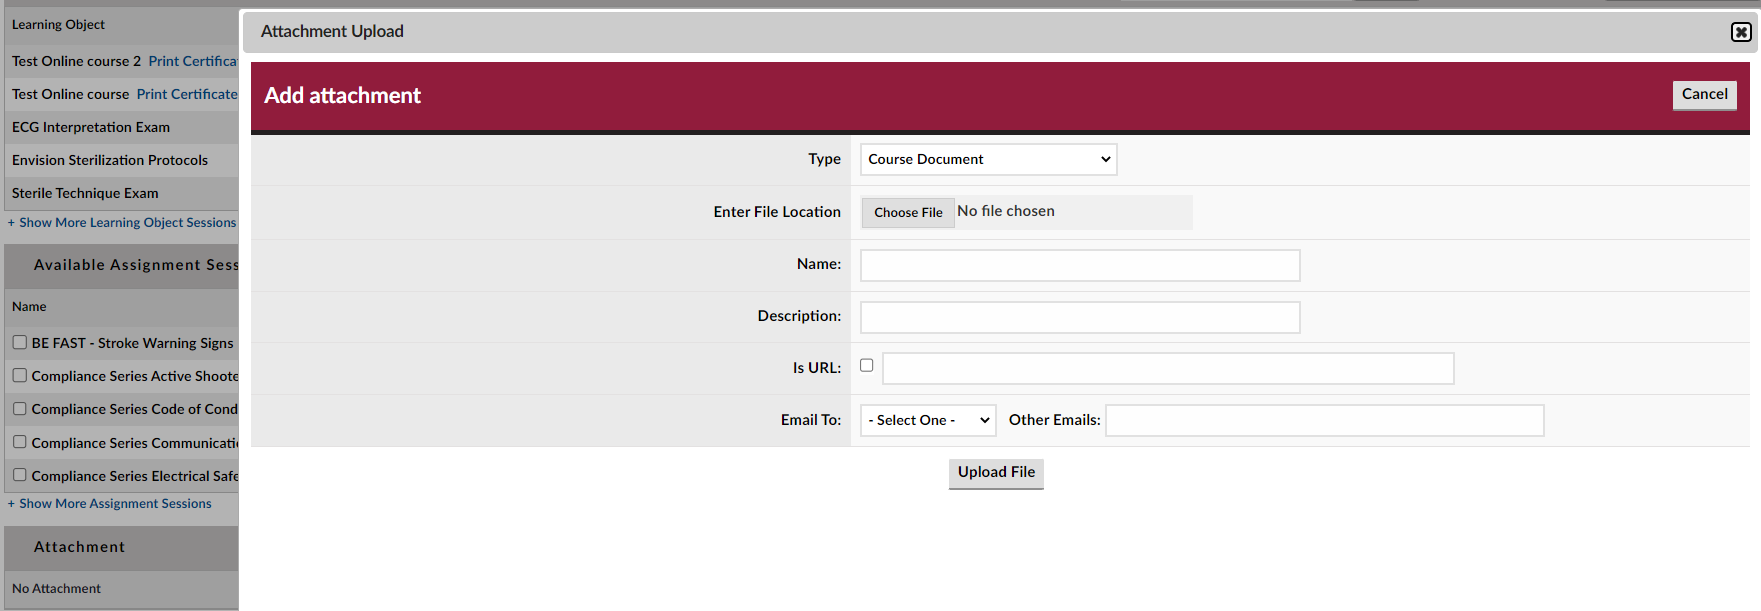
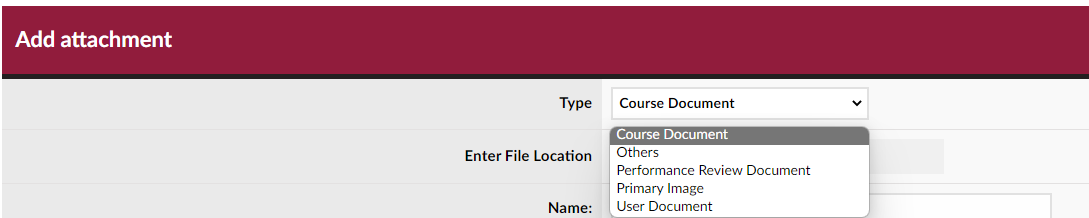
- 6 - Select the document type from the Type dropdown.
- 7 - Click the Browse button to the right of the required Enter File Location field to launch the Windows file dialog box.
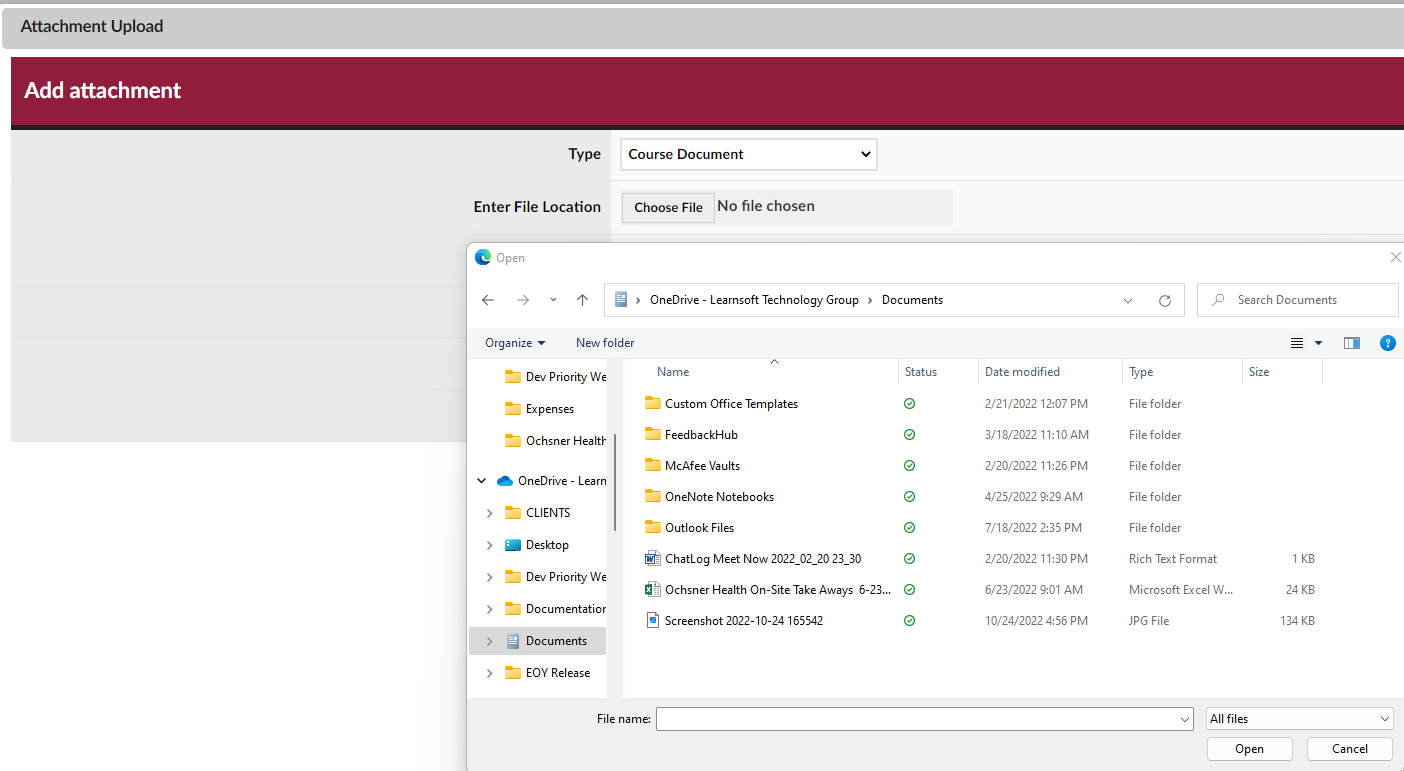
- 8 - Navigate your Windows file system to find the document you wish to upload. Select and click open.
- The path will now appear in the Enter File Location field.
- 9 - Enter a name for the file in the Name field.
- 10 - Enter a description of the file in the Description Field.
- 11 - If desiring to also email the file, select the recipient from the Email To: dropdown menu.
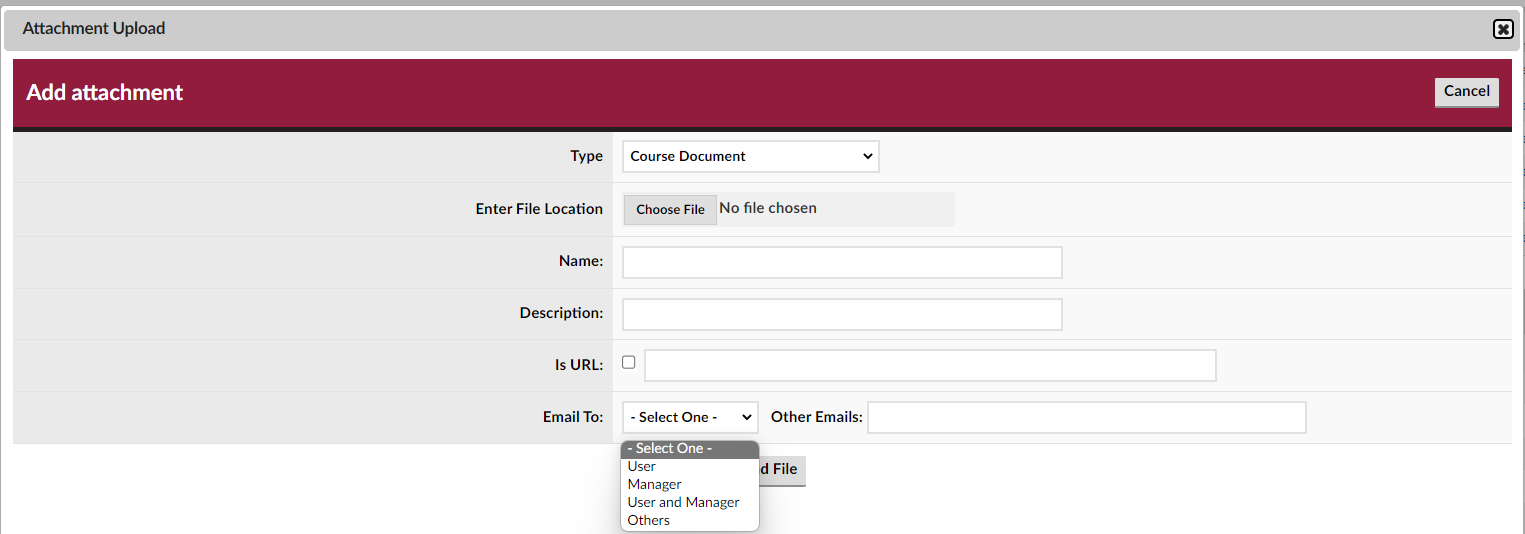
- a - If you selected Others then enter the email address in the Other Emails textbox below the dropdown.
- a-1 - Separate multiple addresses with commas (,) not the semi-colon (;) which is used by outlook.
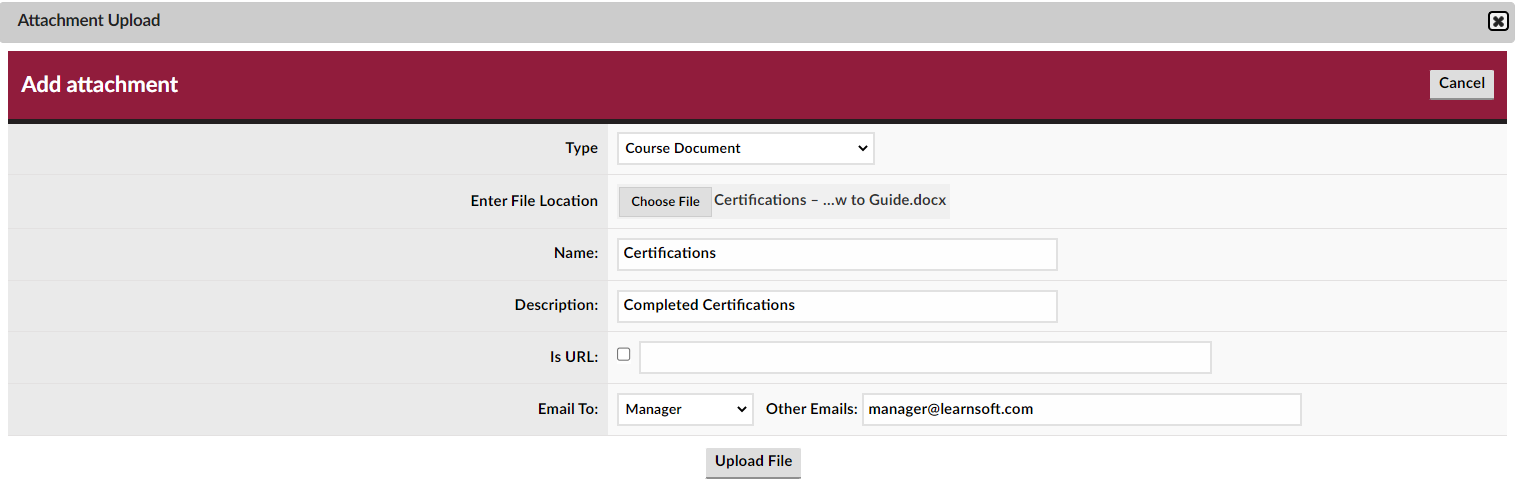
- 12 - When all entries have been made, click the Upload File button to upload the attachment to the User Profile, and if selected, email the attachment.
- 13 - The Attachment will now appear in the user's profile.
- You may need to exit the profile and return to refresh the page to be able to view the updated info.

How to Use the Available Learning Object Sessions
Users are able to access a listing of their currently enrolled and their completed courses by navigating to the Courses / Transcripts sections, respectively when in the simple view. Admins and managers can see a historical listing of all student Learning Session (Course) objects by navigating to the Available Learning Object Sessions of the User Profile. You can also Cancel current enrollment and view associated course attachments.
To access Available Learning Object Sessions,
- 1 - Access the User Profile by selecting Advanced Menu, User Management, Users, finding the desired User and clicking on the row of the User's info to launch the User Details Page / Profile.
- 2 -Either click on the Enrollments tab of the Navigation menu or scroll down to the Available Learning Object Sessions section to see an abbreviated listing of all the user's learning objects.

- 3 - To see a full listing of Learning Object Sessions, click the Show More Learning Object Sessions text link at the bottom left of the listing. This will expand the list to show all the sessions.
- Note, depending on user activity, this may require scrolling for several pages
Explanation of Columns: Available Learning Object Sessions
- Learning Object - The name of the course.
- Status - The student's status (e.g. Enrolled, Cancelled (by whom), Complete)
- Complete Date- Date of Completion
- Type - Course Type (e.g. On-line, classroom, manual, historical) and ability to launch online course if enabled
- Start Date - Course Start date
- Score - Score of associated test or grade by instructor
- Assignment - How the course was enrolled (e.g. Elective (self), Enrolled (by Whom), Mandatory (Assignment Name) and Deadline if any)
- Attachment - a link to course attachments
- Actions - Allows the Admin to cancel the course session and provide the reasoning.
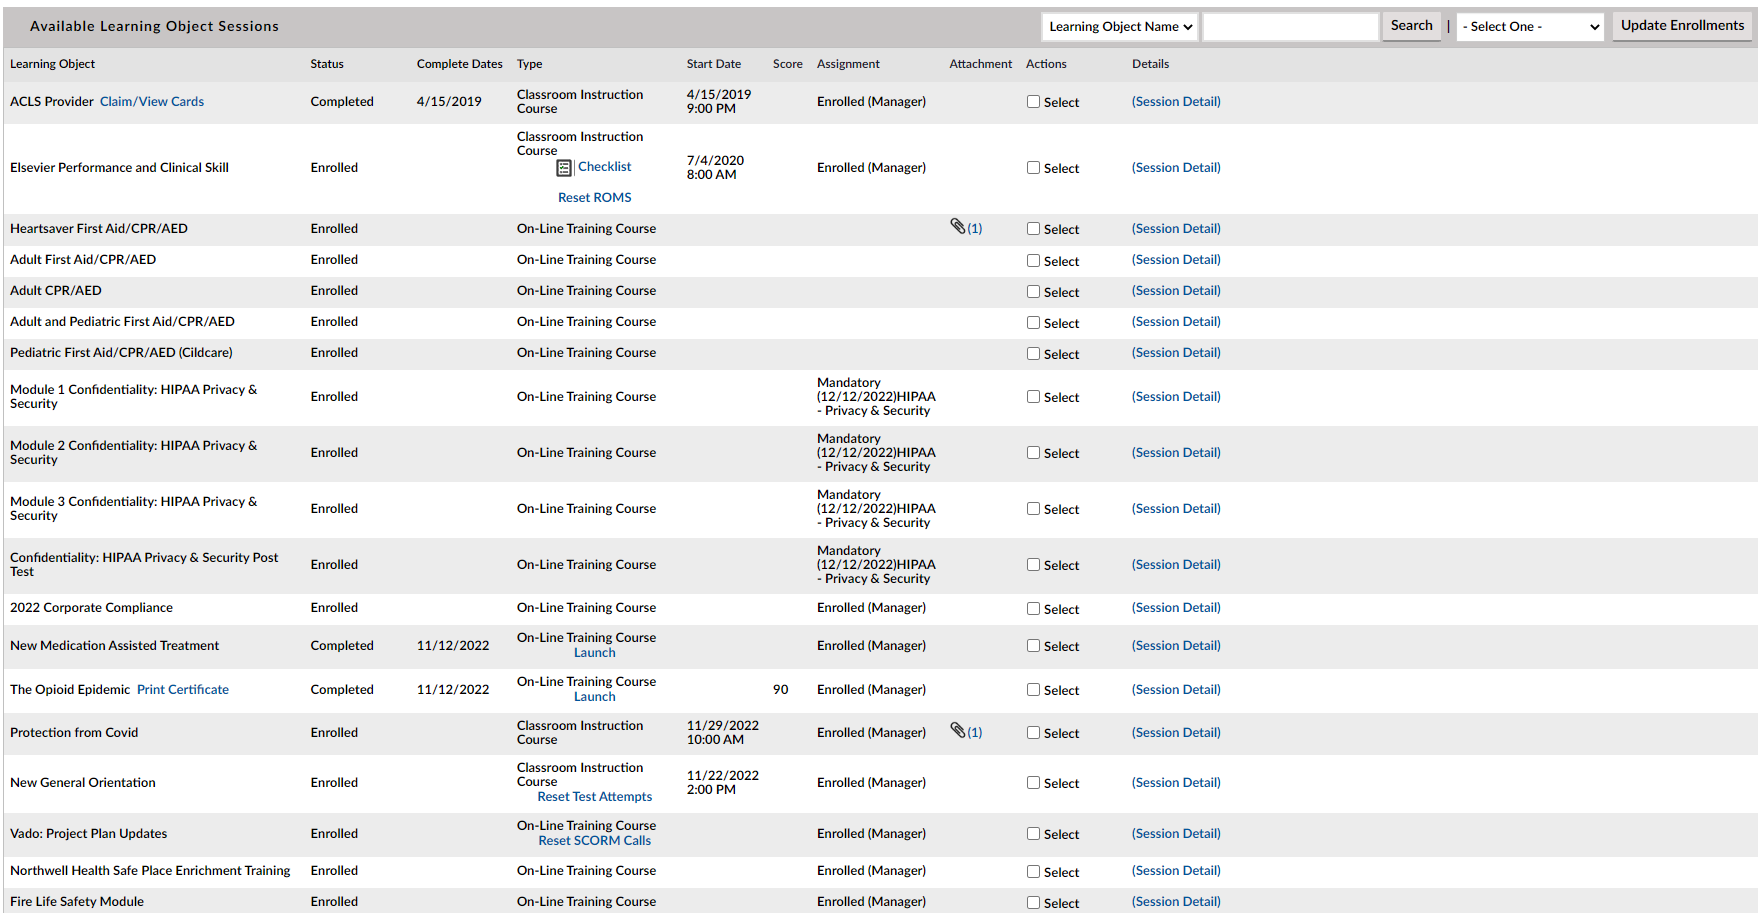
- 4 - Columns with underlined text in the header are sortable by clicking the text heading.
- You can toggle ascending / descending sorts with each additional click.
- 5 - Review desired information and / or view any course or course attachments by clicking on the associated links.
- 6 - If a User is in the Enrolled Status and you have sufficient policy rights, you may cancel a user out of a learning object session by either:
- a - Click the Cancel link next to the red X in the Actions column to the right of the row of the course to be cancelled;

- a-1 - Confirm by clicking Okay in the confirmation pop up box.

How to View Information in the Assignments Section
Administrators can view a listing of assignments that have been associated with this particular user.
To do so,
- 1 - Access the User Profile by selecting Advanced Menu, User Management, Users, finding the desired User and clicking on the row of the User's info to launch the User Details Page / Profile.
- 2 - Either click on the Assignments tab of the Navigation menu or scroll down to the Available Assignment Sessions section to see an abbreviated listing of all the user's assignments.
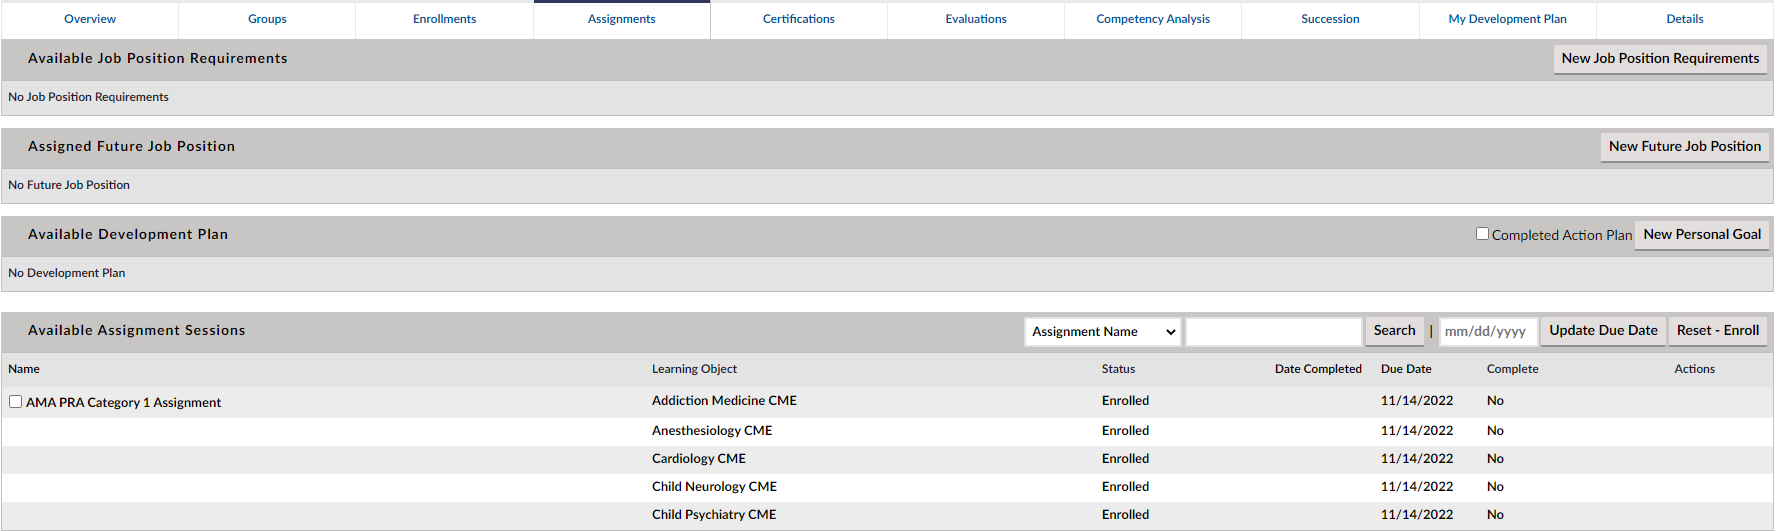
- 3 - To see a full listing of Available Assignment Sessions, click the Show More Assignment Sessions text link at the bottom left of the listing. This will expand the list to show all the sessions.
- Note, depending on user activity, this may require scrolling for several pages
Explanation of Columns: Available Learning Object Sessions
- Name - The name of the assignment.
- Learning Object-“ The name of the associated learning object (course.)
- Status - The student's status (e.g. Enrolled, Cancelled (by whom), Complete)
- Date Complete - Date of Completion
- Due Date - Assignment Due date
- Complete - indicates whether assignment has been completed (Yes / No)
- 4 - Review desired information as needed.