USERS - (Modified Original Guide)
Section 1: Users - Overview
Who Should Use This Guide
This guide is for - Learning Management System (LMS) Client Super Administrators (CSAs) and Administrators to enable them to utilize and train others in the use of the Users Feature and Functionality.
Users - Overview
The Users Feature allows CSAs / Admins to add, edit and manage User Information in the LMS.
Generally, Users are created automatically as part of the daily User Import Service where the latest organizational HR / ERP data is imported into the LMS system. Administrators, however, do have the capability of adding and editing User information directly, assigning groups and enrolling users in courses.
To access the Users Feature, navigate to the Advanced View, hover over the User Management dropdown menu and select Users.
Objectives
Upon completion, you will be able to:
- Access the Users Feature
- Sort, Navigate and Search for Users
- Enroll Users in Courses
- Create a New User
- Upload Multiple Users into the System
- View and Edit Individual User Profile Information
- Add New Group Information To Users
Section 2: Users – How to Guide==
2.1 Access the Users Feature
The Users Feature allows the CSA / Admin to add, edit and manage user information in the LMS.
Generally, Users are created automatically as part of the daily User Import Service where the latest organizational HR / ERP data is imported into the LMS system. Administrators, however, do have the capability of adding and editing User information directly.
To access the Users Feature:
- Navigate to the Advanced View, hover over the User Management dropdown menu and select Users.

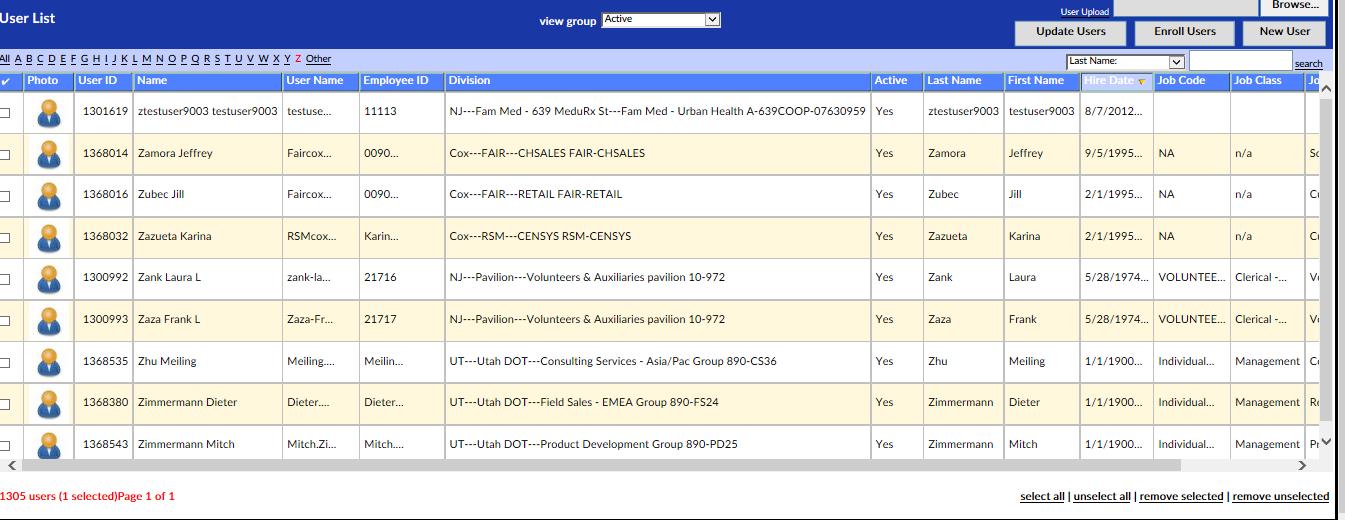
This will bring up the User List which provides a listing of all Users in the LMS system.

Screenshot 02
Explanation of Columns: User List
- - Column of checkboxes allows selection of single or multiple Job classes.

- User ID – LMS System generated ID based on order of creation.
- Name –Name of User, usually in order “Last name” “First Name” “Middle name or initial”
- Username –Unique User Name which is used throughout system for associating this user with various objects..
- Employee ID – ID of user as existing in company’s HRIS System.
- Division– Primary LMS division / department of which the user is a member.
- Active – Indicates whether the user account is active (Yes) or inactive (No)
- Last Name – Last name of User
- First Name – Last name of User
- Hire date – (Not shown in above view) User’s Hire Date.
- Job Code – User’s Job Code.
- Job Class – User’s Job Class.
- Job Position – User’s Job Position.
- Delete – Red (X) icon. If available (usually not available) and clicked, it will ask for confirmation to delete User).
2.1 Sort, Search and Navigate the User List
Some of the most used and powerful capabilities of the Users Feature center around the ability to find individual or groups of users meeting specific search criteria, searching these users and sorting these users cultivated from the thousands or tens of thousands (or more) found in the original User List.
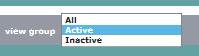
View Group Dropdown Box Filter
The View Group Dropdown box in the top / middle of the User List, allows filtering by Active / Inactive (or ALL) user type.
All / A- Z / Others Filters
In the top left corner, just below the title “User List” are the word “All”, the individual letters A-Z and the word “others”. These single click filters allow for quick filtering by the starting letter (or non-letter if “Others”) of the Name field. For example, click “T” and all names beginning with the letter “T” will be selected. Click “All” to clear the individual filters and select all users.

Column Headers – Sorting Function
Non-filtered or filtered search results can be sorted by alphabetically by individual column types by clicking on the associated column header (except for checkbox and delete columns). Click once for an ascending search and click a second time for a descending search.

For example, the below screenshot shows a filtered result for users whose last name begins with Z and who are sorted by hire date in descending order (newest to oldest). Notice the little yellow down arrow icon to the right of the Hire Date column header .
Field Search Dropdown / Text Search
On the right side, below the buttons, but just above the column headers is the user text search function.

Screenshot 07
This consists of the following components:
- Field Search dropdown menu- – provides a listing of common user profile features from which to search.
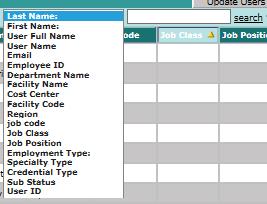
- Text Search Box – allows you to enter the term to search
- Search Link – once a field is chosen and text search has been entered, click to filter by these search parameters.
- Clear Link – only available after a search has been performed, allows you to clear search filtering and show all results from which a new search can be done. (Note: Each successive search is a sub-search using existing results only unless the clear link is selected)
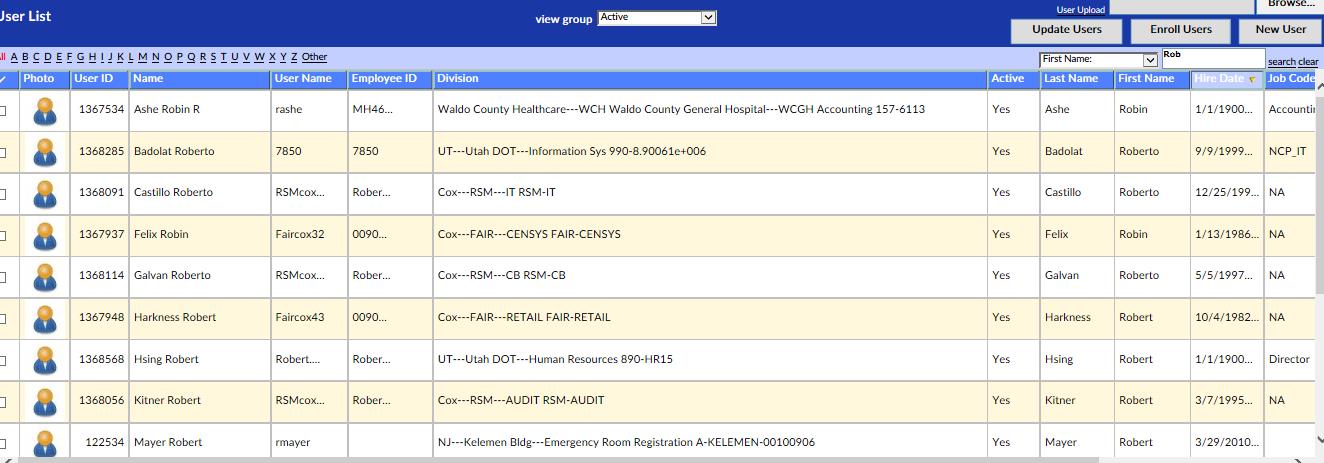
To use the user search
- Use the Field Search dropdown menu and select a user profile field to search. For example, “First name”.
- Enter the specific search term you wish to search by in the Text Search Box. For example “Rob”
- Note: Searches are “includes” searches, so a search for “Rob” would yield “Rob”, but also “Robert”, “Roberto”, “Robin” etc.
- Click Search.
- A filtered result set will appear.
- To sub-search within this result set, follow steps 1 -3 with additional search info.
- To reset and enable another search from the full group, click the Clear Link.
2.2 Enroll Users in a Course Instance
Once a single or group of users has been selected, they can be enrolled in a Learning Object Course. To do so,
- Click on the checkbox(es) to the left of the row of the particular user(s) you wish to enroll .
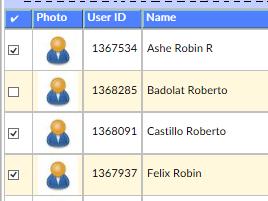
:# You can quickly select all the users of a particular search by clicking on the Select All Link at the bottom of the page.

- Once you have selected the users, click on the Enroll Users button located near the top right of the page.

- This will launch the Learning Object instance List in a separate popup window.
Screenshot 13

- Use the search, sort and navigation functions to find the specific course instance or instances to which you wish to enroll the selected users in.
- Click the check box to the left of the specific instance(s)
- Click the Add Learning Object button.
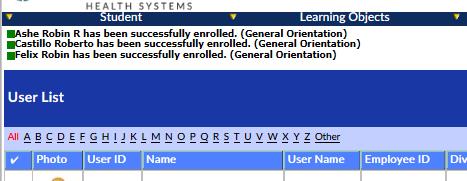
- The popup window will close, the system will show a timer screen while processing and upon completion the results of the request for each individual and course will be displayed in the upper left hand between the Advanced Menu and User List.
2.2 Add a User
As noted earlier, users are created automatically as part of the daily User Import Service where the latest organizational HR / ERP data is imported into the LMS system. Administrators, however, do have the capability to add (and edit) users directly.
To manually add a User to the LMS system, follow these steps:
- Navigate to the Advanced View, hover over the User Management dropdown menu and select Users to bring up the User List.
- Click the New Users button in the upper right hand corner of the Users List.
- This will bring up the New User / Users Details Screen.
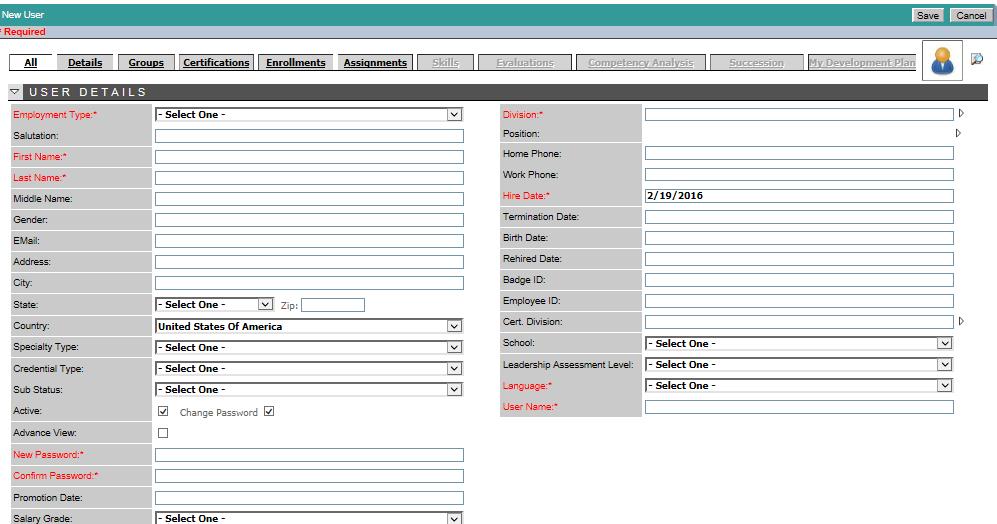
Explanation of Fields: Users Details
Field Descriptions (required fields displayed in red with *):
- Employment Type:* Establishes the employment classification of the selected record. This drop down list contains elements defined during the implementation of your LMS system.
- Salutation: Salutation associated with the selected record.
- First Name:* First name associated with the selected record.
- Middle Name: Middle name associated with the selected record.
- Last Name:* Last name associated with the selected record.
- EMail:* Email address associated with the selected record. This field is used to send reminders to the user and confirm LMS activities.
- Address: Address associated with the selected record.
- City: City associated with the selected record.
- State: State associated with the selected record.
- Country: Country associated with the selected record.
- Active: Check indicates active unchecked indicates the user is no longer active in the system.
- The administrator may also choose to change the password of the account using the Change Password feature.
- Advance View: Specifies whether or not the user associated with the selected record will see the Advanced View which is more data intensive or the Simple View which limits the complexity of the user interface.
- Division:* Division associated with the selected record. May be modified by clicking the icon located next to the textbox. When editing this field a data tree will be displayed to assist with making the correct selection.
- Position: Position associated with the selected record. May be modified by clicking the icon located next to the textbox. When editing this field a data tree will be displayed to assist with making the correct selection.
- Home Phone: Home phone associated with the selected record.
- Work Phone: Work phone associated with the selected record.
- Hire Date:* Hire date associated with the selected record. This field is used to establish anniversary dates for certain assignments and annual mandatory learning activities.
- Termination Date: Termination associated with the selected record. Active records should not contain a termination date.
- Vendor User ID: Employee identification associated with the selected record
- Cert. Division: Division associated with certification for the selected record. May be modified by clicking the icon located next to the textbox. When editing this field a data tree will be displayed to assist with making the correct selection.
- Language:* Specifies the language that will be used to display the MeduRx system for the selected user.
- User Name:* Specifies the User Name that will be used to login to MeduRx by the user associated with the selected record.
- Enter the required fields of Employment Type, First Name, Last Name, Hire Date, Language User Name and select the associated department from the Availability Tree.
- NOTE: Ensure you choose Availability at the lowest, cost center / departmental level (Expand the tree fully) or it may cause problems later.
- It is recommended to enter and confirm a password, email address and position.
- Enter any additional optional field info.
- Click the Save button.
- The new Users will be saved and the Users Details Screen will reload with the updated information.
Screenshot 16
- If wishing to make changes, click the Edit button.
2.3 Editing a Users