Assignments - Admin Guide
SECTION 1: ASSIGNMENT SCHEDULER FEATURE - OVERVIEW
Who Should Use This Guide
This guide is for - Learning Management System (LMS) Client Super administrators (CSA) and Administrators to enable them to utilize and train others in the use of the Assignment Scheduler Functionality.
What is the Assignment Scheduler?
In the Learnsoft LMS, the Assignment Scheduler is a powerful feature and service that enables courses to be automatically assigned to individual or groups of users with a specified deadline based on Administrator defined criteria. These assignments can be one time or as recurring events.
Examples of assignments include:
- An Assignment can be scheduled to run daily that searches for new employees and then assigns a mandatory company or safety orientation class to all such new employees.
- An Assignment can run annually that ensures all employees take a compliance course each year.
- An Assignment can run one time that ensures all persons with a specific job position in all locations or specific locations of an organization are enrolled in a training course due within a defined timeframe.
The Assignment Scheduler combines an advanced feature that allows CSAs to schedule (create, modify and delete) assignments for individual or a group of students that fall within an Admin defined Scope (meet specific criteria that make them eligible for the assignment) with an external service that runs daily (usually nightly) to execute these assignments based on a defined deadline.
NOTE: Before assignments can be scheduled, you must ensure that the Assignment Scheduler Service has been activated and scheduled. This can only be completed by the Learnsoft Technical Team. Please contact your assigned Project Manager to enable the activation and scheduling of this service1.
1 Because this is an advanced feature, the Assignment Scheduler Service is not always activated as part of the initial implementation of the LMS system, but is often activated and scheduled after the CSA and administrators become more familiar with the basic elements system.
Three Elements Required for Execution of Assignments==
An assignment requires three elements to be successfully executed by the assignment scheduler. Below are brief descriptions of the required elements. For further details see, both the How To Guide (Section 2) and the Advanced Concepts Guide (Section 3).
- Scope - This determines which users or group of users will receive an assignment.
- Deadline - This determines both when the assignment is due and when the users will receive the assignment.
- Learning object - This is usually the course(s) that are assigned (Options allow for selection of certifications or goals instead of courses)
Course Overview
The purpose of this manual is to guide administrator(s) on how to effectively create and schedule Assignments using the Assignment Scheduler service and functionality of the LMS system.
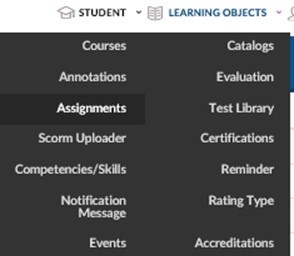
Once the Assignment Scheduler Service has been activated and scheduled, the CSA can create assignments by using the Assignment Scheduler Feature, which is accessible through the Advanced View > Learning Objects > Assignments drop down menu.
This course will cover the basic steps to creating an assignment including:
- Accessing the Assignment Schedule Feature
- Creating new assignments
- Filling in the Assignment Info Section
- Filling in the Assignment Timing Section
- Filling in the Selectors Section
- Filling in the Available / Excluded users Section
- Selecting, Editing and Deleting assignments
- The course will also provide details about some Advanced Concepts of the Assignment Scheduler
SECTION 2: HOW TO GUIDE: ASSIGNMENT SCHEDULER
How to Add an New Assignment to the LMS System
The Assignment Scheduler is a powerful feature and service that enables courses to be automatically assigned to students based on Administrator defined scope and deadline criteria. These assignments can be one time or as recurring events
The Assignment Scheduler can be accessed using the Advanced View > Learning Objects > Assignments drop down menu.
This will bring you to the Assignment List page where you can view, edit, delete existing assignments and create (and schedule) new assignments.

To create a new assignment:
- Click on the New Assignment button.
- This will launch the Learning Object >> Assignments / Assignment details page.
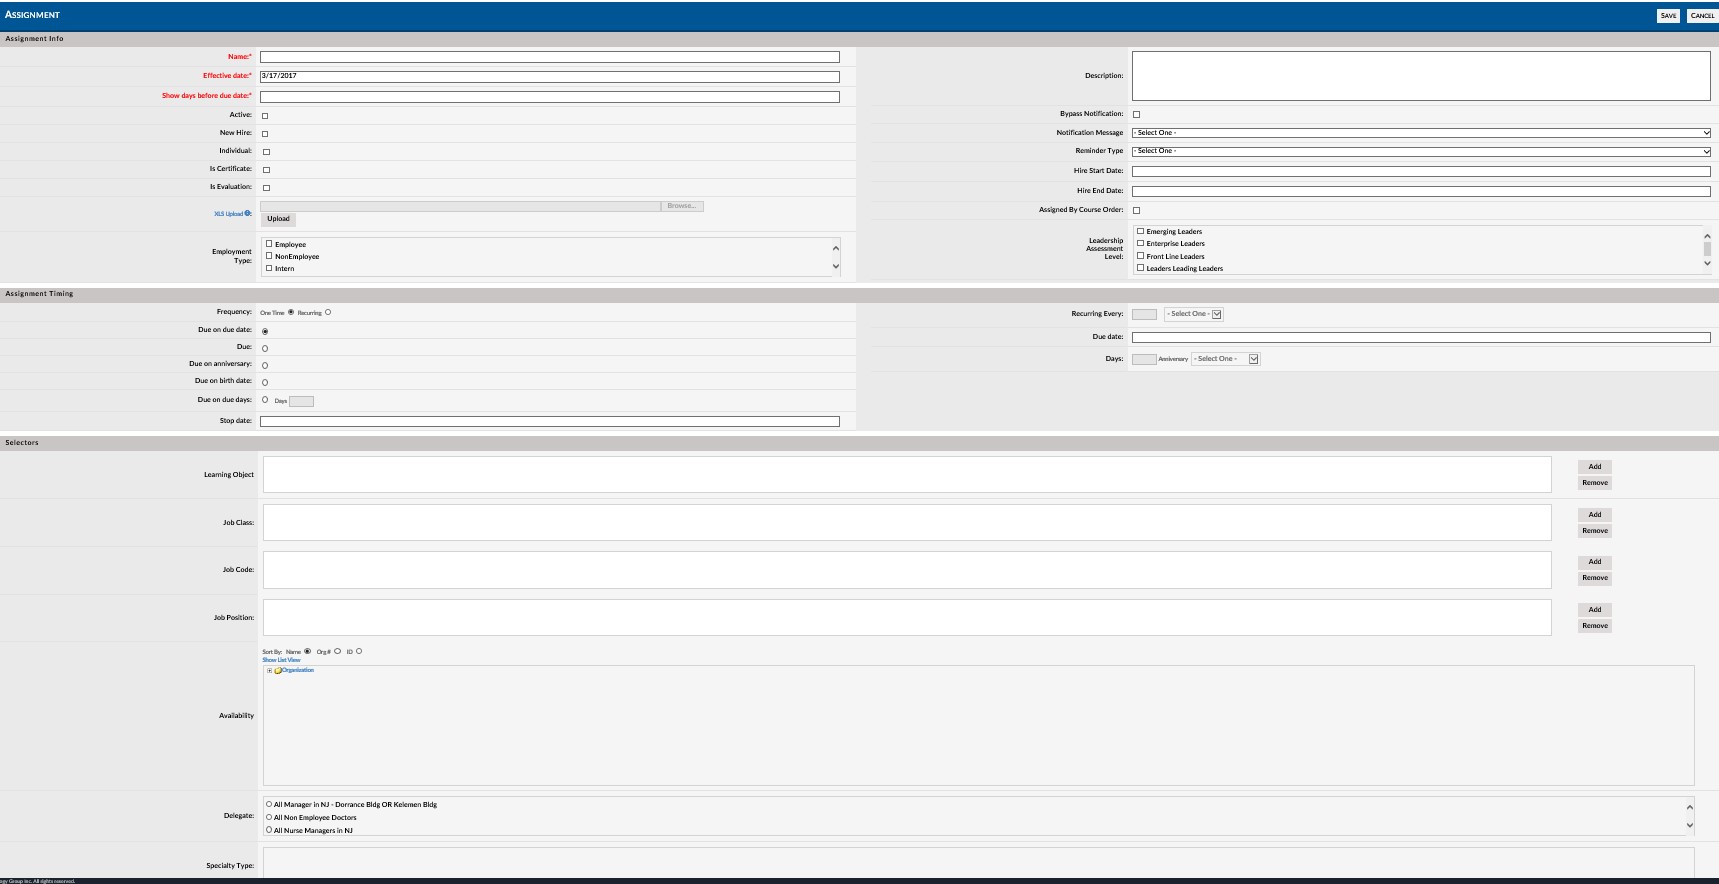
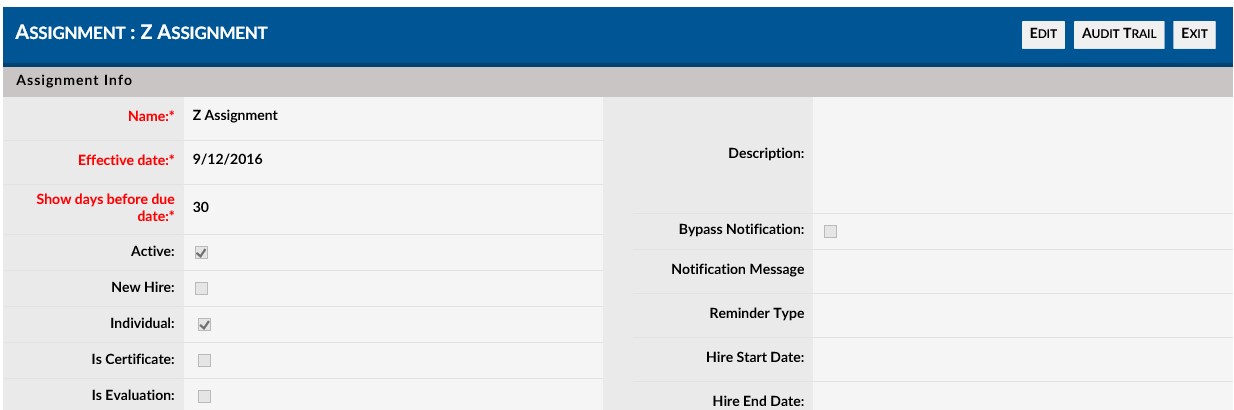
How to Fill-in the Assignment Info Section
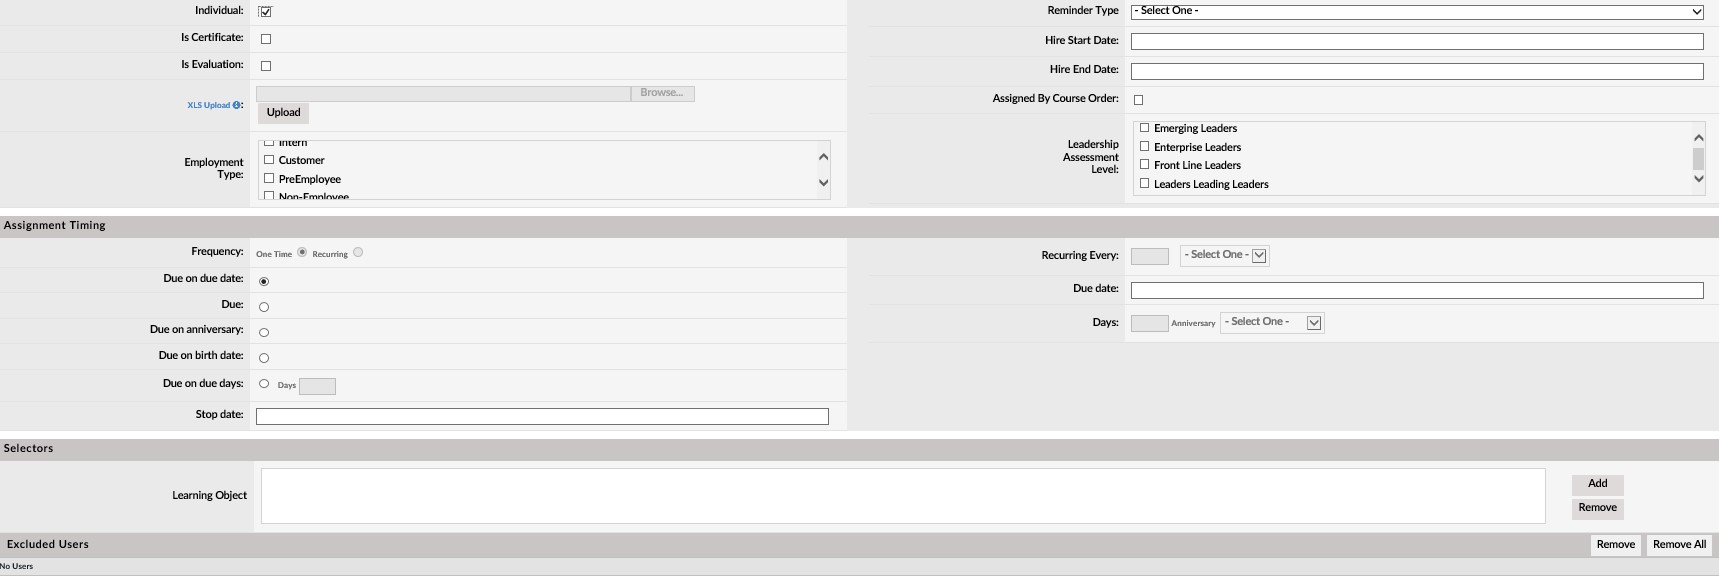
The Assignment info section of the Assignments / Assignment Details page lets you name and describe the assignment, activate / deactivate the assignment, select the assignment type (course, certification, goal), determine if the assignment should be associated with specific individuals, new hires and/ or specific employment and leadership levels.
The only required entry in Assignment info section is a Name for the assignment.
By default, assignments will automatically associated between courses and groups of users that can be further detailed and refined in the Selector section of the Assignments / Assignment Details page, however, in this Assignment info section, this default can be overridden when enabling (checking) the optional checkboxes. This will also change the selectors available in the Selector section.
For example, if the Individual checkbox is enabled (checked), all the default options for selecting groups of users, such as job code or job class, will be hidden. If the Is Certificate checkbox is enabled (checked), the course selector will change to a certificate selector (See next section).
Below is a listing of each of the required and optional fields (attributes) of the Assignment info section along with a brief description.
Assignment Info Section - Explanation of Fields
- Name* - Creator defined name for the assignment.
- Active - If checked, it means it is ready to deploy and will be processed the next time the assignment scheduler service runs.
- New Hire - If checked, the system will apply this assignment only to newly hired employees.
- Note: The system uses a previously defined company timeframe which is added to the user's actual hire date to determine if they are within Scope of an assignment.
- For example, if your company defines a New Hire within the system as 30 Days and a person is hired on January 1, 2016, then this person is within scope of this assignment from January 1, 2016 - January 31, 2016 (January 1, 2016 Hire Date + 30 days Defined Company Timeframe = January 31, 2016).
- Individual - If checked, allows the creator to assign individuals (rather than groups) to the assignment. When enabled it will change options in the Selectors section from group options (e.g. job class, job position) to a single / multi-student selector.
- Is certificate - If checked, allows the creator to assign certifications, rather than courses to in-scope students. When enabled, the Learning Object (Course) selector in the Selectors section will change to a Certificate Selector.
- ''''''''''Is Goal - Part of the Talent Management Suite (TMS). If checked, allows the creator to assign Goals to in-scope users.
- Is Evaluation - Part of the Talent Management Suite (TMS). If checked, allows the creator to assign Evaluations to in-scope users.
- Employment Type - Part of the Scope Process. Allows the creator to limit the assignment to users meeting a specific employment type or types from those predefined for your organization (e.g. Full Time Employees & Interns).
- If no selection is made, than any employment type is eligible to be in scope (subject to other scope restrictions made elsewhere in the assignment).
- Description - Allows for an assignment description (For Administrator Reference).
- Hire Start Date - Part of the Scope Process. Enter the Start Date for a range of dates. Anyone hired within that range of dates will be assigned. (5/12/2016 update). If entering value in Hire Start Date, Must also enter value in Hire End Date and vice versa.
- Hire End Date - Part of the Scope Process. Enter the End Date for a range of dates. Anyone hired within that range of dates will be assigned. (5/12/2016 update). If entering value in Hire Start Date, Must also enter value in Hire End Date and vice versa.
- Assigned by course order - New Feature. If checked, user must take courses in order they are added to the assignment.
- Thus if two courses were added, for example, Beginner Excel and Intermediate Excel (added to the assignment in this order), the assigned student must complete Beginner Excel prior to taking course Intermediate Excel. Note: You will be enrolled in both courses, but (for online courses) couldn't launch the second course until the first was marked as Complete.
- Leadership Assessment Level - A specific Leadership type or types from those predefined for your organization (e.g. Emerging Leaders, Enterprise Leaders) If no selection is made, than this is not part of the scope process.
.
How to Fill-in the Assignment Timing Section
Assignment timing is one of the most powerful, but sometimes most complicated feature of the Assignment module. The Assignment Timing section of the Assignments / Assignment Details page allows you to specify the date which an assignment is due, the date when the assignment is executed and made visible to the user and the frequency of assignment.
NOTE: ASSIGNMENTS WILL ALWAYS HAVE SOME TYPE OF DUE DATE ASSOCIATED WITH THEM

One-time vs. Recurring Assignments
At the basic level, there are two types of timing frequency for assignments: one time and recurring.
- One Time Assignments - once a user falls within scope of an active one time assignment, they will be assigned as directed; however, they can only fall within scope once, even if the assignment remains active and is executed daily by the assignment scheduler.
- For example, imagine an assignment that assigns the course Basic Safety 101 to all users with the job class manager. Also imagine that Bob R. Jones is an active employee, with the active job class designation manager. Tonight, when the assignment scheduler executes this assignment, Bob R. Jones will be enrolled in the Basic Safety 101 course and Bob will receive an email notification of the assignment. Tomorrow (and so on until the assignment ends or is made inactive), when the assignment scheduler executes again, Bob R. Jones' existing assignment will remain, but he will not again be assigned nor notified.
- Recurring Assignments - these are assignments that recur on some creator defined basis, for example on the user's birthday, on the user's anniversary, every quarter, etc. During each recurrence, if the user remains in scope, they will be assigned the course.
- For example, imagine an Annual Safety Compliance course which is compulsory and must be taken every year based on the Anniversary of the user's hire date. If they were hired January 1, 2015, for example, then each successive January 1 (2016, 2017, 2018 etc.) they will be assigned this course (assuming the assignment remains active and they remain in scope).
Mandatory Timing Fields
Note: While an assignment may be due on a certain day or date, the assignment will executed by the Assignment Scheduler Service and made visible to the user, using a combination of scope and the mandatory fields: Effective date* and Show days before due date* and the elective Stop Date
- Effective Date - Essentially the stat date for the assignment to be eligible for execution by the Assignment Scheduler Service (assuming it is made active).
- Stop Date if not made inactive otherwise, this is the end date for the assignment.
- Note: If active, the assignment scheduler service will run this assignment every day from the start date until the stop date (if there is one; otherwise it won’t stop as long as the assignment, assignment scheduler and LMS are active).
- Show days before due date provides the maximum lead time for which the assignment will executed and the user will be assigned and notified.
- For example, if an assignment is set to recur on a user's anniversary date and show due date is set to 90, then (assuming effective and active) ninety days prior to the anniversary date, the assignment will be applied to the user.
- If a user becomes within scope at a time frame less than the show days before due date, they will be assigned as soon as becoming in scope. For example, based on the above, if the user becomes in scope 30 days prior to their anniversary date, they will receive the assignment at that time
Assignment Timing Section - Explanation of Fields
- Effective date* - (REQUIRED) As long as the assignment is active, this is the date in which the Assignment will begin to be executed by the Assignment Scheduler service. It is essentially the assignment start date.
- Frequency - Radio button selector requiring either a value of One Time (default) or Recurring. Depending on selection, other elements of this section may or may not be accessible.
- Due on due date: - Radio button selector allowing creator to set a specific date by which the assignment must be completed
- Works in conjunction with Due Date, below. Note: inactive for Recurring assignments
- Due: - Radio button selector allowing creator to set a specific number of days before or after the Anniversary date by which the assignment must be completed.
- Works in conjunction with Days textbox and Anniversary dropdown box, below.
- Due on anniversary** - Radio button to indicate assignment must be completed by the user's anniversary date.
- Due on birth date: - Radio button to indicate assignment must be completed by the user's birthday.
- Due on due days: - Radio button selector allowing creator to set a specific number of days after a user comes into scope by which the assignment must be completed.
- Works in conjunction with Days textbox, below. Note: Not recommended for use with Recurring assignments.
- Days- Radio button selector allowing creator to set a specific number of days after a user comes into scope by which the assignment must be completed
- Works in conjunction with Days textbox, below. Note: Not recommended for use with Recurring assignments.
- Stop date: - Date at which the assignment will stop and no longer run. User may use the dropdown calendar or enter the date manually using a mm/dd/yyyy format
- Show days before due date*- The number of days prior to the due date in which the assignment will be effective and the user will be notified and enrolled in classes.
- For example, if set to 30, the user will be notified of the assignment 30 days prior to the due date (assuming they were in scope and the assignment was active at least that many days before the due date).
- Due Date: - A specific date by which the assignment must be completed
- Works in conjunction with Due on Due Date radio button, above. User may use the dropdown calendar or enter the date manually using a mm/dd/yyyy format. Note: inactive for Recurring assignments
- Anniversary** - Radio button to indicate assignment must be completed by the user's anniversary date.
- Note: inactive for one time assignments
- Recurring Every (text box) - Text box for numeric entry of a recurring period.
- Works in conjunction with the Recurring Every Dropdown box, below. For example, a biannual assignment would recur every 2 / years while a quarterly assignment would recur every 3 / months. Note: inactive for “one time†assignments
- Recurring Every (dropdown box) - Drop down box for selection of repeating period (Year, Month, Day).
- Works in conjunction with the Recurring Every text box, above. For example, a biannual assignment would recur every 2 / years while a quarterly assignment would recur every 3/ months. Note: inactive for “one time†assignments
*Required Field
**Anniversary In the LMS system, Anniversary refers to the anniversary of the user's hire date
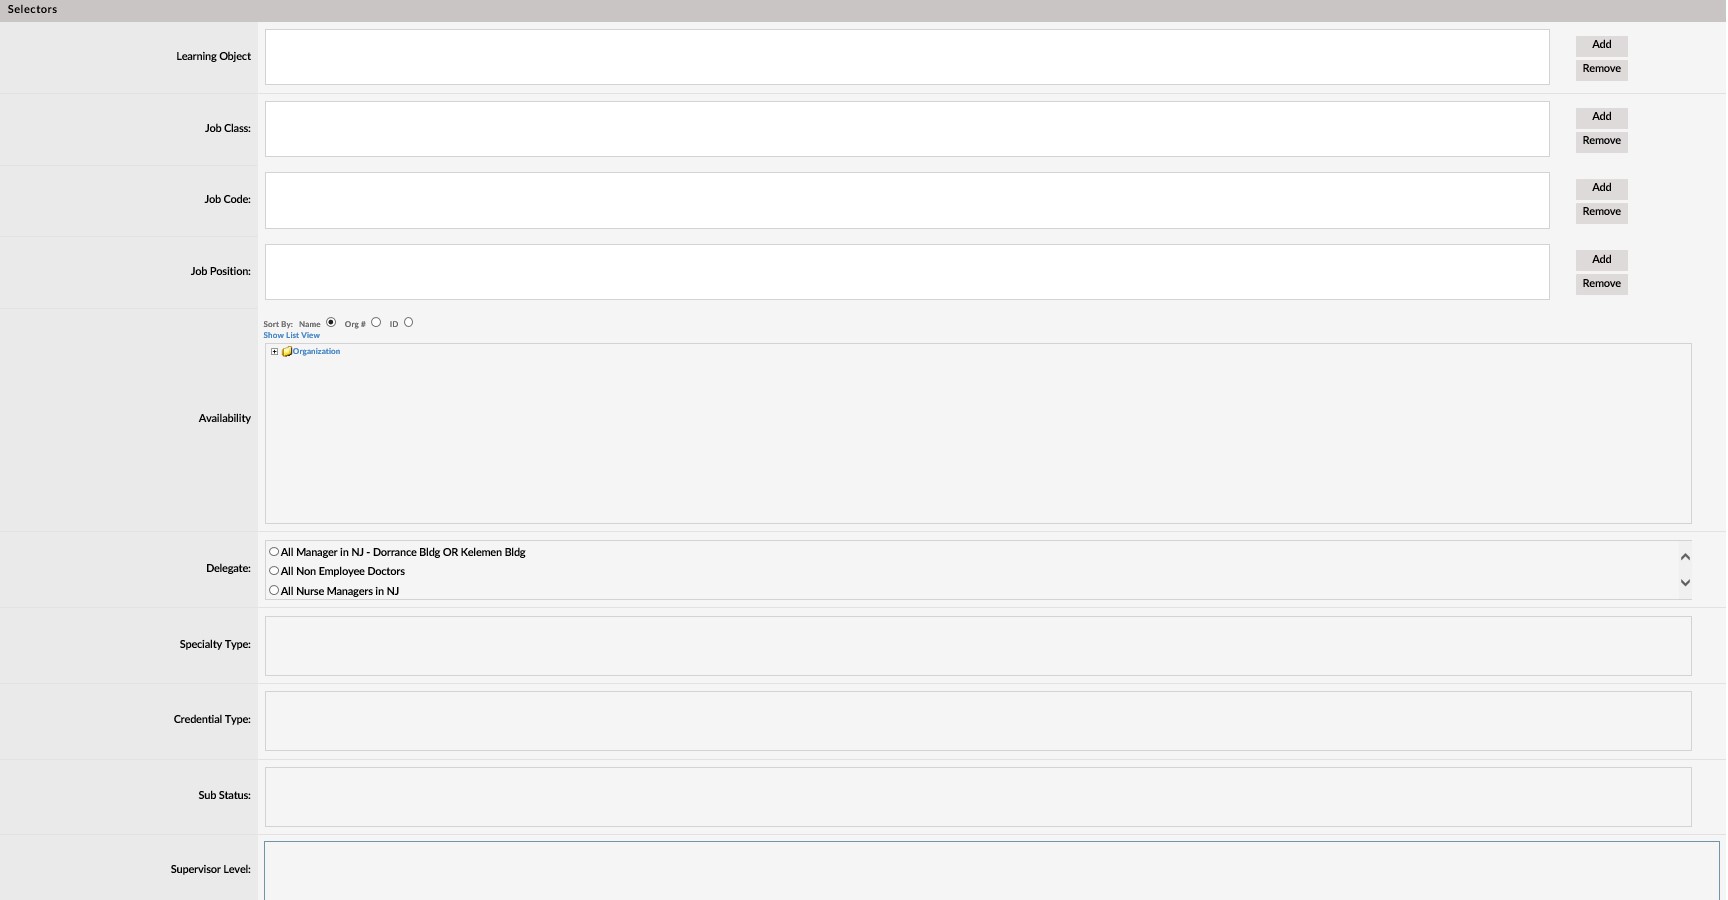
How to Fill-in the Selectors Section
The basic concept of an assignment in the LMS is to associate some group of users (Scope) with some specific learning object (Requirement) in some specific time frame (Deadline). In the Selectors section of the Assignments / Assignment Details page, the creator is able to choose both the specific requirement (usually (a) Learning object / Course(s) or Certification(s)) & make many of the selectors to define Scope (as noted some elements that filter the scope, such as employment type, new hire etc. were found in the Assignment info section of the Assignments / Assignment Details page).
Note: This guide assumes the CSA / Admin is familiar with using the system to select a single or multiple courses or scope selectors such as Job Position or using the tree structure of the Availability tree to select sections of an organization. If not, please see related help sections for further details as to how to utilize those specific elements presented below.
Different Views of the Selectors Section
The specific selector categories that are available to choose from in the Selectors section of the Assignments / Assignment Details page will adjust dependent upon items the Assignment info section of the Assignments / Assignment Details page.
In the DEFAULT VIEW, the Selectors section will allow the creator to select Learning Object / Course(s) to assign, as well as define scope by selecting from Job Class, Job Code, Position, Availability, Delegate fields. Also, if enabled, scope can be further defined using Specialty Type, Credential Type and Sub Status.
If certain options are enabled (checked) in the Assignment info section of the Assignments / Assignment Details page, however, the Selectors section will adjust and offer different selectors.
For example, if the Is Certificate checkbox is enabled (checked), than the option to add Learning Object / Course(s) will not be shown. Rather the Certification text box and buttons to Add / Remove certifications will be visible.

Another example of a view change is if the Individual checkbox is enabled (checked), than the group selectors will no longer be visible and only the Learning Object / Course(s) selector will be available.
Adding Courses to the Assignment
By default, the Learning Object / Course selector is viewable.

By clicking the Add button, the system will launch the Learning Object Lookup / Learning Object List in a new popup window. Here, creators will be able to search and select courses to assign. Courses can be added one at a time or in multiple selections (by using the check box) then pressing the Add Learning Object button.

Once courses are added they will appear in the Learning Object / Course(s) selector textbox window.

They may be removed by first highlighting the specific Learning Object / Course to remove and clicking the Remove button (While courses can be added in bulk, they must be removed individually).
NOTE: See Section 3 - Advanced Concepts & Best Practices section for best practices using an Assignment Instance for courses which will allow users to select their own class instances if classroom-based courses are part of the assignment.
Adding Certifications to the Assignment
If the Is Certificate? Checkbox is checked, the system will replace the Learning Object / Course selector, with the Certification Selector.
By clicking the Add button, the system will launch the Lookup / Certification List in a new popup window. Here, creators will be able to search and select Certifications to assign. Certifications can be added one at a time or in multiple selections (by using the check box) then pressing the Add Certification button.
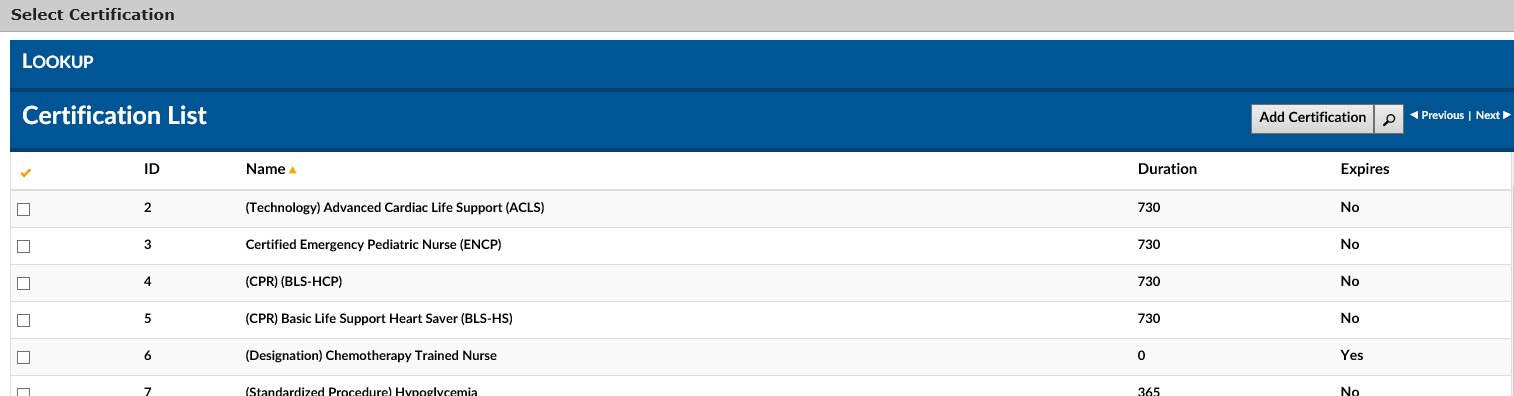
Once certifications are added they will appear in the Selectors section Certification selector textbox window.

They may be removed by first highlighting the specific Certification to remove and clicking the Remove button (While certifications can be added in bulk, they must be removed individually).
NOTE: See Section 3 - Advanced Concepts & Best Practices section for best practices using an Assignment Instance for certifications which will allow users to select their own class instances if classroom-based courses are part of the certification.
Using Other Selectors to Define Scope of Users
As noted, depending on whether specific items were selected in the Assignment info section of the Assignments / Assignment Details page, certain selectors will or will not be visible.
One concept to note is that when using scope selectors, the lookup is an OR search within a specific selector, but an AND search between selectors.
For example, if the creator added Manager and Director to the Job Class selector, a user who had the Job Class = Manager OR had the Job Class = Director would both be in-scope of the assignment.
However, if the creator added the Manager to the Job Class selector AND Selected NY Office from the Availability (Tree) selector, then only a user who had both Availability = NY Office AND Job Class = Manager would become in-scope.
NOTE: Because email notifications will be sent to all in-scope users, pay special attention to use the selectors to limit the scope to the specific users only those required for the specific assignment.
Scope of Users Selectors - Job Class, Job Code, Job Position
The Job Class, Job Code and Job Position selectors allow the creator to specify a particular job class / codes / positions or groups of job classes / job codes / job positions to include in the assignment. Job Class, Job Code and Job Position information is usually provided by the company's HR system and associated with individual users and updated within the LMS as part of the User Import service which runs daily.
If viewable for this assignment, the Job Class. Job Code and Job Position Selectors are just below the Learning Object / Course(s) selector (or below the Certification Selector if the Is Certificate? option is enabled).

By clicking the Add button to the specific selector, the system will launch the Lookup list for the selected item in a new popup window. Here, creators will be able to search and select Job Classes, Job Codes or Job Positions in which to include as part of the scope of the assignment. Job Classes, Job Codes or Job Positions can be added one at a time or in multiple selections (by using the check box) then pressing the Add Job (Class, Code, Position) button.
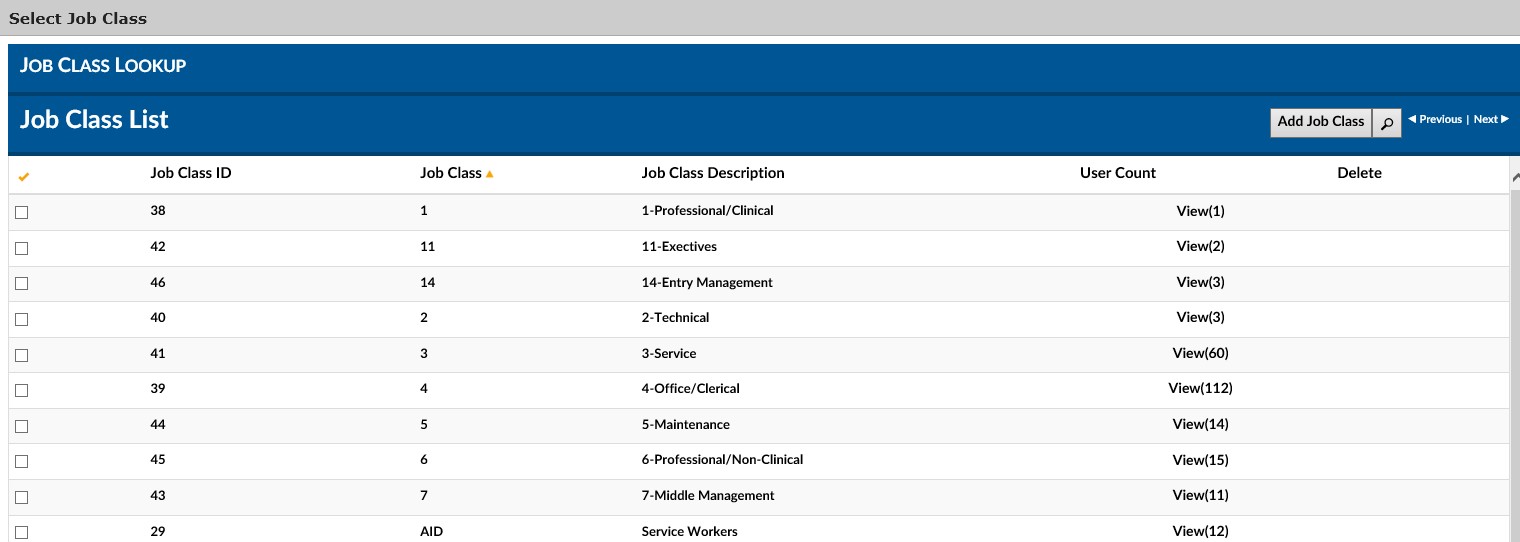
Once Job Classes, Job Codes and / or Job Positions are added they will appear in the corresponding selector textbox window.

They may be removed by first highlighting the specific Job Classes, Job Codes and / or Job Positions to remove and clicking the Remove button (While items can be added in bulk, they must be removed individually).
Scope of Users Selectors - Availability
The Availability selector, which uses a tree structure and usually represents some type of company organization chart, allows the creator to specify which parts of the organization to include in the assignment. The Availability tree is automatically built based upon data imported into the LMS as part of the User Import service which runs daily. The definitions are usually established as part of the initial LMS installation and deployment process (Please contact your project manager if changes to the Availability tree structure are required).
In the default view, the Availability selector is just below the Job Position selector and just above the Delegate selector.

By clicking the (+) button the tree will expand to show deeper levels of the organization. (The Sort By Name, Dept, ID radio buttons allow sorting of the tree view for easier lookup for some organizations.) The assignment creator can select which part of an organization will be eligible to be scope for an assignment by simply clicking the checkbox next to that listing (location, division, department, etc.)
- Multiple selections can be made by selecting multiple checkboxes.
- The tree structure is recursive, that is, if a higher level of the tree is selected, all lower levels in the direct line will be included in the scope, as well.
- Items can be deselected by simply clicking again to remove the checkbox.

Scope of Users Selectors - Delegate
Note: Selection Of A Delegate Will Override All Other Scope Selections!!!
The Delegate selector uses radio buttons to allow the creator to select a specific Delegate list to which the assignment will be applicable.
A delegate list is a listing of users, similar to a distribution list in an email program. The delegate is a very powerful feature that is used extensively by CSAs. Delegates are often created to allow for quick access to frequently used user combinations. Examples include setting up delegates for All Users, All Managers, Combinations of User Types and Divisions, etc. They can be created by using the Advanced View > User Management > Delegates dropdown menu (See separate How to create delegates Admin Guide for further details on creating delegates).
In the default view, the Delegate selector is visible just below the Availability selector. It is prepopulated with all the delegate groups that have been created within the LMS for the organization. The creator can use the scroll up and scroll down arrows on the right side of the selector to view all the different delegate choices.

Click the associated radio button to select the desired Delegate List.
- As noted above, selection of a delegate will override all other scope selections.
- Only one delegate can be selected per assignment.
- Once selected, the delegate can be changed (clicking a different delegate radio button), but the delegate function cannot be deselected
Scope of Users Selectors - Specialty Type, Credential Type, Sub Status
The Specialty Type, Credential Type and Sub Status selectors allow the creator to further refine the scope of users to include in the assignment. Specialty Type, Credential Type and Sub Status are optional informational items that some companies use to group and identify workers. They are usually provided by the company's HR system and associated with individual users and updated within the LMS as part of the User Import service which runs daily.
In the default view, the Specialty Type, Credential Type and Sub Status selectors are at the bottom of the Selectors section. Not all organizations use these fields, but if they are populated, then there will be options to select specific types in the system using checkboxes (if not populated the associated selectors sections will be visible but not accessible).


How to Fill-in the Available Users / Excluded Users Section
By default, the final section of the Assignments / Assignment Details page is the Excluded Users section. This section allows the creator to remove specific individuals from the scope of the assignment. For example, you can assign a course to a specific job position to a course, but remove one or more individuals who have taken an equivalent course.

If the Individual checkbox is enabled (checked) in the Assignment Info section of the Assignments / Assignment Details page, however, the final section will change to the Available Users section. When this is the case, this section is used to add a specific individual or a specific group of individuals (rather than a generic group) users to an assignment.

Note: The Available Users / Excluded Users Section is only visible AFTER saving the assignment and NOT when in Edit Mode.
Filling in the Available Users Section to Add Individuals from Assignment Scope
As noted above, the Excluded Users section is the default view and allows the creator to exclude specific users from an assignment. To add users to the excluded users section, the assignment must first be saved and not in Edit Mode. If this is the case, then the Add User button will be enabled.

To add specific users to this list (and thus exclude them from the assignment scope):
- Click the Add User button.
- The User Lookup / User List Screen will popup.

- Use the search screen to find the users to add.
- Check the checkbox at the left of their records.
- Click the Add Attendees button.
- The User Lookup / User List Screen will close and the Assignments Screen, Excluded Users section will be shown with the users added.

To delete a user from the Excluded Users section:

- Click on the red (X) in the Delete Column of the Excluded Users Section to the left of the user to remove.

- A confirmation box will popup. To delete, press OK.
- To Cancel, press Cancel.
- The confirmation popup will close and the Assignments Screen, Excluded Users section will be shown with the selected user removed from the list..
Filling in the Available Users Section to Remove Individuals from Assignment Scope
As noted above, the Available Users section is enabled when the Individual checkbox is selected in the Assignment Info section of the Assignment Screen. This option will allow the creator to add specific users to an assignment. To add users to the available users section, the Individual checkbox must first be selected and the assignment must first be saved and not in Edit Mode.
The creator has two methods to add users to add users to the Available Users section:
- Add Users from a predefined Excel File using the Multiple User Upload process
- See separate section for using this function
- Add users from within the LMS System, using the Add User button. To do so:

- Click the Add User button.
- The User Lookup / User List Screen will popup.

- Use the search screen to find the users to add.
- Check the checkbox at the left of their records.
- Click the Add Attendees button.
- The User Lookup / User List Screen will close and the Assignments Screen, Available Users section will be shown with the users added.

To delete a user from the Added Users section:

- Click on the red (X) in the Delete Column of the Available Users Section to the left of the user to remove.

- A confirmation box will popup. To delete, press OK.
- To Cancel, press Cancel.
- The confirmation popup will close and the Assignments Screen, Available Users section will be shown with the selected user removed from the lsit.
How to Edit an Assignment
- To edit an assignment, use the Advanced View > Learning Object > Assignments dropdown Menu to navigate to the Assignment List.

- In the section Assignment List, click on the row of the specific Assignment you wish to edit and the associated Assignment Details page will load.
- Click the Edit button to enter Edit mode.
- Click Exit to cancel and return to the Assignment List
- Click Audit Trail to see the audit trail associated with changes to this reminder
- Edit as desired.
- Click Save to save the edits.
- Click Cancel, to cancel any changes.
- Click Clone to create a separate assignment with the same parameters.
How to Delete an Assignment
- To delete an assignment, use the Advanced View > Learning Object > Assignments dropdown Menu to navigate to the Assignment List.

- Click on the delete (X) button to the right of the row of the Assignment you wish to delete.
- A pop-up box will ask you to confirm this deletion.
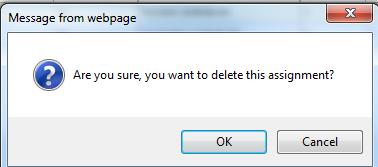
- To confirm deletion, click the OK button.
- To cancel, click Cancel.
SECTION 3 - ADVANCED CONCEPTS & BEST PRACTICES
Advanced Concepts
Understanding Assignment Timing
Assignment Elective days: Defined when LMS is initially implemented, determines the number of days prior to an assignment in which a previously enrolled or completed course may be used instead of the same course from the assignment.
- For example, if on January 1, 2016 a user completed the course Basic Safety 101 and the Assignment Elective Days was set at 30.
- If on January 15, 2016, an assignment finds this user in scope for this course, the user will not have to take this course again.
- Since the Assignment Elective Days was set to 30, then credit is given for completing the course anytime between the Assignment Date for that user (January 15, 2016) and 30 days prior to that date (December 16, 2015). Since they took the course on January 1, 2016, they fall within that range, so do not need to be assigned to that course
- If on February 1, 2016, an assignment finds this user in scope for this course, the user will have to take this course again.
- Since the Assignment Elective Days was set to 30, then credit is given for completing the course anytime between the Assignment Date for that user (February 1, 2016) and 30 days prior to that date (January 2, 2016). Since they took the course on January 1, 2016, they fall outside that range, so must be assigned to that course.
- For courses in which a user has enrolled, but not completed, the same timeframe logic applies. If they are within the time range, they may keep their original course instance (though the type will be changed to Assigned). If the enrolment date falls outside the range, a new instance of the course will be assigned.
In-Scope vs Out-of- Scope User Selection
Each evening when the assignment scheduler service executes, it will determine which students are within the scope of an assignment. Those falling within scope will automatically be assigned as scheduled...
- For example, if you select to assign all users with the Job Position XYZ Administrator to take the course XYZ Administrator Training the following will happen.
- Day 1 - All users in the LMS system who are Active and who have a current, active position as XYZ Administrator will be assigned to the XYZ Administrator Training.
- Each successive evening from Day 2 Until the end date of the assignment (or ongoing if no end date) All users in the LMS system who are active and who have a current, active position as XYZ Administrator and who have not previously been assigned as part of this assignment will be assigned to the XYZ Administrator Training.
- Thus, any new XYZ Administrator or any XYZ Administrator who was previously inactive, but is now made active, who has not completed this course will be assigned to the course.
There is an additional LMS feature, called the Out of Scope feature, which by default is not activated. Should it be made active, the LMS system will not only determine which users are in scope for a particular assignment, but will also determine if any previously in scope users have become out of scope. See below for details.
- Becoming Out of Scope If a user becomes out of scope, either through a change of the Assignment or a change to the user's status (active / inactive) or association with any assignment selector, they will be removed from an assignment.
- Using the example in the prior section, if a user is made inactive or if a user no longer has a current, active position as XYZ Administrator, that user will fall out of scope.
- All courses completed by the user will still be credited, but all other enrollments in these courses made as part of this assignment will be removed.
- For example, if on Monday I become in scope, I am assigned the courses.
- If on Friday, if I become out of scope (e.g. I am promoted and no longer an active XYZ administrator), all courses related to the scope are removed from my My Courses schedule
- * If I have already completed a course in the group, I am still credited for that course, but all remaining courses in the assignment are removed
Best Practices - Assigning Courses using an Assignment Instance
Best Practices - Assigning Certifications using an Assignment Instance