Assignments - Admin Guide
SECTION 1: ASSIGNMENT SCHEDULER FEATURE - OVERVIEW
Who Should Use This Guide
This guide is for - Learning Management System (LMS) Client Super administrators (CSA) and Administrators to enable them to utilize and train others in the use of the Assignment Scheduler Functionality.
What is the Assignment Scheduler?
In the Learnsoft LMS, the Assignment Scheduler is a powerful feature and service that enables courses to be automatically assigned to individual or groups of users with a specified deadline based on Administrator defined criteria. These assignments can be one time or as recurring events.
Examples of assignments include:
- An Assignment can be scheduled to run daily that searches for new employees and then assigns a mandatory company or safety orientation class to all such new employees.
- An Assignment can run annually that ensures all employees take a compliance course each year.
- An Assignment can run one time that ensures all persons with a specific job position in all locations or specific locations of an organization are enrolled in a training course due within a defined timeframe.
The Assignment Scheduler combines an advanced feature that allows CSAs to schedule (create, modify and delete) assignments for individual or a group of students that fall within an Admin defined Scope (meet specific criteria that make them eligible for the assignment) with an external service that runs daily (usually nightly) to execute these assignments based on a defined deadline.
Because this is an advanced feature, the Assignment Scheduler Service is not always activated as part of the initial implementation of the LMS system, but is often activated and scheduled after the CSA and administrators become more familiar with the basic elements system
NOTE: Before assignments can be scheduled, you must ensure that the Assignment Scheduler Service has been activated and scheduled. This can only be completed by the Learnsoft Technical Team. Please contact your assigned Project Manager to enable the activation and scheduling of this service1.
.
Three Elements Required for Execution of Assignments
An assignment requires three elements to be successfully executed by the assignment scheduler. Below are brief descriptions of the required elements. For further details see, both the How To Guide (Section 2) and the Advanced Concepts Guide (Section 3).
- Scope This determines which users or group of users will receive an assignment.
- Deadline This determines both when the assignment is due and when the users will receive the assignment.
- Learning object This is usually the course(s) that are assigned (Options allow for selection of certifications or goals instead of courses)
Course Overview
The purpose of this manual is to guide administrator(s) on how to effectively create and schedule Assignments using the Assignment Scheduler service and functionality of the LMS system.
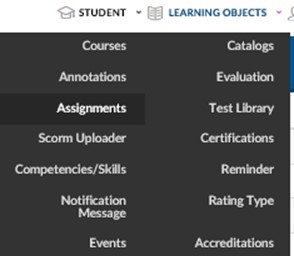
Once the Assignment Scheduler Service has been activated and scheduled, the CSA can create assignments by using the Assignment Scheduler Feature, which is accessible through the Advanced View > Learning Objects > Assignments drop down menu.
This course will cover the basic steps to creating an assignment including:
- Accessing the Assignment Schedule Feature
- Creating new assignments
- Filling in the Assignment Info Section
- Filling in the Assignment Timing Section
- Filling in the Selectors Section
- Filling in the Available / Excluded users Section
- Selecting, Editing and Deleting assignments
- The course will also provide details about some Advanced Concepts of the Assignment Scheduler
SECTION 2: HOW TO GUIDE: ASSIGNMENT SCHEDULER
How to Add an New Assignment to the LMS System
The Assignment Scheduler is a powerful feature and service that enables courses to be automatically assigned to students based on Administrator defined scope and deadline criteria. These assignments can be one time or as recurring events
The Assignment Scheduler can be accessed using the Advanced View > Learning Objects > Assignments drop down menu.
This will bring you to the Assignment List page where you can view, edit, delete existing assignments and create (and schedule) new assignments.

To create a new assignment:
- Click on the New Assignment button.
- This will launch the Learning Object >> Assignments / Assignment details page.
How to Fill-in the Assignment Info Section
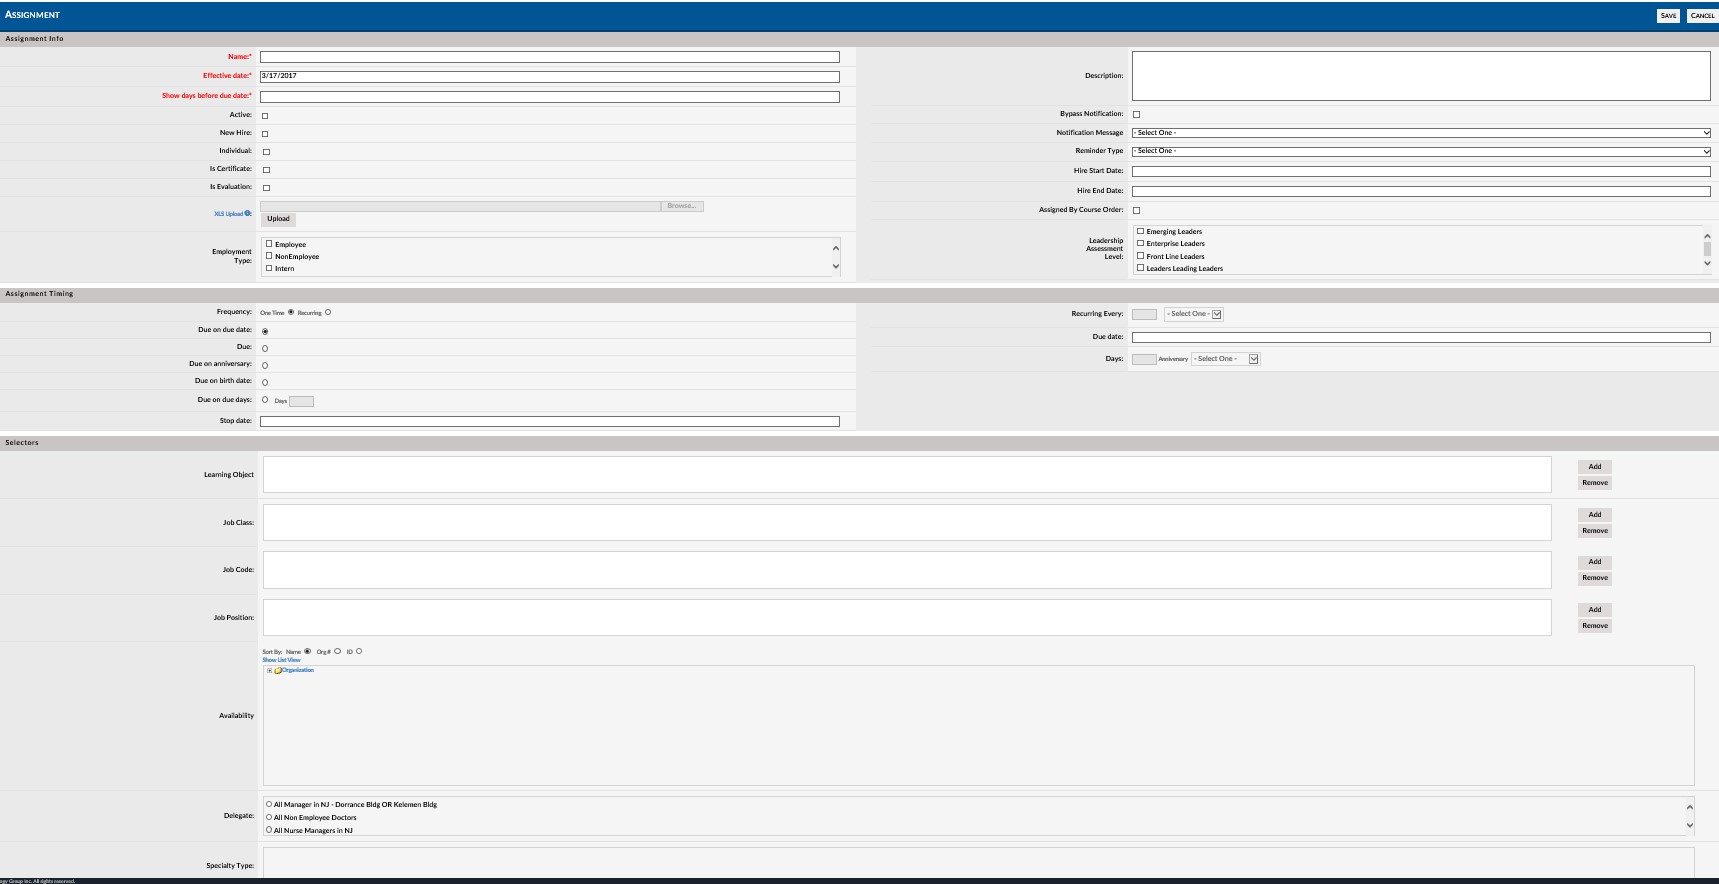
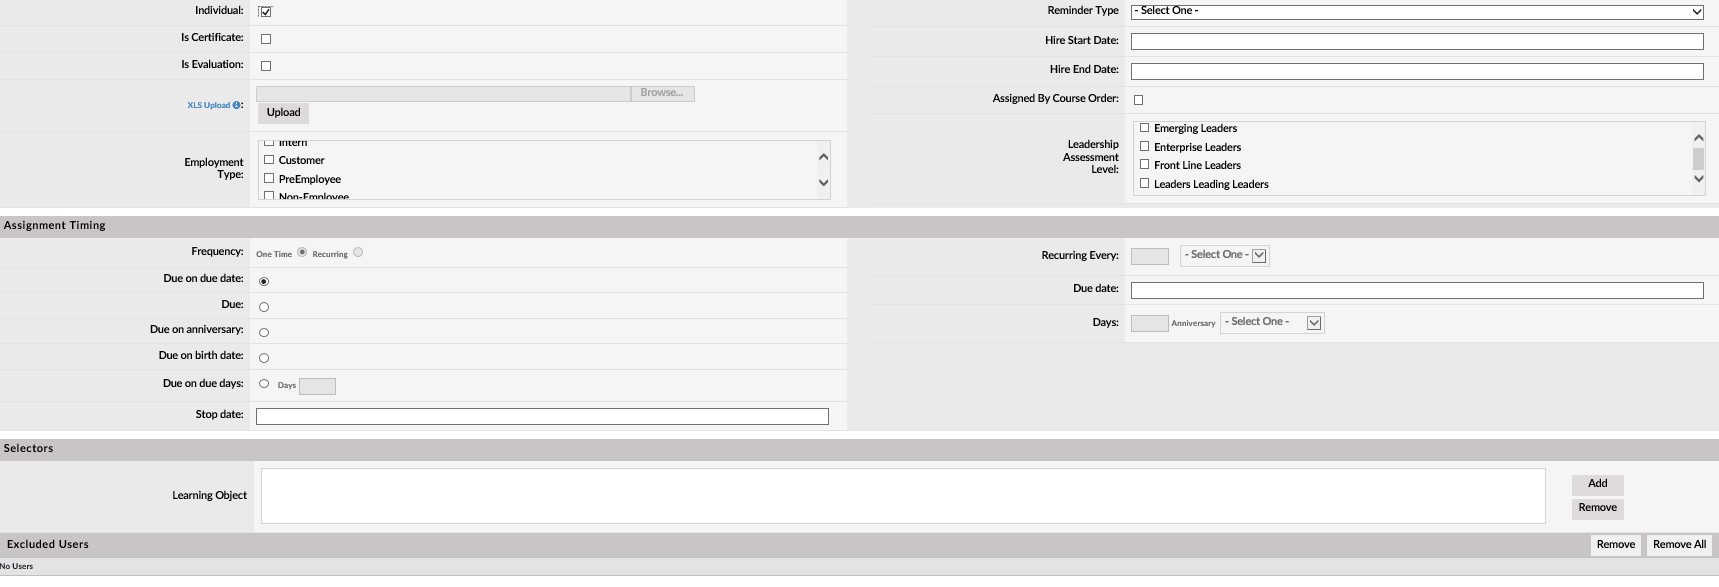
The Assignment info section of the Assignments / Assignment Details page lets you name and describe the assignment, activate / deactivate the assignment, select the assignment type (course, certification, goal), determine if the assignment should be associated with specific individuals, new hires and/ or specific employment and leadership levels.
The only required entry in Assignment info section is a Name for the assignment.
By default, assignments will automatically associated between courses and groups of users that can be further detailed and refined in the Selector section of the Assignments / Assignment Details page, however, in this Assignment info section, this default can be overridden when enabling (checking) the optional checkboxes. This will also change the selectors available in the Selector section.
For example, if the Individual checkbox is enabled (checked), all the default options for selecting groups of users, such as job code or job class, will be hidden. If the Is Certificate checkbox is enabled (checked), the course selector will change to a certificate selector (See next section).
Below is a listing of each of the required and optional fields (attributes) of the Assignment info section along with a brief description.
Assignment Info Section - Explanation of Fields
- Name* - Creator defined name for the assignment.
- Active - If checked, it means it is ready to deploy and will be processed the next time the assignment scheduler service runs.
- New Hire - If checked, the system will apply this assignment only to newly hired employees.
- Note: The system uses a previously defined company timeframe which is added to the user’s actual hire date to determine if they are within Scope of an assignment.
- For example, if your company defines a New Hire within the system as 30 Days and a person is hired on January 1, 2016, then this person is within scope of this assignment from January 1, 2016 – January 31, 2016 (January 1, 2016 Hire Date + 30 days Defined Company Timeframe = January 31, 2016).
- Individual - If checked, allows the creator to assign individuals (rather than groups) to the assignment. When enabled it will change options in the Selectors section from group options (e.g. job class, job position) to a single / multi-student selector.
- Is certificate - If checked, allows the creator to assign certifications, rather than courses to in-scope students. When enabled, the Learning Object (Course) selector in the Selectors section will change to a Certificate Selector.
- Is Goal - Part of the Talent Management Suite (TMS). If checked, allows the creator to assign Goals to in-scope users.
- Is Evaluation - Part of the Talent Management Suite (TMS). If checked, allows the creator to assign Evaluations to in-scope users.
- Employment Type - Part of the Scope Process. Allows the creator to limit the assignment to users meeting a specific employment type or types from those predefined for your organization (e.g. Full Time Employees & Interns).
- If no selection is made, than any employment type is eligible to be in scope (subject to other scope restrictions made elsewhere in the assignment).
- Description - Allows for an assignment description (For Administrator Reference).
- Hire Start Date - Part of the Scope Process. Enter the Start Date for a range of dates. Anyone hired within that range of dates will be assigned.
- Hire End Date - Part of the Scope Process. Enter the End Date for a range of dates. Anyone hired within that range of dates will be assigned.
- Assigned by course order - New Feature. If checked, user must take courses in order they are added to the assignment.
- Thus if two courses were added, for example, "Beginner Excel" and "Intermediate Excel" (added to the assignment in this order), the assigned student must complete "Beginner Excel" prior to taking course â"Intermediate Excel".
- Leadership Assessment Level - A specific Leadership type or types from those predefined for your organization (e.g. Emerging Leaders, Enterprise Leaders) If no selection is made, than this is not part of the scope process.
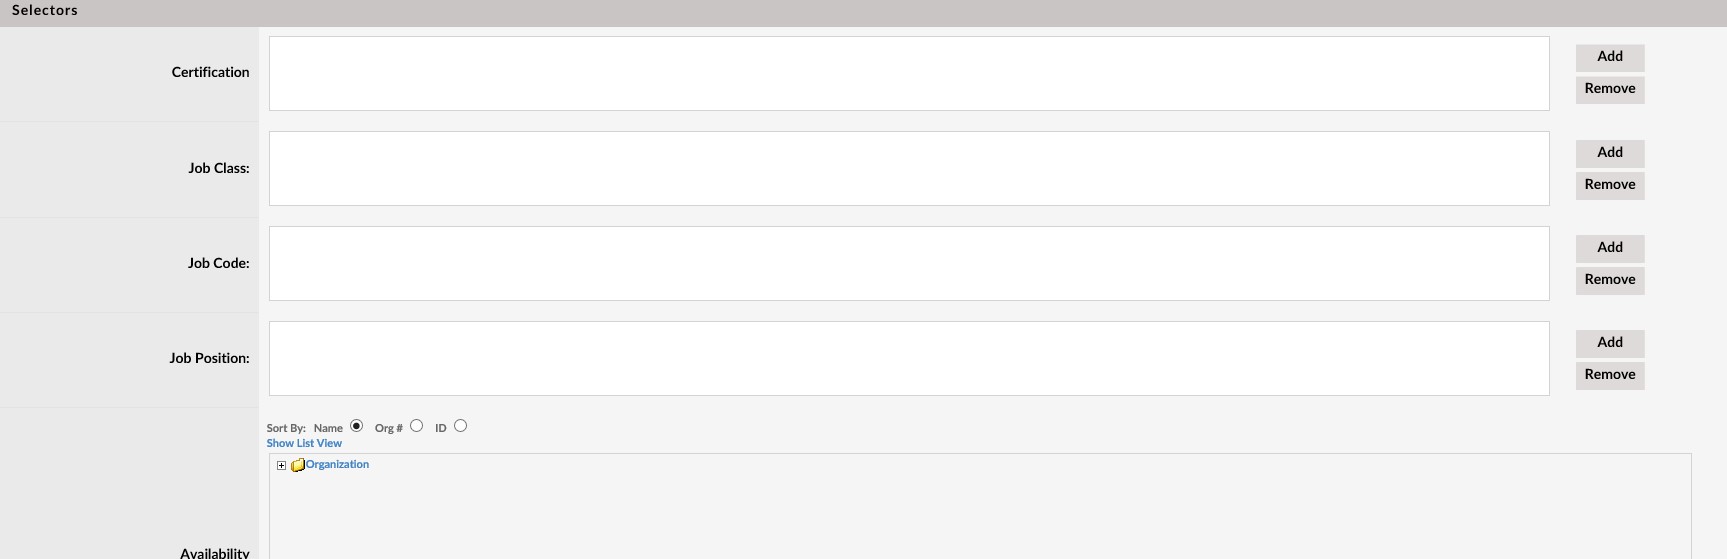
.====How to Fill-in the Selectors Section====
The basic concept of an assignment in the LMS is to associate some group of users (Scope) with some specific learning object (Requirement) in some specific time frame (Deadline). In the Selectors section of the Assignments / Assignment Details page, the creator is able to choose both the specific requirement (usually (a) Learning object / Course(s) or Certification(s)) & make many of the selectors to define Scope (as noted some elements that filter the scope, such as employment type, new hire etc. were found in the Assignment info section of the Assignments / Assignment Details page).
Note: This guide assumes the CSA / Admin is familiar with using the system to select a single or multiple courses or scope selectors such as Job Position or using the tree structure of the Availability tree to select sections of an organization. If not, please see related help sections for further details as to how to utilize those specific elements presented below.
Different Views of the Selectors Section
The specific selector categories that are available to choose from in the Selectors section of the Assignments / Assignment Details page will adjust dependent upon items the Assignment info section of the Assignments / Assignment Details page.
In the DEFAULT VIEW, the Selectors section will allow the creator to select Learning Object / Course(s) to assign, as well as define scope by selecting from Job Class, Job Code, Position, Availability, Delegate fields. Also, if enabled, scope can be further defined using Specialty Type, Credential Type and Sub Status.
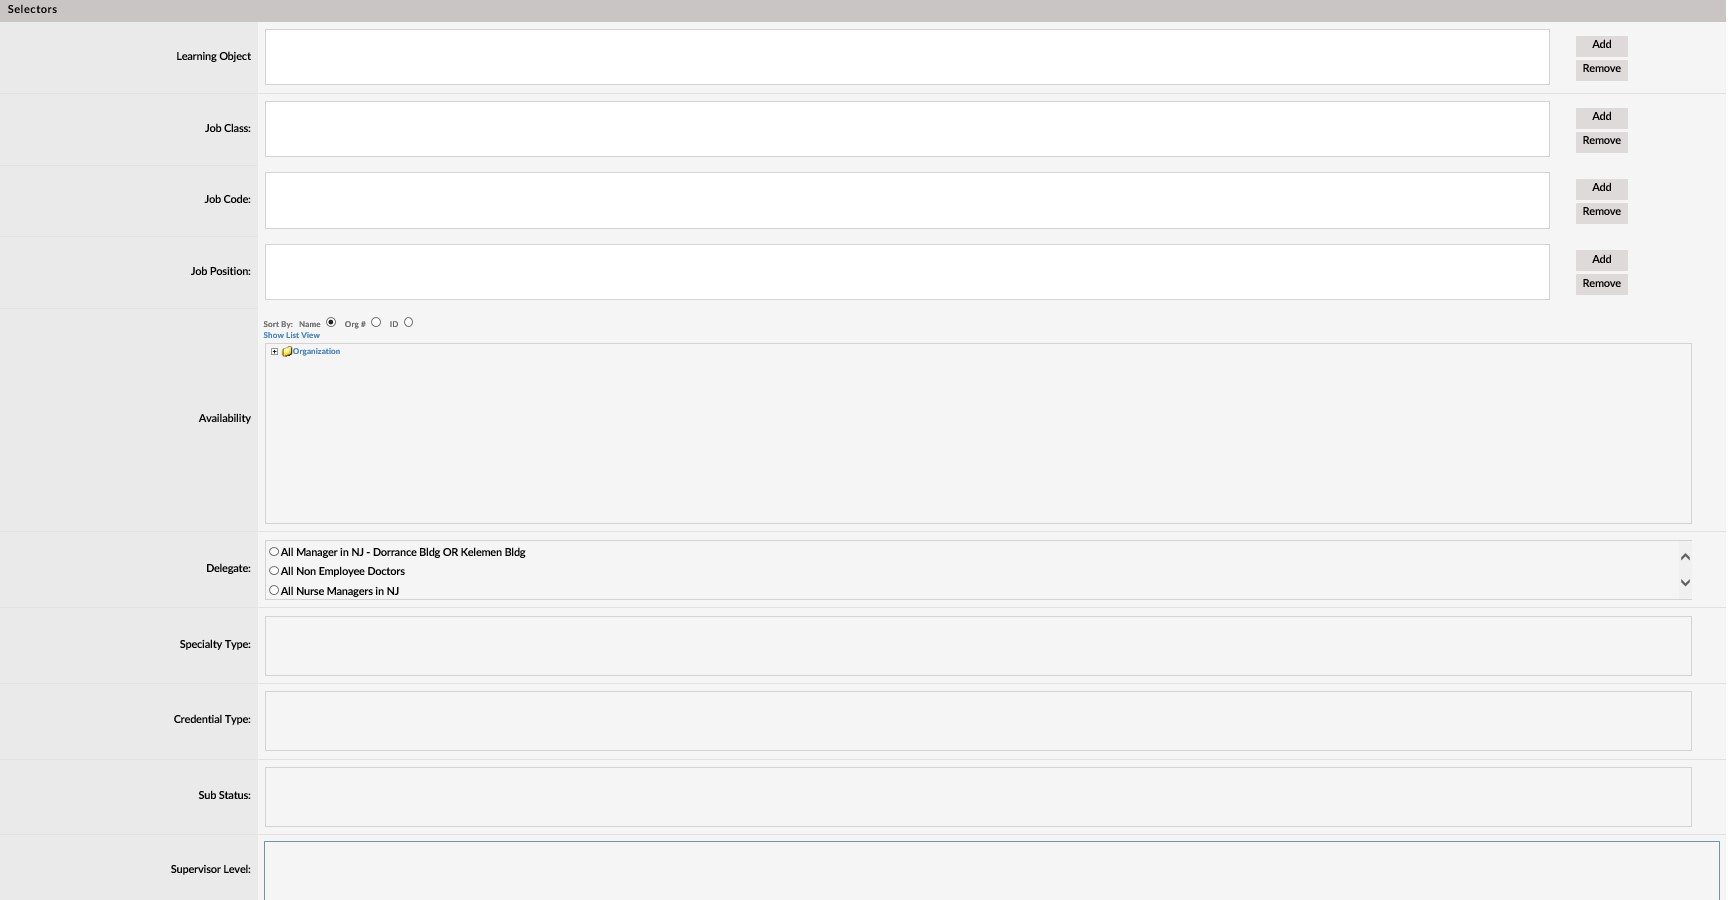
If certain options are enabled (checked) in the Assignment info section of the Assignments / Assignment Details page, however, the Selectors section will adjust and offer different selectors.
For example, if the Is Certificate checkbox is enabled (checked), than the option to add Learning Object / Course(s) will not be shown. Rather the Certification text box and buttons to Add / Remove certifications will be visible.
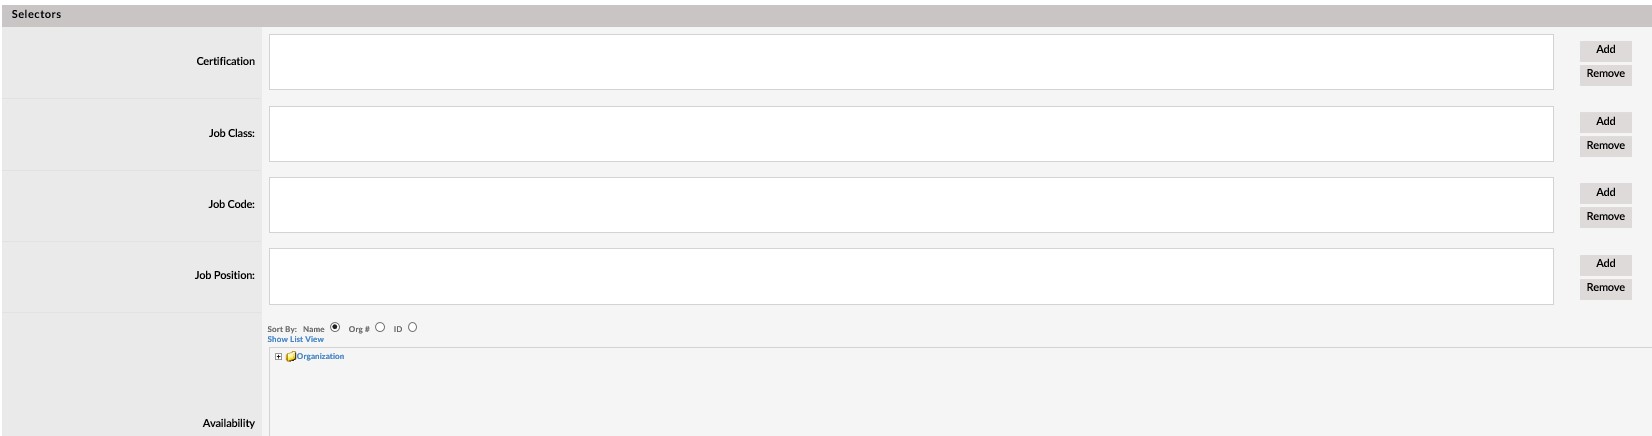
Another example of a view change is if the “Individual†checkbox is enabled (checked), than the group selectors will no longer be visible and only the Learning Object / Course(s) selector will be available.
Adding Courses to the Assignment
By default, the Learning Object / Course selector is viewable.

By clicking the Add button, the system will launch the Learning Object Lookup / Learning Object List in a new popup window. Here, creators will be able to search and select courses to assign. Courses can be added one at a time or in multiple selections (by using the check box) then pressing the Add Learning Object button.
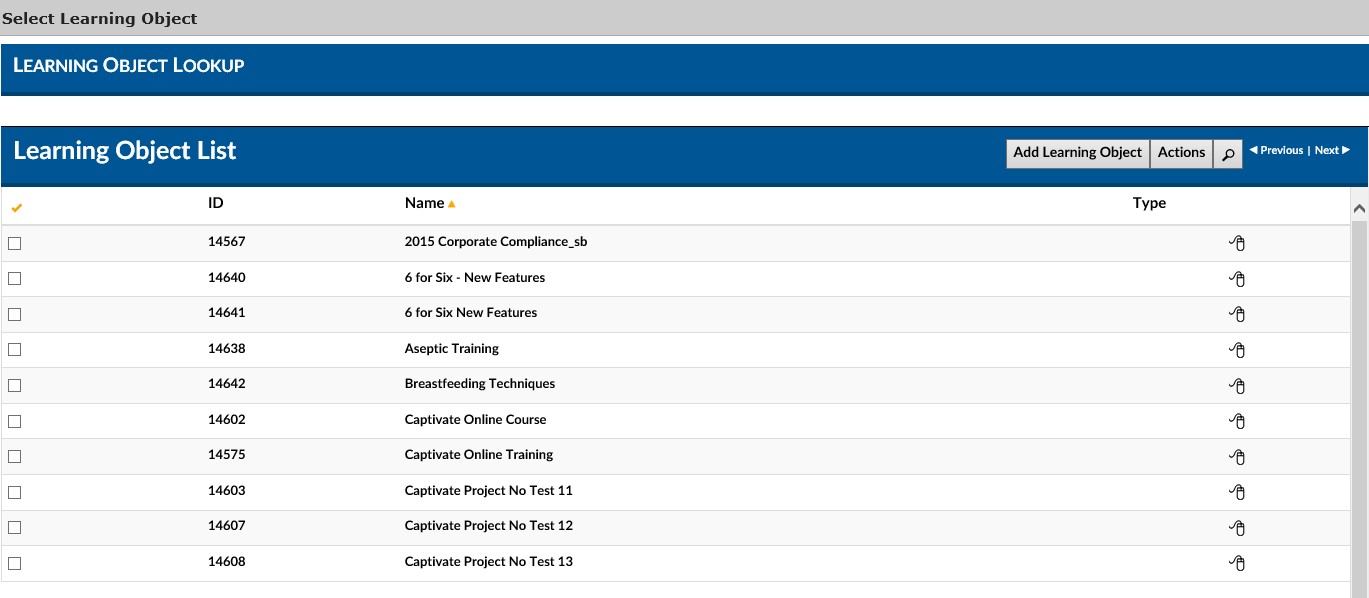
Once courses are added they will appear in the Learning Object / Course(s) selector textbox window.

They may be removed by first highlighting the specific Learning Object / Course to remove and clicking the Remove button (While courses can be added in bulk, they must be removed individually).
NOTE: See Section 3 - Advanced Concepts & Best Practices section for best practices using an Assignment Instance for courses which will allow users to select their own class instances if classroom-based courses are part of the assignment.
Adding Certifications to the Assignment
If the Is Certificate? Checkbox is checked, the system will replace the Learning Object / Course selector, with the Certification Selector.
By clicking the Add button, the system will launch the Lookup / Certification List in a new popup window. Here, creators will be able to search and select Certifications to assign. Certifications can be added one at a time or in multiple selections (by using the check box) then pressing the Add Certification button.
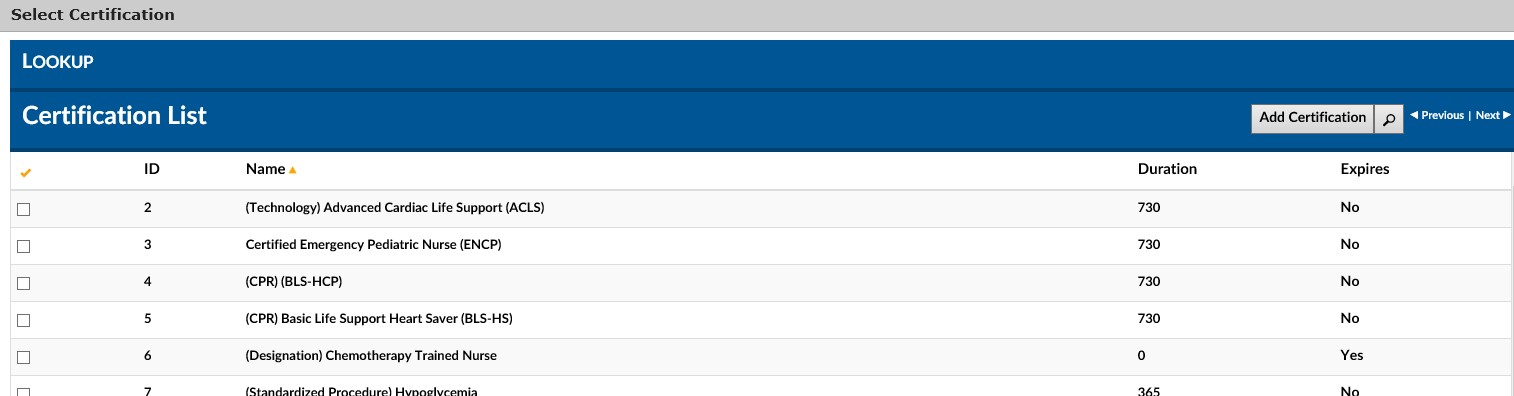
Once certifications are added they will appear in the Selectors section – Certification selector textbox window.

They may be removed by first highlighting the specific Certification to remove and clicking the Remove button (While certifications can be added in bulk, they must be removed individually).
NOTE: See Section 3 - Advanced Concepts & Best Practices section for best practices using an “AssignmentAssignment Instanceâ€Instance for certifications which will allow users to select their own class instances if classroom-based courses are part of the certification.