POLICIES - HOW TO GUIDE
Who Should Use This Guide
This guide is for Learning Management System (LMS) Client Super Administrators (CSA) to enable them to utilize the powerful POLICIES functionality of the LMS system to assign policy Access and Permissions to specific Groups. This guide is for - Learning Management System (LMS) Super administrators and Administrators.The LMS provides the ability to create groups and policies to define a role in the system. Its uses the same functionality of the Windows authentication process to define access rights in the system. Examples of different groups include – super administrators, administrators, managers, instructors and end users. Any group can be assigned any policy by a group (typically the super administrator) that has the policy to assign policies.
Below are listed the typical policies (functions) assigned to the super administrator and administrator roles within the LMS.
Add/Change/Delete functionality is available for each of the functions listed below.
Super Administrator
- Course Management:
- Publish and upload SCORM and AICC-based courses. A published course can be set to active or inactive. An active course can be placed in the catalog and can be assigned to learners.
- Manage and edit class calendars
- Launch and/or create Web Based courses, with associated evaluations, assessments, digital documents, certificates, assignments
- Manage; add/move courses within the catalog tree.
- Activate or inactivate courses. An active course can be placed in the catalog and can be assigned to learners.
- Catalog Management: The catalog is a collection of courses. The learner browses the catalog to find courses that he or she would like to launch.
- Organize the catalog by headings. Headings can contain multiple levels of sub-headings.
- Edit the course catalog structure.
- Facilities and Training Room Management: The LMS provides the ability to create facilities or company locations. It also allows for the creation of classroom or training room facilities within each location. Report Management: The LMS provides reports on courses, learners and groups. .
- Learner Management: The users of the LMS include the administrator of the LMS, the administrators of groups and learners.
- Merge learner accounts, learner profiles, learner groups, job classes, job positions, job codes, learner course or assignment enrollments, manage learner transcript records.
- System Options Management:
- Set system options to control the behavior/structure of the LMS.
- Group Management: The LMS provides the ability to create groups and policies to define a role in the system.
- Edit organizational divisions.
- Manage groups. Note: Learners can belong to one or more groups.
- Email and Forum Management: The LMS provides learners the ability to communicate with other learners and/or instructors online.
- In addition to forums and chat abilities the system provides learners with options to send e-mails to an administrator, manager or instructor.
- Edit forums and create email templates.
- Reminder Management: The LMS provides the ability to establish an email reminder to learners and/or managers who have not completed coursework during a specified time.
- Edit system reminders.
- Administrator Management: Super Administrators can add, delete and edit other Super Administrator and Administrator, Manager, Instructor accounts and permission policies. Administrator
- Course Management: Catalog Management:
- Facilities and Training Room Management: Report Management:
- Learner Management: Email and Forum Management:
- Reminder Management:
- Administrator Management: Administrators can add, delete and edit other Administrators, Manager, Instructor accounts and permission policies.
POLICIES - Overview
What are POLICIES?
In the Learnsoft LMS, POLICIES are rights to view, create, control and manage specific features of the LMS.
The Policies feature provides the Client Super Administrator with the right to: **Provide Access to a Policy to a specific group **Enable varying levels of Permissions to use that Policy (e.g. full control, only view **Edit and delete previously enabled Access and Permissions
For example, the CSA can give the Instructor Group Access to the “Manage Certificates” Policy and assign them the “Only Modify, Not Create” Permission. This would allow instructors to edit (modify) existing certificates, but not create new ones.
The Policies feature is used by the CSA to enable various groups to manage and use different parts of the system allowing the system to more closely align with internal operational procedures. For example, one company might choose to only allow Managers to manage skills, while another company might prefer to assign this Policy to a specialized Proctor or Preceptor group.
Note: By default, different groups are provided Access and Permissions to different features of the system. For example, Users may be allowed to view only their own profile, while Managers can see the profiles of all the users that report to them.
Manual Overview
The purpose of this manual is to guide Client Super Administrators (CSA) to enable them to utilize the powerful POLICIES functionality of the LMS system to assign policy Access and Permissions to specific Groups.
Objectives
Upon completion, you will be able to:- Provide Access to a Policy to a specific group
- Enable varying levels of Permissions to use that Policy (e.g. full control, only view)
- Edit previously enabled Access and Permissions
- Remove Groups (Remove the association) from Policies
Section 1: Providing Policy Access to and Setting Permission access to a Group POLICIES are rights to view, create, control and manage specific features of the LMS. The CSA can give access and permissions to these policies at the group level. All users who belong to a specific group will inherit these policies.
To provide policy Access and Set Permission, first you must access the Policies feature.
- Accessing the Policies Feature / Policy List
- From ADVANCED VIEW, select USER MANAGEMENT > Policies.
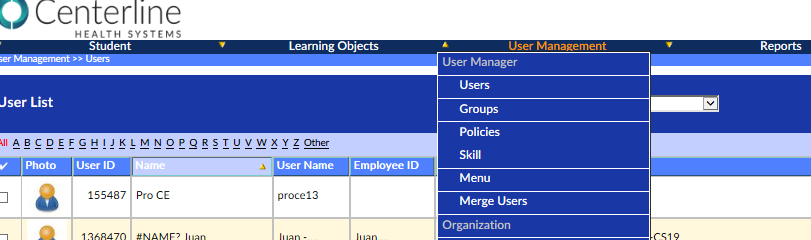
Clicking on Policies will launch the Policy List which provides a matrix of all policies currently in the system. Each policy will have an associated Policy ID, Description and Policy Type.
- How to add a vendor to the LMS system
- Click on the User Management Dropdown Box
- Click Vendors This will bring up the Vendor List screen which displays Vendors that have previously been added to the system.
To add a New Vendor
- Click on the New Vendor button near the top right portion of the screen.
This will launch the New Vendor Details screen. The level of detailed entry will vary based on your organizational needs. (See Explanation of fields on the next page for next steps.)
- Explanation of Fields: New Vendor Details Vendor* The name of the vendor. Address * The vendor street address.
City The vendor city. State The vendor state (Selected from a drop down list) Zip The vendor zip code. Country The vendor country (Selected from a drop down list) Email An email address for the vendor. Phone A telephone number for the vendor. Fax A fax number for the vendor. URL A URL address for the vendor. Hidden Check (select) if the vendor information is to be hidden. Description A description of the vendor. Vendor Logo If desired, a logo can be associated with the vendor. Select the browse button to locate a picture format file (e.g. .jpg) from your internal directory system.
- Required Fields 1. Enter the required information. 2. Enter any desired optional information. 3. Click the Save button located near the top right of the screen.
The vendor has now been created and will be available in the Vendor list. Repeat this step as necessary for all vendors to which POLICIES will be associated.
Section 2: Create an Accreditation Each specific POLICIES is created using the Advanced View > Learning Object Drop Down menu (and selecting “POLICIES”). Each POLICIES will require a name and an association with a previously created vendor. Optional information can store descriptions (“comments”) and an POLICIES Logo. To Create an POLICIES in the LMS system, follow these steps (Note, if desired POLICIES have previously been created, this step can be skipped):
2.1 How to create an POLICIES in the LMS system
1. Click on the Learning Objects Dropdown Box 2. Click POLICIES This will bring up the POLICIES List screen which displays POLICIES that have previously been added to the system.
To add a New Accreditation 1. Click on the New POLICIES button near the top right portion of the screen.
This will launch the POLICIES Details screen. The level of detailed entry will vary based on your organizational needs. (See Explanation of fields on the next page for next steps.)
2.2 Explanation of Fields: POLICIES Details POLICIES Name* The name of the accreditation. Vendor * The vendor associated with this accreditation. Comments Any comments about the accreditation. Vendor Logo If desired, a logo can be associated with the Accreditation. Select the browse button to locate a picture format file (e.g. .jpg) from your internal directory system.
- Required Fields 1. Enter the required information. 2. Enter any desired optional information. 3. Click the Save button located near the top right of the screen.
The POLICIES has now been created and will be available in the POLICIES List. Repeat this step as necessary for all POLICIES required.
Section 3: Add an POLICIES to a Course After creating a course, when viewing Course details, there is a section named Available Learning Object POLICIES. If there are POLICIES associated with this course, they will be visible and editable in this section. To associate a new POLICIES with this course, click on the New Learning Object POLICIES button. This will launch the New Learning Object POLICIES Details screen, which will allow you to associate an already created POLICIES and enter, edit and save specific attributes associated with this specific course / POLICIES combination (e.g. credit hours).
Note: this guide will assume you have already been trained on how to add and edit courses and create course instances. Accordingly, to add an POLICIES to an existing course in the LMS system, follow these steps:
3.1 How to Add an POLICIES to a Course 1. Select the specific Learning Object Course to which you wish to associate an POLICIES and open the (Course) Learning Object Details Page
a Note: Do NOT select “Edit” Mode (Do not click on the EDIT button which allows you to edit Course details, but makes POLICIES info read only.
2. Scroll down to the Available Learning Object POLICIES section (in the lower portion of the page).
3. Click on the Available Learning Object POLICIES button on the right side of the Available Learning Object POLICIES section. 4. This will bring up the Add Learning Object POLICIES Details page in a separate (pop-up) browser window. It is here where you specify attributes for this specific POLICIES / Course association. (The level of detailed entry will vary based on your organizational needs. (See Explanation of fields on the next page for next steps.)
3.2 Explanation of Fields (Attributes): Add Learning Object POLICIES Details
Accreditation* The name of the POLICIES selected from a dropdown list of previously created POLICIES (See section 2). Show Comments A check box which if enabled (Selected) will show comments. Expiration Date The date at which the POLICIES expires. Test If a specific test is required for this particular course / accreditation, it can be selected from the drop-down menu. Enforce Retake Logic if checked if will associate a period of rest between retakes of the test. Days before Test If Enforce retake logic is checked, this is the number of days required between test retakes. Evaluation If an evaluation is required for this particular course / accreditation, it can be selected from the drop-down menu. POLICIES #* The number associated with this particular course / POLICIES (If no relevant number, please enter 0) Credit units The credit units for this particular course / accreditation. Credit Hours The credit hours for this particular course / accreditation. Credit Others Other credits for this particular course / accreditation. Release Date The release date. Passing Score The score required to be considered passing for this particular course / accreditation. Retake Attempts The number of times a user may retake the test. If the maximum is reached and the student does not receive a passing score; that student will be considered to not have passed the course/ accreditation. Paper Certificate A certificate that has been previously designed and upon completion can be printed by the user.
- Required Fields
1. Enter the required information. 2. Enter any desired optional attribute information. 3. Click the Save button located near the top right of the screen to save the attribute association between this particular Course and Accreditation. a. Click the Save and new button if wishing to immediately add another accreditation.
The Learning Object POLICIES has now been added to this course. It will now show in the bottom portion of the Courses Learning Object Details Screen. Repeat this step as necessary for all POLICIES to be applied to each particular course.
Below is a screen shot showing a single course with three associated POLICIES, each with different attributes for testing, evaluation, credit hours, passing score, etc.
Section 4: Select an Accreditation When enrolling in a course, the user will be able to see the POLICIES drop-down box below the Course Name in their Course List (“My Courses”). The user simply uses the drop-down to select the specific POLICIES that will apply to them and confirms via a pop-up confirmation. Once confirmed all predefined attributes for the specific selected POLICIES section will be applied.
This guide will assume users are already familiar with enrolling, taking and launching courses. This section will focus on specific additional items that will be seen and must be selected.
4.1 How to see an POLICIES in the LMS system when enrolling in a course
This manual assumes that users do know how to select and enroll in courses. When POLICIES are utilized, however, there will be an additional way to search for course instances associated with POLICIES when using the course Search function. That is, there will be a drop-down box enabling the search to specify an POLICIES one of the search criterial. In the below screen show, the POLICIES drop-down box is second from the bottom.
When a specific course is identified and the Enroll link is selected, the Course info screen will display. About 2/3 of the way down, the associated POLICIES will be listed in a scrollable text-box. A subset of attributes (e.g. course units, expiration, etc.) will also be visible.
4.2 How to select the user specific POLICIES for this course
Once a user enrolled in the course. The new course and course options will appear in their own personal (“My Courses”) Course list with a drop-down box asking them to Select Accreditation. This POLICIES drop-down box is just below the Course Name for each course offering Accreditation.
The student uses the POLICIES drop-down box to select the POLICIES appropriate to them.
A separate Message from webpage window will pop-up asking the user to confirm the application of the chosen accreditation. If the wrong POLICIES was selected, they can click on the Cancel button. Assuming the correct choice was made, the user clicks OK. When the user takes the course all testing, grading, credits, retake, evaluation and other selected attributes will be those specific to the POLICIES option they chose.